Linksys HPN100 User Guide - Page 6
Installing Your HomeLink Card
 |
UPC - 745883548972
View all Linksys HPN100 manuals
Add to My Manuals
Save this manual to your list of manuals |
Page 6 highlights
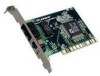
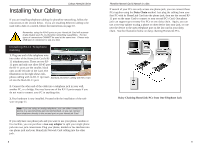
Linksys HomeLink Series Installing Your HomeLink Card Before You Begin The HomeLink Phoneline Network Card is equipped with two phoneline ports, called RJ-11 ports, to use in a phoneline network utilizing your existing telephone line. The HomeLink Card also has an optional RJ-45 10Mbps Ethernet port for use with 10BaseT Ethernet networks. Using Your HomeLink Card in a Ethernet Network If you intend to use the HomeLink Card on a 10Mbps Ethernet network, only use RJ-45 twisted-pair cabling. 10BaseT cabling is available in various grades. For best results, we recommend using 8-wire, Category 5 UTP cabling for an Ethernet network. Although Category 3 can be used successfully, Category 5 is much more reliable, and it is compatible with faster 100Mbps networks- a useful feature if you upgrade to Fast Ethernet speeds in the future. Both Category 3 and Category 5 twisted-pair cabling can be purchased from computer retail stores, or if you prefer, you can crimp your own cables. See page 54 for details on wiring. Note: Keep in mind that RJ-11 and RJ-45 capabilities cannot be used at the same time. If the one is in use, the other is automatically disabled. Regardless of what speed your Ethernet network runs, you must always use Category 5 UTP twisted-pair cabling with a switch or a hub. Each PC plugs into the switch or hub with its own twisted pair cable. Because all the PCs' cables converge at the hub's central location, a twisted-pair network is often referred to as having a star topology. Do not connect PCs with crossover cables or without using a hub. Your network might work, but the connection will be very unstable. Only use crossover cables as a last resort when there are no uplink ports available. Note: The RJ-45 cable connecting your PC's HomeLink Card to your hub must not exceed 100 meters (328 feet) in length. 6 Phoneline Network Card & Network in a Box Installing the HomeLink Card Note: Most newer PCs (Pentium 166 or higher) usually come 1. Power off your PC and disconnect any peri- equipped with all PCI bus master- pheral equipment including the power cable. ing slots. If your slots are not labeled, check your motherboard's 2. Remove your computer's outside cover. documentation to determine which slot is a PCI Master slot. 3. Locate an open PCI expansion slot on the motherboard, and determine which PCI slot is a Master slot. If you have difficulties locating a PCI Master slot, consult your PC's motherboard documentation. 4. Slide the HomeLink Card into your PCI slot. Make sure that all its pins are touching the slot's contacts. Applying a bit of force may be required to push the Card completely in. After the card is firmly in place, secure its fastening tab to your PC's chassis with a mounting screw. 5. Replace your PC's cover and reconnect your PC's power source. The card installation is complete, and you are now ready to proceed to the next section to install your telephone or Ethernet network cabling. 7
-
 1
1 -
 2
2 -
 3
3 -
 4
4 -
 5
5 -
 6
6 -
 7
7 -
 8
8 -
 9
9 -
 10
10 -
 11
11 -
 12
12 -
13
-
14
-
15
-
16
-
17
-
18
-
19
-
20
-
21
-
22
-
23
-
24
-
25
-
26
-
27
-
28
-
29
-
30
-
31
-
32
-
33
 |
 |
