Linksys SPA-841 User Guide - Page 8
Network and Service Configuration Settings, Please locate the following before using the phone - sipura ip phone
 |
View all Linksys SPA-841 manuals
Add to My Manuals
Save this manual to your list of manuals |
Page 8 highlights
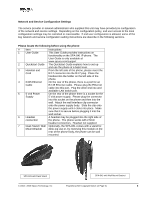
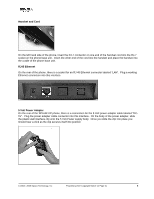
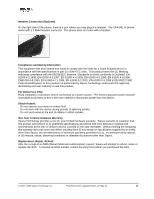
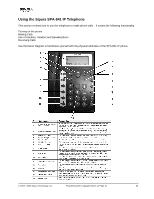
Network and Service Configuration Settings The service provider or network administrator who supplied this unit may have provided pre-configuration of the network and service settings. Depending on the configuration policy, end user access to the local configuration settings may be restricted or inaccessible. If end user configuration is allowed, some of the key network and service configuration setting instructions are describe in the following sections. Please locate the following before using the phone: # Item Instructions 1 User Guide This User Guide provides instructions on functionality on the SPA-841 IP phone. The User Guide is only available at www.sipura.com/support 2 Quickstart Guide The Quickstart Guide explains how to set-up and use the phone at a basic level. 3 Handset and From the left side of the phone, please insert the Cord RJ-7 connector into the RJ-7 plug. Place the handset into the holder on the left side of the phone. 4 RJ45 Ethernet On the rear of the phone, there is a port for an Cable RJ 45 Ethernet cable. Please plug the Ethernet cable into this port. Plug the other end into and available LAN switch port. 5 5 Volt Power On the rear of the phone there is a socket for the Supply 5 Volt power supply. Please plug the connector into this socket on the phone and then into the wall. Attach the wall interface clip connector onto the power supply body. Slide the clip onto the power supply until it clicks into place. Make sure that it is secure before plugging it into the wall socket. 6 Headset A headset may be plugged into the right side of connection the phone. The phone works with 2.5mm headset connectors. Headset not supplied. 7 Desk Stand / Wall Optionally, the SPA-841 comes with a stand for Mount Bracket desk-top use or, by reversing this module on the rear of the phone body, the phone can be wall mounted. SPA-841 with Desk Stand © 2003 - 2005 Sipura Technology, Inc SPA-841 with Wall Mount Bracket Proprietary (See Copyright Notice on Page 2) 8
-
 1
1 -
2
-
 3
3 -
 4
4 -
 5
5 -
 6
6 -
 7
7 -
 8
8 -
 9
9 -
 10
10 -
 11
11 -
 12
12 -
 13
13 -
14
-
15
-
16
-
17
-
18
-
19
-
20
-
21
-
22
-
23
-
24
-
25
-
26
-
27
-
28
-
29
-
30
-
31
-
32
-
33
-
34
-
35
-
36
-
37
-
38
-
39
-
40
-
41
-
42
-
43
-
44
-
45
-
46
-
47
-
48
-
49
-
50
-
51
-
52
-
53
-
54
-
55
-
56
-
57
-
58
-
59
-
60
-
61
-
62
-
63
-
64
-
65
-
66
-
67
-
68
-
69
-
70
-
71
 |
 |