Linksys WPSM54G User Guide - Page 9
The Protocol Tab > SNMP, Advanced Configuration - wireless g printserver
 |
UPC - 745883576319
View all Linksys WPSM54G manuals
Add to My Manuals
Save this manual to your list of manuals |
Page 9 highlights
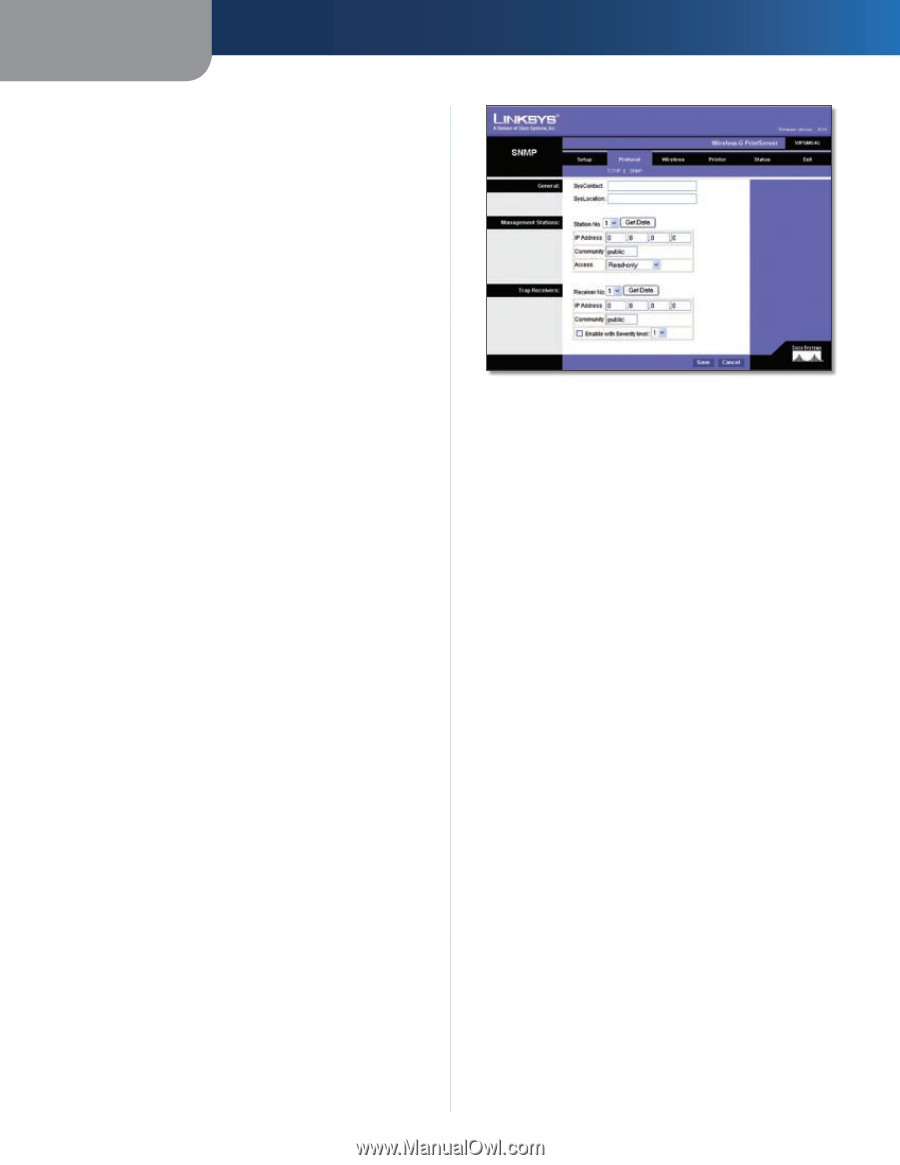
Chapter 3 IP Address Obtain an IP Address Automatically If your router is using DHCP to automatically assign IP addresses, keep the default, Obtain an IP Address Automatically. Use the Following IP Address If you need to assign the PrintServer a fixed IP address (also known as static IP address), select Use the Following IP Address, and enter the appropriate values in the IP Address, Subnet Mask, and Gateway fields. Make sure the IP Address and Subnet Mask are appropriate for your network. If you change the PrintServer's IP address, make sure you that you reconnect to the PrintServer using that new IP address. Otherwise, you will not be communicating with the PrintServer. In most cases, the Gateway IP address is the IP address of your router, and you should complete the Gateway field if you will use the PrintServer for Internet printing. (To find out your router's IP address, refer to your router's documentation.) Connection Delay before reconnection attempt Set how long, in seconds, you want the PrintServer to wait between attempts. Number of reconnection attempts Specify the number of times that the PrintServer will attempt to connect to the network. Click the Save button to apply your changes, or click the Cancel button to cancel your changes. The Protocol Tab > SNMP Use this screen to view or change the PrintServer's SNMP (Simple Network Management Protocol) settings. The PrintServer supports SNMP, which allows network administrators to monitor and control the PrintServer through the use of network management platforms, such as HP OpenView. The appropriate MIB file must be imported into your SNMP management program using the Import-Compile command. Check your program's documentation for details on this procedure. The MIB file is named Mib2p.mib and is provided in the MiB folder on the Setup CD-ROM. Advanced Configuration Protocol > SNMP General SysContact Enter the name of the contact person. SysLocation Enter the location of the contact person. Management Stations Station No. Select the number of the management station (1-4). Click the Get Data button to display the information for the selected station. IP Address Enter the IP address of the management station running the SNMP program. Community Enter the name of the SNMP community, which is usually public or private. Access Select the level of access for this management station: Not Accessible, Read-only, or Read/Write. Trap Receivers Receiver No. Select the number of the trap receiver (1-4). Click the Get Data button to display the information for the selected trap receiver. IP Address Enter the IP address of the trap receiver that will be sent the trap messages or notifications. Community Enter the name of the SNMP community, which is usually public or private. Enable with Severity level To designate a severity level, select this option. From the drop-down menu, select the desired level of severity, with 1 being least severe. Click the Save button to apply your changes, or click the Cancel button to cancel your changes. Wireless-G PrintServer 7
-
 1
1 -
2
-
3
-
 4
4 -
 5
5 -
 6
6 -
 7
7 -
 8
8 -
 9
9 -
 10
10 -
 11
11 -
 12
12 -
 13
13 -
 14
14 -
15
-
16
-
17
-
18
-
19
-
20
-
21
-
22
-
23
-
24
-
25
-
26
-
27
-
28
-
29
-
30
-
31
-
32
-
33
-
34
-
35
-
36
-
37
 |
 |