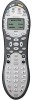
Logitech SST-659 User Manual - Page 15
Using Modes within an Activity
 |
UPC - 097855037312
View all Logitech SST-659 manuals
Add to My Manuals
Save this manual to your list of manuals |
Page 15 highlights
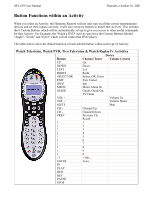
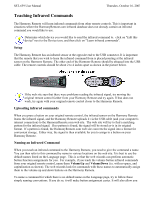
SST-659 User Manual Thursday, October 16, 2003 Using Modes within an Activity Once you have selected an Activity to enjoy, the functionality of each button on your Harmony Remote is automatically configured to that Activity. In addition the Custom Buttons and Display will give you access to other commands for that Activity which cannot be set to the standard buttons. This is known as the Activity or default mode. Within each Activity you can change how the Harmony Remote behaves by switching into one of 3 alternative modes; Sound mode puts the emphasis on controlling the sound fields of the device that you have chosen to control your sound (e.g. Stereo Receiver); Picture mode puts the emphasis on controlling the picture of the device that you have chosen to view your pictures (e.g. TV or Projector); and Device mode which gives you access to all of the possible commands for every one of the devices that are included in your Harmony Remote configuration. Sound Mode When in any Activity, press the "SOUND" button to switch into this mode. Once in the Sound mode, the Harmony Remote will place the emphasis on controlling the device that you have chosen to control your sound. For example, if you have chosen your Stereo Receiver to control the sound in your 'Watch a DVD' Activity, then the Sound mode will change the Harmony Remote buttons to control the Stereo Receiver as completely as possible. In the Display you will see commands such as "Surround Field" or "Bass+". Press the "SOUND" or appropriate Activity button to return to the default Activity Mode. Picture Mode When in any Activity, press the "PICTURE" button to switch into this mode. Once in the Picture mode, the Harmony Remote will place the emphasis on controlling the device that you have chosen to display your video. For example, if you have chosen your Projector to display the video in your 'Watch a DVD' Activity, then the Picture mode will change the Harmony Remote buttons to control the Projector as completely as possible. In the Display you will see commands such as "Aspect" or "Picture Adjust". Press the "PICTURE" or appropriate Activity button to return to the default Activity Mode. Device Mode When in any Activity, press the "DEVICE" button to switch into this mode. Once in the Device mode, the Harmony Remote will display a list of all the devices that you have in your Harmony configuration. Select a Device from the display and the Harmony Remote will place the emphasis on controlling the device that you have chosen. For Example, is you choose the Television Device, the numbers, volume, channel buttons will all control your television. Press the appropriate Activity button to return to the default Activity Mode. To find out how to change the function of buttons in each of your Harmony Remote Modes read the "Customizing your Harmony Remote" chapter of this manual.
-
 1
1 -
2
-
3
-
4
-
5
-
6
-
7
-
8
-
9
-
 10
10 -
 11
11 -
 12
12 -
 13
13 -
 14
14 -
 15
15 -
 16
16 -
 17
17 -
 18
18 -
 19
19 -
 20
20
 |
 |
