MSI Creator TRX40 User Manual - Page 62
EZ Mode, Setup Mode switch, OC GENIE 4 switch, A-XMP switch optional, Screenshot, Search, Ctrl+F - build
 |
View all MSI Creator TRX40 manuals
Add to My Manuals
Save this manual to your list of manuals |
Page 62 highlights
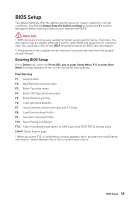
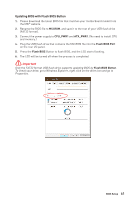
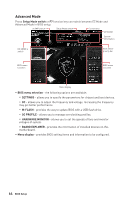
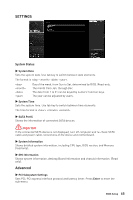
EZ Mode At EZ mode, it provides the basic system information and allows you to configure the basic setting. To configure the advanced BIOS settings, please enter the Advanced Mode by pressing the Setup Mode switch or F7 function key. A-XMP switch Setup Mode switch Screenshot Language System information OC GENIE 4 switch Information display Boot device priority bar M-Flash Favorites Hardware Monitor Function buttons ∙∙ OC GENIE 4 switch - click to select the overclocking stage as you desire. Read the abilities of OC GENIE 4 by clicking on the question mark in the right-bottom corner. This function will only be available if the installed processor supports this function. To disable OC GENIE 4, select 0. ⚠⚠Important Please don't make any changes in OC menu and don't load defaults to keep the optimal performance and system stability after activating the OC GENIE 4 function. ∙∙ A-XMP switch (optional) - click on the inner circle to enable/ disable the A-XMP. Switch the outer circle to select the memory profile if any. This switch will only be available if the installed processor and memory modules support this function. ∙∙ Setup Mode switch - press this tab or the F7 key to switch between Advanced mode and EZ mode. ∙∙ Screenshot - click on this tab or the F12 key to take a screenshot and save it to USB flash drive (FAT/ FAT32 format only). ∙∙ Search - click on this tab or the Ctrl+F keys and the search page will show. It allows you to search by BIOS item name, enter the item name to find the item listing. Move the mouse over a blank space and right click the mouse to exit search page. ⚠⚠Important In search page, only the F6, F10 and F12 function keys are available. ∙∙ Language - allows you to select the language of BIOS setup. ∙∙ System information - shows the CPU/ DDR speed, CPU/ MB temperature, MB/ CPU type, memory size, CPU/ DDR voltage, BIOS version and build date. 62 BIOS Setup
-
 1
1 -
2
-
3
-
4
-
5
-
6
-
7
-
8
-
9
-
10
-
11
-
12
-
13
-
14
-
15
-
16
-
17
-
18
-
19
-
20
-
21
-
22
-
23
-
24
-
25
-
26
-
27
-
28
-
29
-
30
-
31
-
32
-
33
-
34
-
35
-
36
-
37
-
38
-
39
-
40
-
41
-
42
-
43
-
44
-
45
-
46
-
47
-
48
-
49
-
50
-
51
-
52
-
53
-
54
-
55
-
56
-
 57
57 -
 58
58 -
 59
59 -
 60
60 -
 61
61 -
 62
62 -
 63
63 -
 64
64 -
 65
65 -
 66
66 -
 67
67 -
68
-
69
-
70
-
71
-
72
-
73
-
74
-
75
-
76
-
77
-
78
-
79
-
80
-
81
-
82
-
83
-
84
-
85
-
86
-
87
-
88
-
89
-
90
-
91
 |
 |
