MSI Creator TRX40 User Manual - Page 86
Installing RAID Driver, New Operating System Installation
 |
View all MSI Creator TRX40 manuals
Add to My Manuals
Save this manual to your list of manuals |
Page 86 highlights
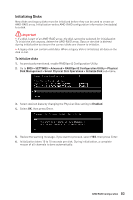
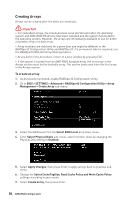
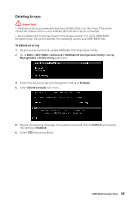
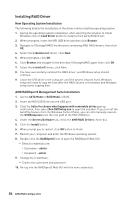
Installing RAID Driver New Operating System Installation The following details the installation of the drivers while installing operating system. 1. During the operating system installation, after selecting the location to install Windows click on Load driver button to install a third party RAID driver. 2. When prompted, insert the MSI USB drive and then click Browse. 3. Navigate to \\Storage\AMD\ the directory containing AMD RAID drivers, then click OK. 4. Select the (rcbottom.inf) driver, click Next. 5. When prompted, click OK. 6. Click Browse and navigate to the directory \\Storage\AMD\ again, then click OK. 7. Select the (rcraid.inf) driver, click Next. 8. You have successfully installed the RAID driver, and Windows setup should continue. 9. Leave the USB drive in the computer until the system reboots itself. Windows setup will need to copy the files after the RAID volume is formatted, and Windows setup starts copying files. AMD RAIDXpert2 Management Suite Installation 1. Set the SATA Mode to RAID Mode in BIOS 2. Insert the MSI USB Drive into the USB port. 3. Click the Select to choose what happens with removable drives pop-up notification, then select Run DVDSetup.exe to open the installer. If you turn off the AutoPlay feature from the Windows Control Panel, you can still manually execute the DVDSetup.exe from the root path of the MSI USB Drive. 4. Under the Drivers/Software tab, check the AMD RAID Drivers check-box. 5. Click the Install button. 6. When prompt you to restart, click OK button to finish. 7. Restart your computer and enter the Windows operating system. 8. Double-click the RAIDXpert2 icon to open the RAIDXpert2 Web GUI. ▪▪Default credentials are: ▫▫Username - admin ▫▫Password - admin 9. Change the credentials: ▪▪Create new username and password 10. Re-log into the RAIDXpert2 Web GUI with the new credentials. 86 AMD RAID Configuration
-
 1
1 -
2
-
3
-
4
-
5
-
6
-
7
-
8
-
9
-
10
-
11
-
12
-
13
-
14
-
15
-
16
-
17
-
18
-
19
-
20
-
21
-
22
-
23
-
24
-
25
-
26
-
27
-
28
-
29
-
30
-
31
-
32
-
33
-
34
-
35
-
36
-
37
-
38
-
39
-
40
-
41
-
42
-
43
-
44
-
45
-
46
-
47
-
48
-
49
-
50
-
51
-
52
-
53
-
54
-
55
-
56
-
57
-
58
-
59
-
60
-
61
-
62
-
63
-
64
-
65
-
66
-
67
-
68
-
69
-
70
-
71
-
72
-
73
-
74
-
75
-
76
-
77
-
78
-
79
-
80
-
 81
81 -
 82
82 -
 83
83 -
 84
84 -
 85
85 -
 86
86 -
 87
87 -
 88
88 -
 89
89 -
 90
90 -
 91
91
 |
 |