MSI G31M3 User Guide - Page 85
Intel ICH7R SATA RAID, Step 1: Con Volume, RAID Volume Name, RAID Level, RAID 0, RAID 1, RAID
 |
View all MSI G31M3 manuals
Add to My Manuals
Save this manual to your list of manuals |
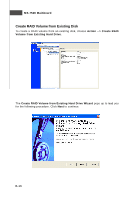
Page 85 highlights
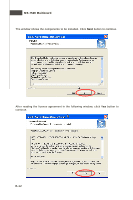
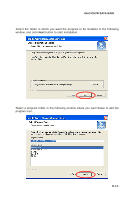
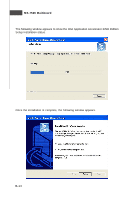
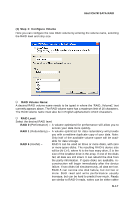
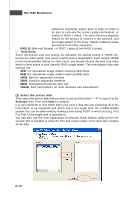
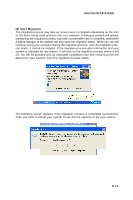
Intel ICH7R SATA RAID (1) Step 1: Configure Volume Here you can configure the new RAID volume by entering the volume name, selecting the RAID level and strip size. † RAID Volume Name: A desired RAID volume name needs to be typed in where the 'RAID_Volume1' text currently appears above. The RAID volume name has a maximum limit of 16 characters. The RAID volume name must also be in English alphanumeric ASCII characters. † RAID Level: Select the desired RAID level: RAID 0 (Performance) - A volume optimized for performance will allow you to access your data more quickly. RAID 1 (Redundancy) - A volume optimized for data redundancy will provide you with a realtime duplicate copy of your data. Note: Only half of the available volume space will be avail- RAID 5 (Useful) - able for data storage. RAID 5 can be used on three or more disks, with zero or more spare-disks. The resulting RAID-5 device size will be (N-1)*S, where N is the how many drive, S is the size of the smallest drive in the array. If one of the disks fail, all data are still intact. It can rebuild the disk from the parity information. If spare disks are available, re- construction will begin immediately after the device failure. If two disks fail simultaneously, all data are lost. RAID-5 can survive one disk failure, but not two or more. Both read and write performance usually increase, but can be hard to predict how much. Reads are similar to RAID-0 reads, writes can be either rather B-17
-
 1
1 -
2
-
3
-
4
-
5
-
6
-
7
-
8
-
9
-
10
-
11
-
12
-
13
-
14
-
15
-
16
-
17
-
18
-
19
-
20
-
21
-
22
-
23
-
24
-
25
-
26
-
27
-
28
-
29
-
30
-
31
-
32
-
33
-
34
-
35
-
36
-
37
-
38
-
39
-
40
-
41
-
42
-
43
-
44
-
45
-
46
-
47
-
48
-
49
-
50
-
51
-
52
-
53
-
54
-
55
-
56
-
57
-
58
-
59
-
60
-
61
-
62
-
63
-
64
-
65
-
66
-
67
-
68
-
69
-
70
-
71
-
72
-
73
-
74
-
75
-
76
-
77
-
78
-
79
-
 80
80 -
 81
81 -
 82
82 -
 83
83 -
 84
84 -
 85
85 -
 86
86 -
 87
87 -
 88
88 -
 89
89 -
 90
90 -
91
 |
 |
