MSI H87M User Guide - Page 100
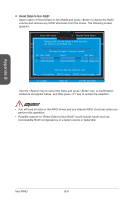
Degraded RAID Array, simultaneously during the Power-On Self Test POST.
 |
View all MSI H87M manuals
Add to My Manuals
Save this manual to your list of manuals |
Page 100 highlights
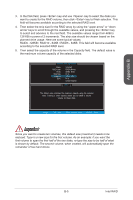
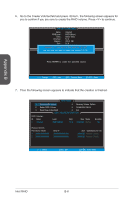
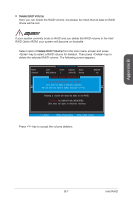
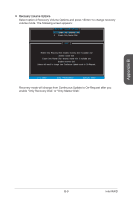
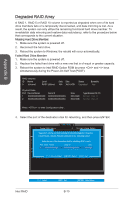
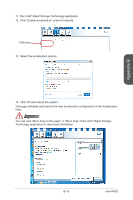
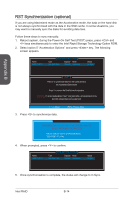
Appendix B Degraded RAID Array A RAID 1, RAID 5 or RAID 10 volume is reported as degraded when one of its hard drive members fails or is temporarily disconnected, and data mirroring is lost. As a result, the system can only utilize the remaining functional hard drive member. To re-establish data mirroring and restore data redundancy, refer to the procedure below that corresponds to the current situation. Missing Hard Drive Member 1. Make sure the system is powered off. 2. Reconnect the hard drive. 3. Reboot the system to Windows; the rebuild will occur automatically. Failed Hard Drive Member 1. Make sure the system is powered off. 2. Replace the failed hard drive with a new one that is of equal or greater capacity. 3. Reboot the system to Intel RAID Option ROM by press and keys simultaneously during the Power-On Self Test (POST). RAID Volumes ID Name 0 Volume0 Level Strip Size RAID 1(Mirror) N/A XXX.XGB Status Degraded Bootable Yes Physical Disks: Port Device Model 1 XXXXXXXXXXXXX 2 XXXXXXXXXXXXX Serial # XXXXXXXXXXXXX XXXXXXXXXXXXX Size XXX.XGB XXX.XGB Type/Status(Vol ID) Member Disk (0) Member Disk (0) Press to enter Configuration Utility.. 4. Select the port of the destination disk for rebuilding, and then press ENTER. [ MAIN MENU ] 1. Create RAID Volume 4. Recovery Volume Options 2. Delete RAID Volu[mDeEGRADED VOLUME DE4T. ECTREeDco]very Volume Options "Degraded" volume and disk ava5i.lableEfxoirt rebuilding detected. Selecting a disk initiates a reb[ uiDldI.SRKe/bVuOildLUcMomEpINleFteOsRinMAthTeIOoNper]ating system. RAID VolumeSs e: lect the port of the destination disk for rebuilding (ESC to exit): None defined. Port Drive Model Serial # Size Physical De1vices X: XXX-XXXXXXXX XXXXXXXXXXXXXX XXX.XGB Port Device Model Serial # Size Type/Status (Vol ID) 1 XXXX-XXXXXXXX XXXXXXXXXXXXXX XXX.XGB Non-RAID Disk 2 XXXX-XXXXXX[ X↑X↓] - PreXviXouXsX/XNXeXxXt XX[XEXNXTXER] - Select XX[EXS.XCG]B- ExNiton-RAID Disk Intel RAID [ ↑↓] - Select [ESC] - Exit [ENTER] - Select Menu B-10
-
 1
1 -
2
-
3
-
4
-
5
-
6
-
7
-
8
-
9
-
10
-
11
-
12
-
13
-
14
-
15
-
16
-
17
-
18
-
19
-
20
-
21
-
22
-
23
-
24
-
25
-
26
-
27
-
28
-
29
-
30
-
31
-
32
-
33
-
34
-
35
-
36
-
37
-
38
-
39
-
40
-
41
-
42
-
43
-
44
-
45
-
46
-
47
-
48
-
49
-
50
-
51
-
52
-
53
-
54
-
55
-
56
-
57
-
58
-
59
-
60
-
61
-
62
-
63
-
64
-
65
-
66
-
67
-
68
-
69
-
70
-
71
-
72
-
73
-
74
-
75
-
76
-
77
-
78
-
79
-
80
-
81
-
82
-
83
-
84
-
85
-
86
-
87
-
88
-
89
-
90
-
91
-
92
-
93
-
94
-
 95
95 -
 96
96 -
 97
97 -
 98
98 -
 99
99 -
 100
100 -
 101
101 -
 102
102 -
 103
103 -
 104
104
 |
 |
