MSI MS5169 User Guide - Page 6
Hardware Installation - mainboard
 |
View all MSI MS5169 manuals
Add to My Manuals
Save this manual to your list of manuals |
Page 6 highlights
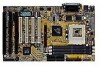
CHAPTER 2 HARDWARE INSTALLATION Chapter 2 HARDWARE INSTALLATION 2.1 Central Processing Unit: CPU The ATX AL9 mainboard operates with Intel® Pentium® processor/ Pentium® processor with MMXTM technology, Cyrix® 6x86/6x86L/ 6x86MX and AMD® K5/K6 processors. It could operate with 2.1V to 3.5V processors. The mainboard provides a 321-pin ZIF Socket 7 for easy CPU installation, a DIP switch (S1) to set the proper speed for the CPU and for setting the CPU voltage. The CPU should always have a cooling fan attached to prevent overheating. 2.1-1 CPU Installation Procedures 1. Pull the lever sideways away from the socket. Then, raise the lever up to a 90-degree angle. Sliding Plate Open Lever Pin 1 2. Locate Pin 1 in the socket and look for the white dot or cut edge in the CPU. Match Pin 1 with the white dot/cut edge. Then, insert the CPU. It should insert easily. CPU White dot/ Cut edge 3. Press the lever down to complete the installation. Close Lever CPU 2-1
-
 1
1 -
 2
2 -
 3
3 -
 4
4 -
 5
5 -
 6
6 -
 7
7 -
 8
8 -
 9
9 -
 10
10 -
 11
11 -
 12
12 -
13
-
14
-
15
-
16
-
17
-
18
-
19
-
20
-
21
-
22
-
23
-
24
-
25
-
26
-
27
-
28
-
29
-
30
-
31
-
32
-
33
-
34
-
35
-
36
-
37
-
38
-
39
-
40
-
41
-
42
-
43
-
44
-
45
-
46
-
47
-
48
-
49
-
50
-
51
-
52
-
53
-
54
-
55
 |
 |
