MSI X299 SLI PLUS User Manual - Page 99
M.2 PCIe SSD RAID, Creating a M.2 PCIe SSD RAID with M.2/Optane Genie
 |
View all MSI X299 SLI PLUS manuals
Add to My Manuals
Save this manual to your list of manuals |
Page 99 highlights
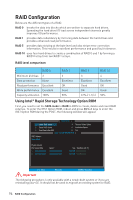
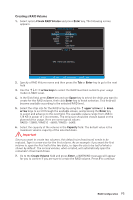
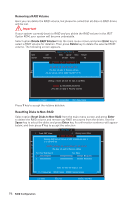
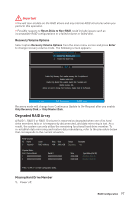
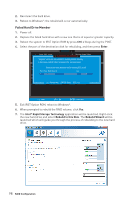
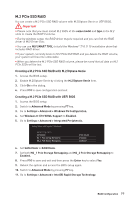
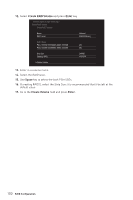
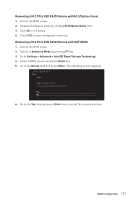
M.2 PCIe SSD RAID You can create a M.2 PCIe SSD RAID volume with M.2/Optane Genie or UEFI BIOS. Important y Please note that you must install M.2 SSDs of the same model and type in the M.2 slots to create the RAID 0 volume. y During windows setup, the RAID driver may be required and you can find the RAID driver in MSI Driver Disc. y You can use MSI SMART TOOL to build the Windows® 7/ 8.1/ 10 installation drive that includes RAID driver. y If your system currently boots to M.2 PCIe SSD RAID and you delete the RAID volume, your system will become unbootable. y When you delete the M.2 PCIe SSD RAID volume, please be noted that all data on M.2 PCIe SSDs will be lost. Creating a M.2 PCIe SSD RAID with M.2/Optane Genie 1. Access the BIOS setup. 2. Enable M.2/Optane Genie by clicking the M.2/Optane Genie item. 3. Click Ok in the dialog. 4. Press F10 to save configuration and exit. Creating a M.2 PCIe SSD RAID with UEFI BIOS 1. Access the BIOS setup 2. Switch to Advanced Mode by pressing F7 key. 3. Go to Settings > Advanced > Windows OS Configuration. 4. Set Windows 8.1/10 WHQL Support to Enabled. 5. Go to Settings > Advanced > Integrated Peripherals. Setting\Advanced\Integrated Peripherals SATA Configuration SATA Mode M2_1 Pcie Storage Remapping M2_2 Pcie Storage Remapping [RAID Mode] [Enabled] [Enabled] 6. Set SATA Mode to RAID Mode. 7. Set both M2_1 Pcie Storage Remapping and M2_2 Pcie Storage Remapping to Enabled. 8. Press F10 to save and exit and then press the Enter key to select Yes. 9. Reboot the system and access the BIOS setup again. 10. Switch to Advanced Mode by pressing F7 key. 11. Go to Settings > Advanced > Intel(R) Rapid Storage Technology. RAID Configuration 99
-
 1
1 -
2
-
3
-
4
-
5
-
6
-
7
-
8
-
9
-
10
-
11
-
12
-
13
-
14
-
15
-
16
-
17
-
18
-
19
-
20
-
21
-
22
-
23
-
24
-
25
-
26
-
27
-
28
-
29
-
30
-
31
-
32
-
33
-
34
-
35
-
36
-
37
-
38
-
39
-
40
-
41
-
42
-
43
-
44
-
45
-
46
-
47
-
48
-
49
-
50
-
51
-
52
-
53
-
54
-
55
-
56
-
57
-
58
-
59
-
60
-
61
-
62
-
63
-
64
-
65
-
66
-
67
-
68
-
69
-
70
-
71
-
72
-
73
-
74
-
75
-
76
-
77
-
78
-
79
-
80
-
81
-
82
-
83
-
84
-
85
-
86
-
87
-
88
-
89
-
90
-
91
-
92
-
93
-
 94
94 -
 95
95 -
 96
96 -
 97
97 -
 98
98 -
 99
99 -
 100
100 -
 101
101 -
 102
102 -
 103
103 -
 104
104 -
105
-
106
-
107
-
108
-
109
-
110
 |
 |
