MSI X79A User Guide - Page 39
MS-7760, The JUSB3, red mark connector supports MSI's new SuperCharger technology
 |
View all MSI X79A manuals
Add to My Manuals
Save this manual to your list of manuals |
Page 39 highlights
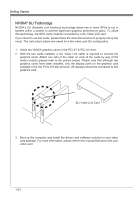
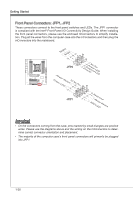
Chapter 1 115V BATT + MS-7760 USB 2.0 Expansion Connectors: JUSB2, JUSB3 This connector is designed for connecting high-speed USB peripherals such as USB HDDs, digital cameras, MP3 players, printers, modems, and many others. 2.V4C.U6CS.U8BS1.1G0B-r.1No+uCnd 1.V3C.U5CS.U7BS.0G9B-.rN0o+ounPdin * The MB layout in this figure is for reference only. USB 2.0 Bracket (optional) The JUSB3 (red mark) connector supports MSI's new SuperCharger technology which provides quicker USB charging of your cellular phone or other USB-powered devices. To enable this feature, please install the MSI SuperCharger application on your computer. When the SuperCharger application is turned on, the JUSB3 connector will convert data channels to extra power channels to quickly charge your connected device. Please note that when the SuperCharger application is turned on, data transmission and synchronization over the JUSB3 connector will not function. To enable the JUSB3 connector to function as a normal USB 2.0 connector, please turn off the SuperCharger application. When the computer is in stand-by or hibernation mode (S3/ S4/ S5) SuperCharger mode will automatically be enabled. Important • Note that the VCC and GND pins must be connected correctly to avoid possible damage. • Please only connect one device per USB port to ensure stable charging. • SuperCharger Technology is only available on select MSI mainboard models. Please refer to the MSI website to check if your mainboard has SuperCharger technology. • For iPad, JUSB3 (red mark) can still charge iPad in S3, S4, S5 state. • We recommend that don't disconnect the device when you charge it in S1 state. 1-29
-
 1
1 -
2
-
3
-
4
-
5
-
6
-
7
-
8
-
9
-
10
-
11
-
12
-
13
-
14
-
15
-
16
-
17
-
18
-
19
-
20
-
21
-
22
-
23
-
24
-
25
-
26
-
27
-
28
-
29
-
30
-
31
-
32
-
33
-
 34
34 -
 35
35 -
 36
36 -
 37
37 -
 38
38 -
 39
39 -
 40
40 -
 41
41 -
 42
42 -
 43
43 -
 44
44 -
45
-
46
-
47
-
48
-
49
-
50
-
51
-
52
-
53
-
54
-
55
-
56
-
57
-
58
-
59
-
60
-
61
-
62
-
63
-
64
-
65
-
66
-
67
-
68
-
69
-
70
-
71
-
72
-
73
-
74
-
75
-
76
-
77
-
78
-
79
-
80
-
81
-
82
-
83
-
84
-
85
-
86
-
87
-
88
-
89
-
90
 |
 |
