MSI X79A User Guide - Page 42
No Pin, Control pin, Control pin, Control pin, Control pin, Control pin, Control pin, Control pin,
 |
View all MSI X79A manuals
Add to My Manuals
Save this manual to your list of manuals |
Page 42 highlights
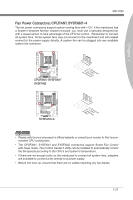
Getting Started Voice Genie Connector: JDLED3 (optional) This connector is used to link to the voice control module (optional). Please refer to its user guide for more details and usages. 2.C4o.Cn6ot.rVn8oCt.1lrCCo0pol1.3iNnn2pt1o.riC4noP.olCinnpotirnnotlropl in1p.i5n3V.C5So.BC7no.tCr9noo.tlGr1nop1rtl1ori.noR3pul.einnGpsdreinoruvendd pin BATT + MultiConnect Panel Connector: JTURBO1 (optional) This connector is used to connect an optional front panel for controling the OC Genie and some additional functions. Please refer to its user guide for more details and usages. 1.T2U.CRoBnOtrol Pin 3.T4U.NRoBPOin BATT + 1-32
-
 1
1 -
2
-
3
-
4
-
5
-
6
-
7
-
8
-
9
-
10
-
11
-
12
-
13
-
14
-
15
-
16
-
17
-
18
-
19
-
20
-
21
-
22
-
23
-
24
-
25
-
26
-
27
-
28
-
29
-
30
-
31
-
32
-
33
-
34
-
35
-
36
-
 37
37 -
 38
38 -
 39
39 -
 40
40 -
 41
41 -
 42
42 -
 43
43 -
 44
44 -
 45
45 -
 46
46 -
 47
47 -
48
-
49
-
50
-
51
-
52
-
53
-
54
-
55
-
56
-
57
-
58
-
59
-
60
-
61
-
62
-
63
-
64
-
65
-
66
-
67
-
68
-
69
-
70
-
71
-
72
-
73
-
74
-
75
-
76
-
77
-
78
-
79
-
80
-
81
-
82
-
83
-
84
-
85
-
86
-
87
-
88
-
89
-
90
 |
 |

1-32
Gett±ng Started
Vo±ce Gen±e Connector: JDLED3 (opt±onal)
Th±s connector ±s used to l±nk to the vo±ce control module (opt±onal). Please refer to ±ts
user gu±de for more deta±ls and usages.
BATT
+
10.No Pin
14.Control pin
8.Control pin
12.Control pin
6.VCC3
4.Control pin
2.Control pin
1.5VSB
3.Control pin
5.Control pin
7.Control pin
9.Ground
11.Reserved pin
13.Ground
Mult±Connect Panel Connector: JTURBO1 (opt±onal)
Th±s connector ±s used to connect an opt±onal front panel for control±ng the OC Gen±e and
some add±t±onal funct±ons. Please refer to ±ts user gu±de for more deta±ls and usages.
3.TURBO
4.No Pin
2.Control Pin
1.TURBO
BATT
+