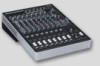
Mackie Onyx 1220i Owner's Manual - Page 21
And Ol Leds, Channel Fader
 |
View all Mackie Onyx 1220i manuals
Add to My Manuals
Save this manual to your list of manuals |
Page 21 highlights
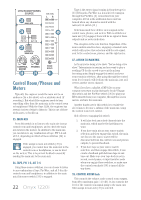
32. -20 and OL LEDs 1 ONYX MIC PRE 9 2 ONYX MIC PRE 3 ONYX MIC PRE 4 ONYX MIC PRE CTRL - RM BAL/UNBA 12 L LINE IN 5-6 10 1 LINE 18 BAL/UNBAL LINE HI-Z 2 LINE BAL/UNBAL LINE HI-Z 3 LINE BAL/UNBAL 75Hz 18dB/OCT 4 LINE 11 BAL/UNBAL 75Hz 18dB/OCT L (MONO) BAL/UNBAL R 19 20 48V 48V 48V 48V 30 U 20 21 40 GAIN U 60 -20dB +40dB 30 U 20 40 GAIN U 60 -20dB +40dB 30 U 20 40 GAIN U 60 -20dB +40dB 30 U 20 40 GAIN U 60 -20dB +40dB U GAIN -20dB +20dB SEND 22 PRE POST SEND PRE POST SEND PRE POST SEND PRE POST SEND PRE POST U 24 -15 +15 1k EQ HIGH 12kHz 25 FREQ 100 8k U 26 MID -15 +15 U 28 LOW 80Hz -15 +15 U EQ -15 +15 1k HIGH 12kHz FREQ 100 8k U MID -15 +15 U LOW 80Hz -15 +15 U EQ -15 +15 1k HIGH 12kHz FREQ 100 8k U MID -15 +15 U LOW 80Hz -15 +15 U EQ -15 +15 1k HIGH 12kHz FREQ 100 8k U MID -15 +15 U LOW 80Hz -15 +15 U EQ HIGH 12kHz -15 +15 U 27 MID 2.5kHz -15 +15 U LOW 80Hz -15 +15 AUX AUX AUX AUX AUX 29 1 MAX 1 MAX 1 MAX 1 MAX 1 MAX These LEDs indicate the channel's signal level after the gain and EQ controls, but just before the channel's level. So even if the level is turned down, you can see if a signal is present, or if the channel is being overloaded. The OL (overload) LED will come on when the channel's input signal is too high. This should be avoided, as distortion will occur. If the OL LED comes on regularly, check that the gain control [21] is set correctly for your input device, and that the channel EQ is not set with too much boost. The -20 LED comes on when the channel signal strength has reached that level. 33. CHANNEL FADER This is the last control in a channel's signal path, and it adjusts the level of each channel onto the main mix. The "U" mark indicates unity gain, meaning no increase or decrease of signal level. All the way up provides an additional 10 dB, should you need to boost a section of a song. If you find that the overall level is too quiet or too loud with the level near unity, check that the gain control [21] is set correctly. 34. SOLO OO OO OO OO OO OO OO OO OO OO 29 2 MAX PAN 30 L R 2 MAX PAN L R 2 MAX PAN L R 2 MAX PAN L R 2 MAX PAN L R Whenever a solo switch is engaged, you will only hear the soloed channel(s) in the headphones and control room. This gives you the opportunity to audition the channels before they are added to the main mix or alt 3-4 mix. You can still hear, even when the fader is down. OO OO 31 MUTE ALT 3/4 MUTE ALT 3/4 MUTE ALT 3/4 MUTE ALT 3/4 MUTE ALT 3/4 dB 10 5 32 U OL 5 - 20 33 10 20 30 40 50 60 dB 10 5 U OL 5 - 20 10 20 30 40 50 60 dB 10 5 U OL 5 - 20 10 20 30 40 50 60 dB 10 5 U OL 5 - 20 10 20 30 40 50 60 dB 10 5 U OL 5 - 20 10 20 30 40 50 60 OO OO OO Solo is also used to set the gain of each channel correctly. When a channel is soloed, you can adjust the channel gain [21] until your input source reaches the level of the 0 dB LED of the right meter. Solo signals reaching the headphones and control room are not affected by the channel level or main level; therefore, turn down the phones level [39] and control room level [38] first, as soloed channels may be loud. The rude solo light [41] will turn on as a reminder that what you are listening to in the headphones and control room is just the soloed channel(s). 34 SOLO SOLO SOLO SOLO SOLO For stereo channels, the mono sum of the left and 1 2 3 4 5-6 right is soloed. Soloed channels are sent to the source mix, which ultimately feeds your control room, phones, and meters. Whenever solo is engaged, all source selections (main mix, alt 3-4, tape, and FireWire) are defeated, to allow the soloed signal to do just that-solo! Owner's Manual 21
-
 1
1 -
2
-
3
-
4
-
5
-
6
-
7
-
8
-
9
-
10
-
11
-
12
-
13
-
14
-
15
-
 16
16 -
 17
17 -
 18
18 -
 19
19 -
 20
20 -
 21
21 -
 22
22 -
 23
23 -
 24
24 -
 25
25 -
 26
26 -
27
-
28
-
29
-
30
-
31
-
32
-
33
-
34
-
35
-
36
-
37
-
38
-
39
-
40
-
41
 |
 |
