Mackie Onyx 1220i Owner's Manual - Page 25
Talkback
 |
View all Mackie Onyx 1220i manuals
Add to My Manuals
Save this manual to your list of manuals |
Page 25 highlights
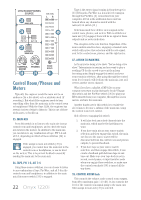
U GAIN 23 -20dB +20dB SEND INPUT CTRL ROOM/PHONES SOURCE 35 MAIN MIX LINE U FW 1-2 HIGH 12kHz -15 +15 U MID 2.5kHz -15 +15 36 TAPE FW 1-2 ALT 3-4 37 ASSIGN TO MAIN MIX 0dB=0dBu LR 20 CLIP 15 10 6 3 0 2 4 40 LEVEL SET 7 10 20 30 U LOW 80Hz -15 +15 AUX OO MAX CONTROL ROOM 38 OO MAX PHONES 39 RUDE SOLO 41 AUX MASTER 43 SEND 45 RETURN 1 MAX PRE POST 2 MAX PAN PRE POST L R OO OO OO OO 1 42+15 RTN TO AUX1 2 +15 1 44+10 2 +10 46 POWER OO OO MUTE ALT 3/4 47 dB MIC 10 5 U OL 5 - 20 10 48 MAX LEVEL DESTINATION 20 30 49 40 50 PHONES AUX 1-2 60 OO OO SOLO 11-12 50 TALKBACK TALKBACK 51 dB 10 5 U 5 10 20 30 40 50 60 MAIN MIX OO 46. POWER LED This green LED will turn on when the mixer is turned on, as a reminder of how on it really is. If it is not on, then it is off, and the mixer becomes a rather nice weight for keeping your morning newspaper from blowing away in the wind. If it does not turn on, make sure the power cord is correctly inserted at both ends, the local AC mains supply is active, and the power switch [2] is on. Talkback The talkback feature allows the engineer to communicate with the talent either through the phones outputs [17] or the aux 1-2 send outputs [6] using the built-in talkback microphone. This saves a lot of shouting over the audience's heads as you set up the talented one's stage monitors to their peculiarly-picky satisfaction. 47. TALKBACK MIC This is where the built-in talkback microphone is located. It is an omni-directional dynamic microphone, and it will pick up your voice from anywhere in front of the mixer. 48. TALKBACK LEVEL Use this knob to control the level of the talkback signal being routed to the phones or aux 1-2 outputs, from the internal microphone. 1. Start with this control turned down. 2. Select the destination, either headphones and/or aux 1-2, and make sure their levels are already set nicely, such as phones [39] or aux sends [42]. 3. Hold down the talkback switch [50] as you make your fruity-toned announcements. 4. Slowly turn this talkback level control up until you get confirmation from whoever is listening to headphones or monitors that they can hear and obey your every command. Once you have set the level, you can leave it there for the duration of the session or gig. 49. DESTINATION: PHONES, AUX 1-2 Push in the phones switch to route the talkback signal to the headphones. Use this to communicate with the talent in the studio through the headphones during a recording session. When the talkback circuit is activated by pushing the talkback [50] switch, the control room outputs [12] are attenuated to allow your voice to come through clearly. Owner's Manual 25
-
 1
1 -
2
-
3
-
4
-
5
-
6
-
7
-
8
-
9
-
10
-
11
-
12
-
13
-
14
-
15
-
16
-
17
-
18
-
19
-
 20
20 -
 21
21 -
 22
22 -
 23
23 -
 24
24 -
 25
25 -
 26
26 -
 27
27 -
 28
28 -
 29
29 -
 30
30 -
31
-
32
-
33
-
34
-
35
-
36
-
37
-
38
-
39
-
40
-
41
 |
 |
