Mackie Onyx 1220i Owner's Manual - Page 33
Appendix D: Rack Ear installation instructions
 |
View all Mackie Onyx 1220i manuals
Add to My Manuals
Save this manual to your list of manuals |
Page 33 highlights
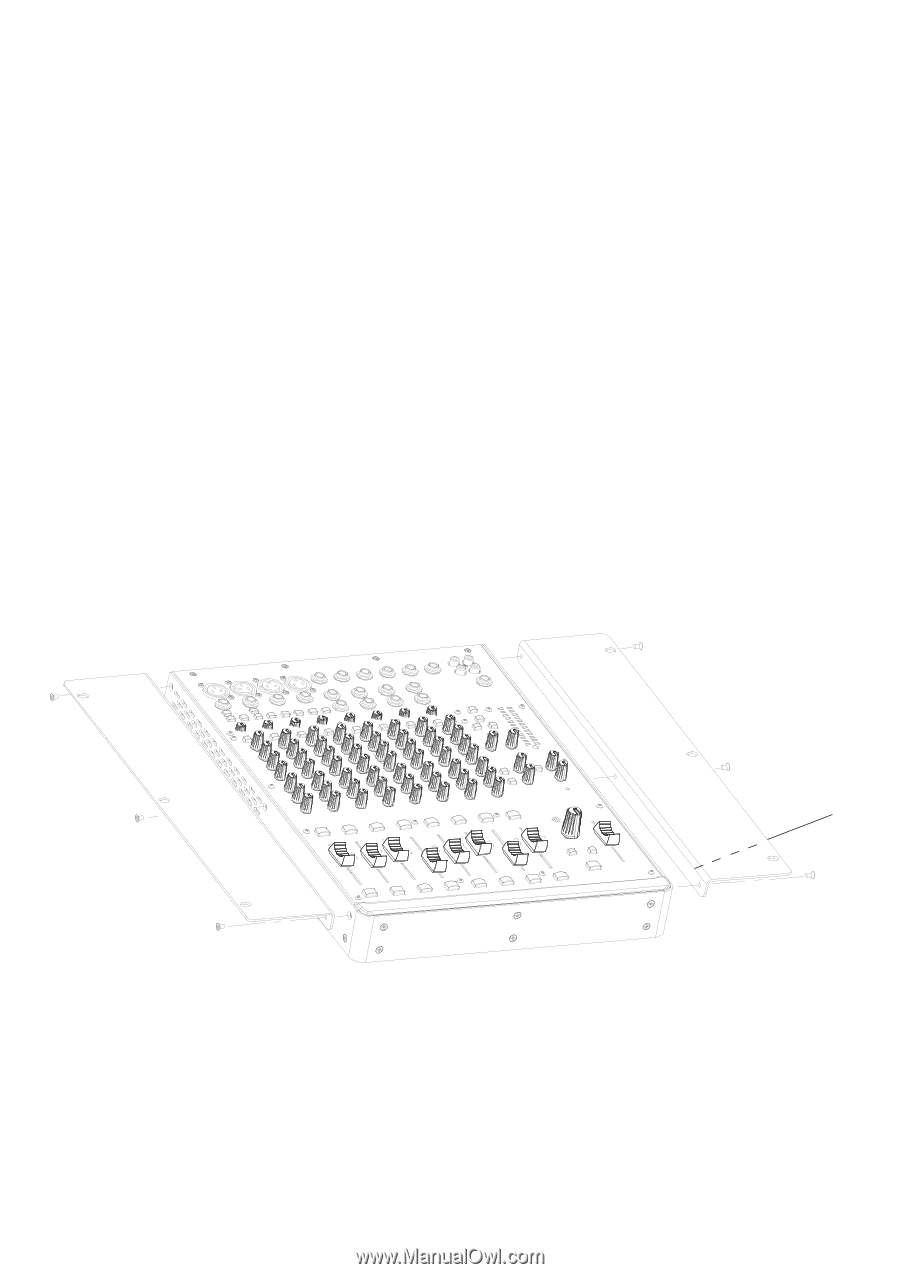
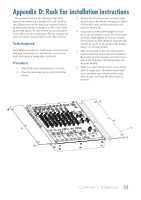
Appendix D: Rack Ear installation instructions The optional Rack Ear Kit allows the Onyx 1220i mixer to be mounted in a standard 19" rack. It will be out of harm's way and the band may continue tearin' it up without fearing any consequences. The mixer takes up ten rack spaces. Be sure to allow for an extra space or two above to make connections. The kit contains two rack ear brackets and six black screws (M3.5 x 8mm). Tools Required: One phillips screwdriver, a comfy chair, a bowl of cereal with milk and bananas (or strawberries, your choice), toast, and a glass of orange juice (optional). Procedure: 1. Turn off the mixer and disconnect all cords. 2. Place the mixer face up on a soft and dry flat surface. 3. Remove the six silver screws as shown below, place them in the shoe box housing all of those old baseball cards, and keep them in a safe place for further use. 4. Using only the new screws supplied, secure the rack ear brackets to each side of the mixer as shown. Hand-tighten the screws securely. The brackets are NOT identical. The right side bracket has an 'R' on the inside of the bracket flange (see drawing below). 5. Offer up the mixer to the rack and secure it in place with four rack screws (not supplied). Remember to leave enough room at the top to attach the AC power cord and any other connections needed. 6. Relax, you did it! Break out the cereal, frosty glass of orange juice, the buttered-just-right toast, and plant your bottom on that comfy chair of yours and enjoy the sweet taste of success! R Owner's Manual 33
-
 1
1 -
2
-
3
-
4
-
5
-
6
-
7
-
8
-
9
-
10
-
11
-
12
-
13
-
14
-
15
-
16
-
17
-
18
-
19
-
20
-
21
-
22
-
23
-
24
-
25
-
26
-
27
-
 28
28 -
 29
29 -
 30
30 -
 31
31 -
 32
32 -
 33
33 -
 34
34 -
 35
35 -
 36
36 -
 37
37 -
 38
38 -
39
-
40
-
41
 |
 |