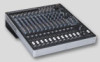
Mackie Onyx 1620i Owner's Manual - Page 17
Send Firewire Pre/post, Input Line Or Fw 1-2, Channel Equalization Eq, 48v Phantom Power Ch. 1-8
 |
View all Mackie Onyx 1620i manuals
Add to My Manuals
Save this manual to your list of manuals |
Page 17 highlights
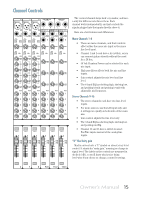
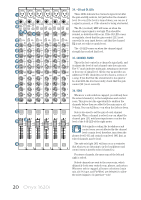
20. 48V PHANTOM POWER (Ch. 1-8 only) Most modern professional condenser mics require 48V phantom power, which lets the mixer send lowcurrent DC voltage to the mic's electronics through the same wires that carry audio. (Semi-pro condenser mics often have batteries to accomplish the same thing.) "Phantom" owes its name to an ability to be "unseen" by dynamic mics (Shure SM57/SM58, for instance), which don't need external power and aren't affected by it anyway. Press this switch in if your microphone requires phantom power. (Always check the position of this switch before connecting microphones.) Never plug s ingle-ended (unbalanced) microphones, or ribbon mics into the mic input jacks if phantom power is on. Do not plug instrument outputs into the mic XLR input jacks with phantom power on, u nless you know for certain it is safe to do so. Be sure the main level [55] is turned down when connecting microphones to the mic inputs when phantom power is turned on, to prevent pops from getting through to the speakers. 21. GAIN CONTROL If you haven't already, please read the level-setting procedure on page 3. The gain knobs adjust the input sensitivity of the mic and line inputs. This allows signals from the outside world to be adjusted to run through each channel at optimal internal operating levels. If the signal originates through the mic XLR jack, there will be 0 dB of gain with the knob fully down, ramping to 60 dB of gain fully up. Through the 1⁄4" line input of channels 1-8, there is 20 dB of attenuation fully down and 40 dB of gain fully up, with unity gain "U" at 11:00. Through the 1⁄4" line input of channels 9-16, there is 20 dB of attenuation fully down and 20 dB of gain fully up, with unity gain "U" at 11:00. This 20 dB of attenuation can be very handy when you are inserting a hot signal, or when you want to add EQ gain, or both. Without this "virtual pad," there is more chance of channel clipping. 22. SEND FIREWIRE PRE/POST Each channel of the mixer can send a FireWire output to your computer or DAW. The FireWire output from each channel can be tapped before (pre) or after (post) the channel EQ. (The output is always pre-fader). If you want the mixer EQ to affect the FireWire recording, then set this switch to post. This is useful in recording channels in a studio (where the recording includes the beneficial effect of our Perkins EQ). If you would rather record the straight signals from a live performance, and EQ them later in your DAW, then set this switch to pre. This is good for live work, where you may have added EQ to adjust for the room, and yet not want this added to your recording. 23. INPUT (LINE or FW 1-2) Channel 15 and 16 can either be fed from the 1/4" line level inputs, or by two outputs from a computer via FireWire. This switch lets you choose which to use. Either way, the channels receive line-level analog audio signals just prior to the gain control, so channel setup, gain adjustment and EQ adjustment are the same for line or FireWire. This is useful for virtual instruments that want to be "just another channel" among hardware instruments. CHANNEL EQUALIZATION (EQ) There are two different flavors of EQ: Mono Channels 1-8 4-band EQ with shelving high, shelving low, and peaking hi-mid and peaking lo-mid with adjustable mid frequency. Stereo Channels 9-16 3-band EQ with shelving high, shelving low, and peaking mid EQ. Shelving means that the circuitry boosts or cuts all frequencies past the specified frequency. For example, the low EQ boosts bass frequencies below 80 Hz and continuing down to the lowest note you never heard. Peaking means that certain frequencies form a "hill" around the center frequency. With too much EQ, you can really upset things. We've designed a lot of boost and cut into each equalizer circuit because we know that everyone will occasionally need that. But if you max the EQ on every channel, you'll get mix mush. Equalize subtly and use the left sides of the knobs (cut), as well as the right (boost). If you find yourself repeatedly using a lot of boost or cut, consider altering the sound source, such as placing a mic differently, trying a different kind of mic, a different vocalist, changing the strings, or gargling. Owner's Manual 17
-
 1
1 -
2
-
3
-
4
-
5
-
6
-
7
-
8
-
9
-
10
-
11
-
 12
12 -
 13
13 -
 14
14 -
 15
15 -
 16
16 -
 17
17 -
 18
18 -
 19
19 -
 20
20 -
 21
21 -
 22
22 -
23
-
24
-
25
-
26
-
27
-
28
-
29
-
30
-
31
-
32
-
33
-
34
-
35
-
36
-
37
-
38
-
39
-
40
 |
 |
