Mackie Onyx 1620i Owner's Manual - Page 34
Installation for Windows XP - driver
 |
View all Mackie Onyx 1620i manuals
Add to My Manuals
Save this manual to your list of manuals |
Page 34 highlights
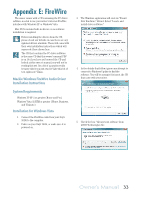
6. Select "Install," and the driver software will be installed. Installation for Windows XP 1. Connect the FireWire cable from your Onyx 1620i to the computer. 2. Power on your Onyx 1620i . 3. The Windows XP application will start its "Found New Hardware" wizard. 7. The following message confirms that the driver software has been successfully installed. 4. Ignore any attempt to connect to Windows Update to find the software, by checking the "No, not at this time" button. Select "Next." The audio interface is now ready to use with the Digital Audio Workstation software of choice, as well as with consumer audio applications such as iTunes® or Windows Media Player. 5. Insert the CD that came with your Onyx 1620i (if you haven't already). 6. Select "Install the software automatically." 34 Onyx 1620i
-
 1
1 -
2
-
3
-
4
-
5
-
6
-
7
-
8
-
9
-
10
-
11
-
12
-
13
-
14
-
15
-
16
-
17
-
18
-
19
-
20
-
21
-
22
-
23
-
24
-
25
-
26
-
27
-
28
-
 29
29 -
 30
30 -
 31
31 -
 32
32 -
 33
33 -
 34
34 -
 35
35 -
 36
36 -
 37
37 -
 38
38 -
 39
39 -
40
 |
 |
