Mackie Onyx 1620i Owner's Manual - Page 3
Quick Start - manual
 |
View all Mackie Onyx 1620i manuals
Add to My Manuals
Save this manual to your list of manuals |
Page 3 highlights
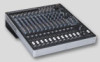
Quick Start We realize that you must be really keen to try out your new mixer. Please read the safety instructions on page 2, read this page, and then have a look through some of the features and details in this manual. Setup Use the mixer in a nice clean and dry environment, free from dryer lint and dust bunnies. Zero the controls 1. Fully turn down all the knobs and faders to minimum, except for the channel EQ and pan controls, which should be centered. 2. Make sure all buttons are in the out position. Connections 1. Make sure the AC power switch is off before making any connections. 2. Push the linecord securely into the IEC connector on the rear panel, and plug it into a 3-prong AC outlet. The mixer can accept any AC voltage ranging from 100 VAC to 240 VAC. 3. Plug a balanced microphone into one of the mic XLR (3-pin) connectors. Or connect any linelevel signal (keyboard, or guitar preamp) to a line input jack using a TS or TRS 1/4" plug. 4. If your microphone requires phantom power, press in the 48V phantom power button. 5. You can connect a guitar directly to line inputs 1 or 2 without the need for a DI box. Press a hi-z switch if you connect a guitar directly. 6. The insert jacks of channels 1 to 8 can be used to connect an external effects or dynamics processor into the channel signal chain. 7. Connect the main outputs of the mixer (either XLR or TRS 1/4") to the line-level inputs of your amplifier (with speakers already attached) or to the line-level inputs of powered speakers. 8. Engage the main mix switch in the control room/phones source selection, so the meters will show the main mix levels in the next steps. Part No. SW0723 Rev. D 07/2011 ©2011 LOUD Technologies Inc. All Rights Reserved. Loosely based on a dream sequence in which the technical writer is given keys to a sports car of his choice, unlimited gas, and closed roads. The dream suddenly ends and reality kicks in. A mixer manual to write, a mixer manual to write! Set the levels It's not even necessary to hear what you're doing to set optimal levels. But if you'd like to: Plug in headphones and turn up the phones knob just a little. 1. Turn on the mixer's power switch. 2. For one channel, press the solo switch in, and the rude solo light will turn on. 3. Play something into that input at real-world levels. 4. Adjust that channel's gain control until the right main meter stays around the 0 dB LED (marked "level set"). 5. Disengage the channel's solo switch. 6. Repeat steps 2 to 5 for the remaining channels. 7. Turn up a channel fader to the "U" mark. 8. Slowly turn up the main mix fader until you hear the signals in your speakers or headphones. 9. If needed, apply some channel EQ wisely. 10. Adjust the channel faders to get the best mix. Keep the gain controls and faders fully down on unused channels. 11. During the performance, if you notice a channel OL LED turning on during peaks, carefully turn down that channel's gain control until OL does not turn on. FireWire • See page 34 for details of getting started with FireWire. • PC drivers are on the supplied CD-ROM. Mac OS X contains built-in drivers, so no software installation is required. Other Notes • When shutting down, turn off any power amplifiers or powered speakers first. When powering up, turn them on last. This will reduce the chance of turn-on or turn-off thumps. • Always turn down the phones level when making connections, pressing solo, or doing anything that may cause loudness in the headphones. This will help protect your hearing. • Always turn down the main mix level and control room level when making connections to the mixer. Better yet, turn off the power. • Save the shipping box! Owner's Manual 3
-
 1
1 -
 2
2 -
 3
3 -
 4
4 -
 5
5 -
 6
6 -
 7
7 -
 8
8 -
 9
9 -
10
-
11
-
12
-
13
-
14
-
15
-
16
-
17
-
18
-
19
-
20
-
21
-
22
-
23
-
24
-
25
-
26
-
27
-
28
-
29
-
30
-
31
-
32
-
33
-
34
-
35
-
36
-
37
-
38
-
39
-
40
 |
 |
