Mackie Onyx 1640i Owner's Manual - Page 10
Onyx 1640i Features - alternative
 |
View all Mackie Onyx 1640i manuals
Add to My Manuals
Save this manual to your list of manuals |
Page 10 highlights
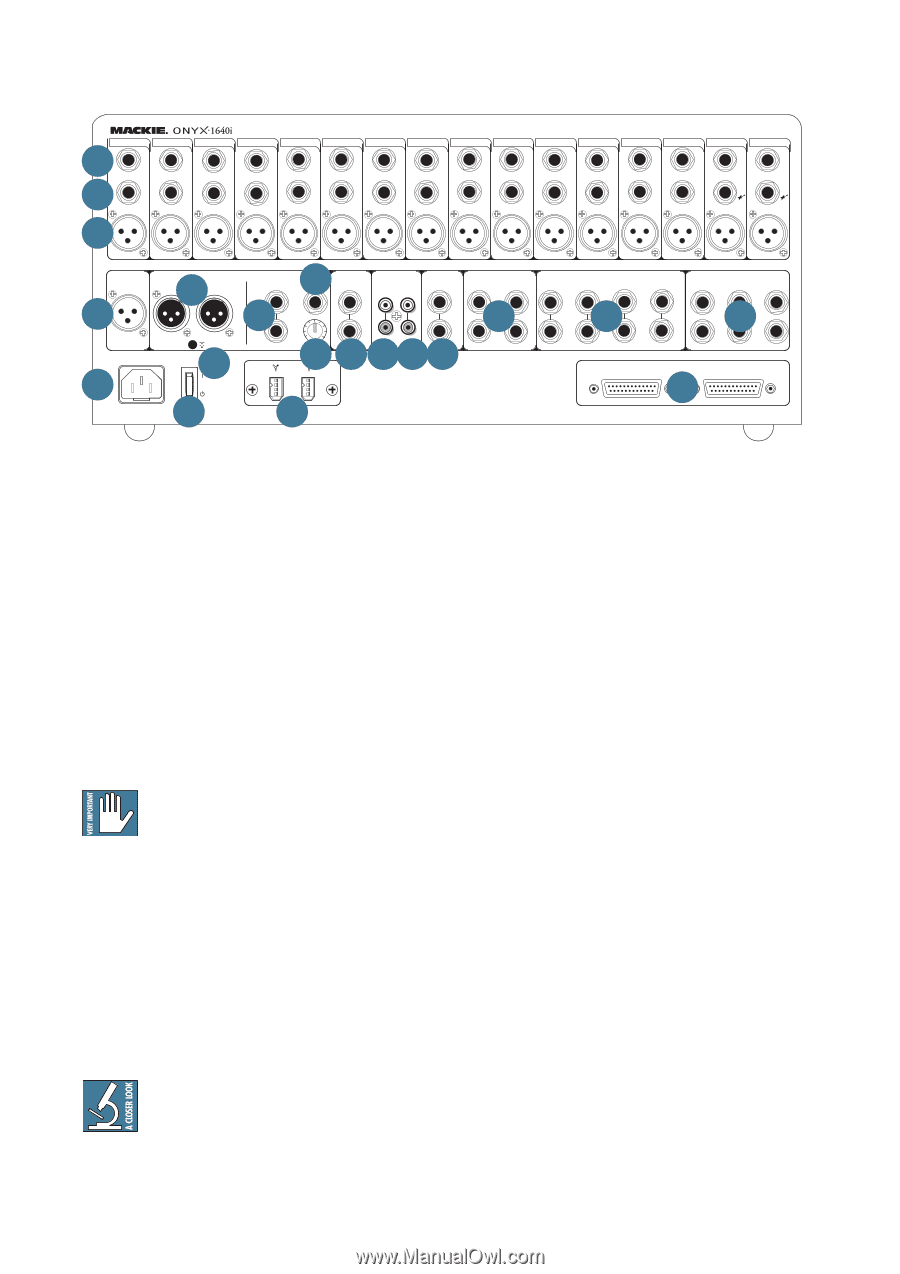
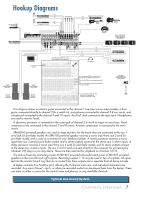
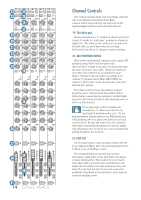
Onyx 1640i Features 6 5 4 16 15 14 13 12 11 10 9 8 7 6 5 4 3 2 1 INSERT INSERT INSERT INSERT INSERT INSERT INSERT INSERT INSERT INSERT INSERT INSERT INSERT INSERT INSERT INSERT LINE BAL/UNBAL ONYX MIC PRE LINE BAL/UNBAL ONYX MIC PRE LINE BAL/UNBAL ONYX MIC PRE LINE BAL/UNBAL ONYX MIC PRE LINE BAL/UNBAL ONYX MIC PRE LINE BAL/UNBAL ONYX MIC PRE LINE BAL/UNBAL ONYX MIC PRE LINE BAL/UNBAL ONYX MIC PRE LINE BAL/UNBAL ONYX MIC PRE LINE BAL/UNBAL ONYX MIC PRE LINE BAL/UNBAL ONYX MIC PRE LINE BAL/UNBAL ONYX MIC PRE LINE BAL/UNBAL ONYX MIC PRE LINE BAL/UNBAL ONYX MIC PRE HI-Z BAL/UNBAL ONYX MIC PRE HI-Z BAL/UNBAL ONYX MIC PRE TALKBACK MIC +48v R 8BALANCED L MAIN OUT BAL /UNBAL 11MONO MAIN INSERT (TIP=SEND RING=RTN) TAPE IN OUT L CTRL-RM OUT BAL /UNBAL SUB OUT BAL/UNBAL 3 1 AUX RETURN BAL/UNBAL 4 3 2 1 AUX SEND BAL/UNBAL 5 3 1 L L L L L L L 7 10 174 2 (MONO) 18(MONO) (MONO) (MONO) 19 6 4 2 MAIN OUTPUT LEVEL POWER ON +4dB MIC 9 R R R R +6 OO 12 13 14 15 16 FIREWIRE 1 R R R R 9-16 RECORDING OUTS POST GAIN PRE INSERT BALANCED 1- 8 20 2 3 Rear Panel - Connections 1. POWER CONNECTION This is a standard 3-prong IEC power connector. Connect the detachable linecord (included in the box with your mixer) to the power receptacle, and plug the other end of the linecord into an AC outlet. The Onyx 1640i has a universal power supply that can accept any AC voltage ranging from 100 VAC to 240 VAC. No need for voltage select switches. It will work virtually anywhere in the world. That's why we call it a "Planet-Earth" power supply! It is less susceptible to voltage sags or spikes, compared to conventional power supplies, and provides greater electromagnetic isolation and better protection against AC line noise. Disconnecting the plug's ground pin is dangerous. Don't do it. 2. POWER SWITCH Press the top of this rocker switch inwards to turn on the mixer. The front panel power LED [64] will glow with happiness, or at least it will if you have the mixer plugged into a suitable live AC mains supply. Press the bottom of this switch to put the mixer into standby mode. It will not function, but the circuits are still live. To remove AC power, either turn off the AC mains supply, or unplug the power cord from the mixer and the AC mains supply. As a general guide, you should turn on your mixer first, before any external power amplifiers or powered speakers, and turn it off last. This will reduce the possibilities of any turn-on, or turn-off thumps in your speakers. 10 Onyx 1640i 3. FIREWIRE CONNECTIONS FireWire is a high-speed two-way interface for connecting digital devices. Two FireWire connectors allow the transfer of digital audio to and from your computer or digital audio workstation (DAW) with ultra-low latency. Usually, only one connector is used. The FireWire interface provides the following outputs to your computer: • Individual channels, tapped pre-fader, and either pre-EQ, or post EQ (your choice). • Aux sends 1-6 for effects plug-in routing or alternate mix recording. • Subgroups 1-4 for subgroup or alternate mix recording. • Left/right main mix. The left/right main mix at the FireWire output is not affected by the main mix fader (important for recording live). Use FireWire to record a live performance directly to your computer, then you can mixdown to a stereo mix or add overdubs later. Or you can use FireWire to turn your Onyx mixer into a high-quality computer audio interface for your DAW. The FireWire interface also provides 16 channels of audio from your computer. The first two channels can be routed to either channels 1-2 or the control room for convenient monitoring of a wide range of applications (iTunes®, for example). The FireWire interface works with both PC (using ASIO for Windows XP and Vista) and Mac (Core Audio for Mac OS 10.4.11 or higher). See page 42 for more details about FireWire.
-
 1
1 -
2
-
3
-
4
-
 5
5 -
 6
6 -
 7
7 -
 8
8 -
 9
9 -
 10
10 -
 11
11 -
 12
12 -
 13
13 -
 14
14 -
 15
15 -
16
-
17
-
18
-
19
-
20
-
21
-
22
-
23
-
24
-
25
-
26
-
27
-
28
-
29
-
30
-
31
-
32
-
33
-
34
-
35
-
36
-
37
-
38
-
39
-
40
-
41
-
42
-
43
-
44
-
45
-
46
-
47
-
48
-
49
-
50
 |
 |