Mackie Onyx 1640i Owner's Manual - Page 25
Talkback
 |
View all Mackie Onyx 1640i manuals
Add to My Manuals
Save this manual to your list of manuals |
Page 25 highlights
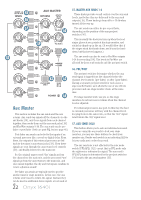
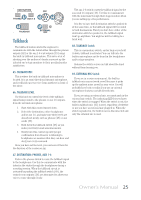
DESTINATION MIC 67 PHONES AUX 1-6 68 TALKBACK 65 66 69 EXTERNAL MIC OO MAX LEVEL Talkback The talkback feature allows the engineer to communicate with the talent either through the phones outputs [42] or the aux 1-6 send outputs [19] using the built-in talkback microphone. This saves a lot of shouting over the audience's heads as you set up the talented one's stage monitors to their peculiarly-picky satisfaction. 65. TALKBACK MIC This is where the built-in talkback microphone is located. It is an omni-directional dynamic microphone, and it will pick up your voice from anywhere in front of the mixer. 66. TALKBACK LEVEL Use this knob to control the level of the talkback signal being routed to the phones or aux 1-6 outputs, from the internal microphone. 1. Start with this control turned down. 2. Select the destination, either headphones and/or aux 1-6, and make sure their levels are already set nicely, such as phones [48] or aux sends [55]. 3. Hold down the talkback switch [68] as you make your fruity-toned announcements. 4. Slowly turn this control up until you get confirmation from whoever is listening to headphones or monitors that they can hear and obey your every command. Once you have set the level, you can leave it there for the duration of the session or gig. The aux 1-6 switch routes the talkback signal to the aux send 1-6 outputs [19]. Use this to communicate with the musicians through their stage monitors when you are setting up a live performance. It is fine to have both destination switches pushed in at the same time, so the talkback signal will be routed to both destinations. But if you don't have either of the destination switches pushed in, the talkback signal won't go anywhere. You might as well be talking to a brick wall. 68. TALKBACK Switch This is a momentary switch, and as long as you hold it down, talkback is activated. You can talk into the built-in microphone and be heard in the headphones and/or stage monitors. Release the switch so you can talk about the band without them hearing you. 69. EXTERNAL MIC Switch If you are in a noisy environment, the built-in talkback mic may not work as well because it picks up the ambient noise as well as your voice. You will probably have better results if you use an external microphone that you can talk directly into. If you are using an external mic, you must push in the external mic switch. The indicating LED lets you know when the switch is engaged. When the switch is out, the built-in talkback mic [65] is used, regardless of whether or not you have an external mic plugged in. When the switch is pushed in, the built-in mic is disconnected and only the external mic is used. 67. DESTINATION: PHONES, AUX 1-6 Push in the phones switch to route the talkback signal to the headphones. Use this to communicate with the talent in the studio through the headphones during a recording session. When the talkback circuit is activated by pushing the talkback switch [68], the control room outputs [16] are attenuated to allow your voice to come through clearly. Owner's Manual 25
-
 1
1 -
2
-
3
-
4
-
5
-
6
-
7
-
8
-
9
-
10
-
11
-
12
-
13
-
14
-
15
-
16
-
17
-
18
-
19
-
 20
20 -
 21
21 -
 22
22 -
 23
23 -
 24
24 -
 25
25 -
 26
26 -
 27
27 -
 28
28 -
 29
29 -
 30
30 -
31
-
32
-
33
-
34
-
35
-
36
-
37
-
38
-
39
-
40
-
41
-
42
-
43
-
44
-
45
-
46
-
47
-
48
-
49
-
50
 |
 |