Mackie Onyx 820i Owner's Manual - Page 24
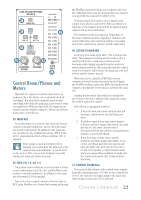
PHONES Knob, LEFT/RIGHT Level Meters, RUDE SOLO Light
 |
View all Mackie Onyx 820i manuals
Add to My Manuals
Save this manual to your list of manuals |
Page 24 highlights
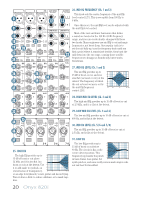
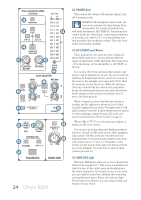
CTRL ROOM/PHONES SOURCE 38 MAIN MIX 0dB=0dBu LR 20 CLIP 15 10 39 TAPE 6 3 43 FW 1-2 ALT 3-4 40 0 2 LEVEL 4 SET 7 ASSIGN TO 10 MAIN MIX 20 41 42 30 OO MAX CONTROL ROOM OO MAX PHONES RUDE SOLO 44 AUX MASTER PRE 46 POST SEND 48 1 45 +15 RTN TO AUX1 RETURN 1 47+10 OO OO OO OO PRE POST 2 +15 2 +10 49 AUX SEND 1-2 TO FW 5-6 50 POWER 51 52 MIC MAX LEVEL DESTINATION 53 PHONES AUX 1-2 54 TALKBACK OO OO 56 ASSIGN TO FW 7-8 U 55 +10dB MAIN MIX 24 Onyx 820i 42. PHONES Knob This controls the volume at the phones output, from off to maximum gain. WARNING: The headphone amp is loud, and can cause permanent hearing damage. Even intermediate levels may be painfully loud with some headphones. BE CAREFUL! Always turn this control all the way down before connecting headphones, or pressing a solo switch [37], or doing anything new that may affect the headphone volume. Then turn it up slowly as you listen carefully. 43. LEFT/RIGHT Level Meters These peak meters are made up of two columns of twelve LEDs, with three colors to indicate different ranges of signal level, traffic light style. They range from -30 at the bottom, to 0 in the middle, to +20 (CLIP) at the top. If no source [38, 39] is selected in the control room/ phones, and no channels are in solo, the meters won't do anything. To display signal levels, select one or more of the sources. For example, press main mix [38] to show the main mix level in the meters. While the listening levels are controlled by the control room and phones knobs, the meters indicate the source mix before these knobs, giving you the real facts at all times, even if you're not listening at all. When a channel is soloed, the left meter shows no reading, and the right meter shows the level of that channel's signal level, pre-fader. The right meter's 0 dB LED is labeled "level set" to show where the level should be when adjusting a channel's gain [23] in the solo mode (as described in "Set the Levels" on page 3). When 0 dBu (0.775 V) is at the main mix outputs, it shows as 0 dB on the meters. You can get a good mix with peaks flashing anywhere between -20 and +10 dB on the meters. Most amplifiers clip at about +10 dBu, and some recorders aren't so forgiving either. For best real-world results, try to keep your peaks between "0" and "+6." Remember, audio meters are just tools to help assure you that your levels are "in the ballpark." You don't have to stare at them (unless you want to). 44. RUDE SOLO Light This large LED flashes when one or more channel solo switches are engaged [37]. This acts as a reminder that what you hear in the control room and headphones is the soloed channel(s). If you forget you're in solo mode, you can easily be tricked into thinking that something is wrong with your mixer. Hence, the rude solo light. Please forgive its rudeness, it is only trying to help, and wants to be your friend.
-
 1
1 -
2
-
3
-
4
-
5
-
6
-
7
-
8
-
9
-
10
-
11
-
12
-
13
-
14
-
15
-
16
-
17
-
18
-
 19
19 -
 20
20 -
 21
21 -
 22
22 -
 23
23 -
 24
24 -
 25
25 -
 26
26 -
 27
27 -
 28
28 -
 29
29 -
30
-
31
-
32
-
33
-
34
-
35
-
36
-
37
-
38
-
39
-
40
-
41
-
42
 |
 |
