Mackie Onyx 820i Owner's Manual - Page 27
Main Mix
 |
View all Mackie Onyx 820i manuals
Add to My Manuals
Save this manual to your list of manuals |
Page 27 highlights
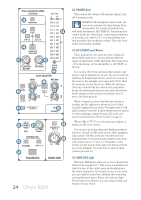
The aux 1-2 switch routes the talkback signal to the aux send 1 and 2 outputs [12]. Use this to communicate with the musicians through their stage monitors when you are setting up a live performance. It is fine to have both destination switches pushed in at the same time, so the talkback signal will be routed to both destinations. But if you don't have either of the destination switches pushed in, the talkback signal won't go anywhere. You might as well be talking to a brick wall. 54. TALKBACK Switch 56. ASSIGN TO FW 7-8 This switch allows you to assign the left and right main mix to FireWire outputs 7 and 8. For example, you can record the live performance main mix onto your computer. This does not affect the analog main mix outputs. The output level to your computer is not affected by the main mix level control [55]. When this switch is disengaged, then mixer channels 7 and 8 are assigned to FireWire outputs 7 and 8 instead. This is a momentary switch, and as long as you hold it down, talkback is activated. You can talk into the built-in microphone and be heard in the headphones and/or stage monitors. Congratulations! You've just read about all the features of your mixer. Time for a frosty beverage. Release the switch so you can talk about the band without them hearing you. Main Mix 55. MAIN MIX This stereo control allows you to adjust the levels of the main mix signals sent to the XLR and 1/4" main linelevel outputs [4, 14], and the tape outputs [16]. This gives you the ultimate feeling of power and control over the sound levels sent to your audience. If you press the main mix switch [38], you can see the main mix levels in the meters [43]. Adjust this control carefully, with your good eye on the meters to check against overloading, and your good ear to the levels to make sure your audience (if any) is happy. This control does not affect the aux outputs [12], alt 3-4 outputs [7], or the main mix FireWire outputs 7-8. It affects the control room or headphones if the main mix switch [38] is engaged. The main mix signals are off with the knob fully down, the "U" marking is unity gain, and fully up provides 10 dB of additional gain. This additional gain will typically never be needed, but once again, it's nice to know that it's there. The fader is stereo, as it affects both the left and right of the main mix equally. This is the ideal control to slowly bring down at the end of a song (or quickly in the middle of a song if the need ever arises). Owner's Manual 27
-
 1
1 -
2
-
3
-
4
-
5
-
6
-
7
-
8
-
9
-
10
-
11
-
12
-
13
-
14
-
15
-
16
-
17
-
18
-
19
-
20
-
21
-
 22
22 -
 23
23 -
 24
24 -
 25
25 -
 26
26 -
 27
27 -
 28
28 -
 29
29 -
 30
30 -
 31
31 -
 32
32 -
33
-
34
-
35
-
36
-
37
-
38
-
39
-
40
-
41
-
42
 |
 |
