Magellan MobileMapper 6 Getting Started Guide - Page 15
First-Time Use - for windows 7
 |
UPC - 000099060350
View all Magellan MobileMapper 6 manuals
Add to My Manuals
Save this manual to your list of manuals |
Page 15 highlights
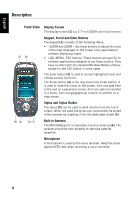
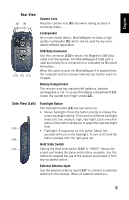
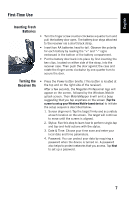
English First-Time Use Inserting Fresh Batteries • Turn the finger screw counter-clockwise a quarter turn and pull the battery door open. The battery door stays attached to the receiver via a short black strap. • Insert two AA batteries head-to-tail. Observe the polarity for each battery by reading the "+" and "-" signs embossed in the bottom of the battery compartment. • Put the battery door back into place by first inserting the two clips, located on either side of the strap, into the receiver case. Then push the door against the case and rotate the finger screw clockwise by one-quarter turn to secure the door. Turning the Receiver On • Press the Power button briefly. (This button is located at the top and on the right side of the receiver). After a few seconds, the Magellan Professional logo will appear on the screen, followed by the Windows Mobile splash screen. Then MobileMapper 6 will emit a beep suggesting that you tap anywhere on the screen (Tap the screen to set up your Windows Mobile-based device) to initiate the setup sequence described below: 1. Screen alignment: Tap the target firmly and accurately at each location on the screen. The target will continue to move until the screen is aligned. 2. Stylus: Run this step to learn how to perform single-tap and tap-and-hold actions with the stylus. 3. Date & Time: Choose your time zone and enter your local date and time parameters. 4. Password: You can protect your data by requiring a password when the device is turned on. A password also helps to protect networks that you access. Tap Next to set up a password. 7
-
 1
1 -
2
-
3
-
4
-
5
-
6
-
7
-
8
-
9
-
 10
10 -
 11
11 -
 12
12 -
 13
13 -
 14
14 -
 15
15 -
 16
16 -
 17
17 -
 18
18 -
 19
19 -
 20
20 -
21
-
22
-
23
-
24
-
25
-
26
-
27
-
28
 |
 |