Magic Chef MCSRE24S User Manual - Page 10
Installation Requirements
 |
View all Magic Chef MCSRE24S manuals
Add to My Manuals
Save this manual to your list of manuals |
Page 10 highlights
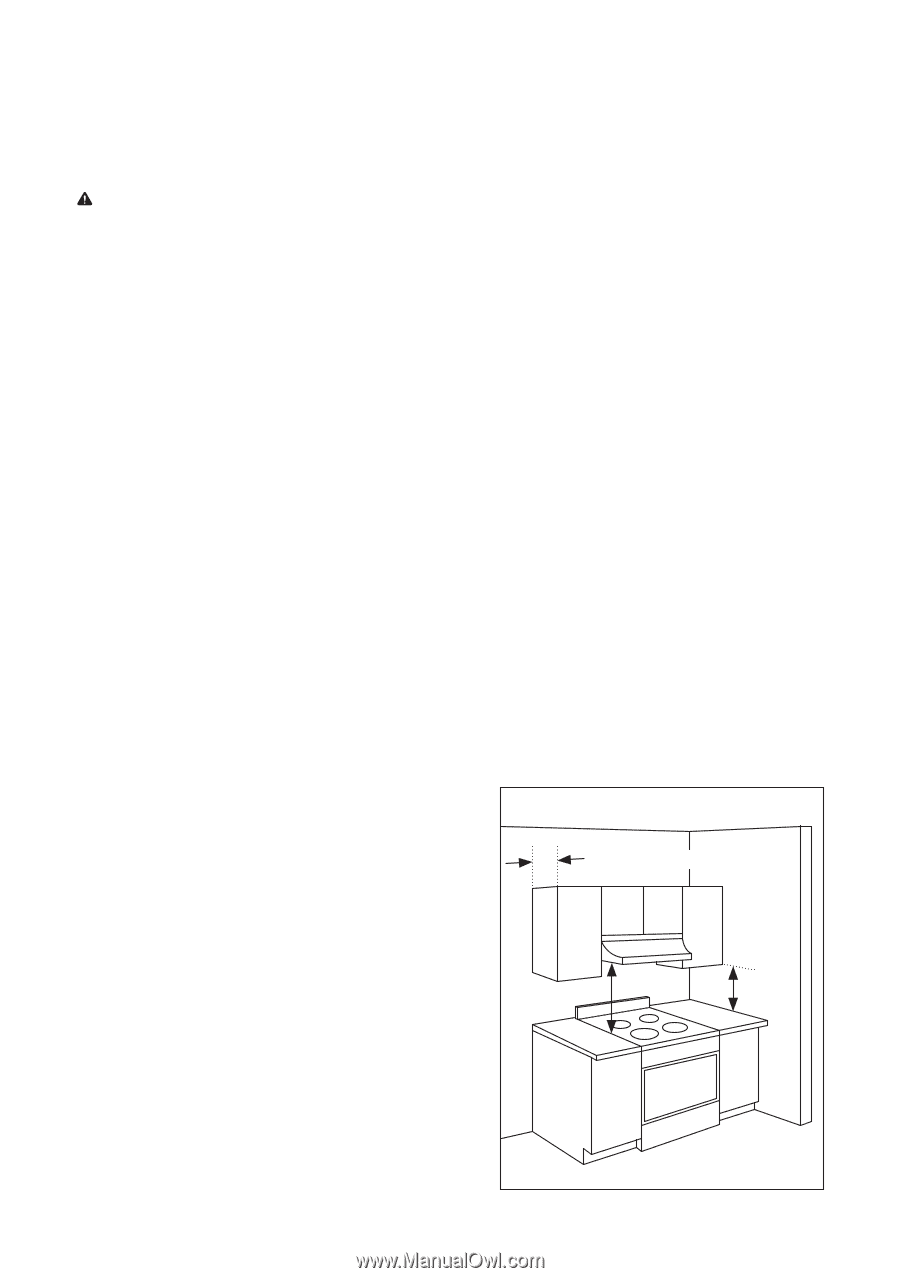
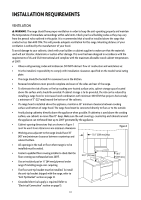
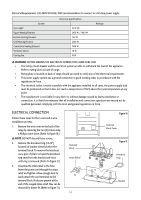
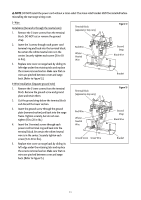
INSTALLATION Requirements ventilation WARNING: The range should have proper ventilation in order to keep the unit operating properly and maintain the temperature of immediate surroundings within safe limits. Check your local building codes as they may vary from the general rules outlined in this guide. It is recommended that a hood be installed above the range that is rated no less than 400 CFM. This will provide adequate ventilation for this range. Mounting distance of your ventilation is outlined by the manufacturer of your hood. To avoid damage to your cabinets, check with your builder or cabinet supplier to make sure that the materials used will not discolor, delaminate or sustain other damage. This oven has been designed in accordance with the requirements of UL and CSA International and complies with the maximum allowable wood cabinet temperatures of 200°F. • Observe all governing codes and ordinances. DO NOT obstruct flow of combustion and ventilation air. • It is the installer's responsibility to comply with installation clearances specified on the model/serial rating plate. • The range should be located for convenient use in the kitchen. • Recessed installations must provide complete enclosure of the sides and rear of the range. • To eliminate the risk of burns or fire by reaching over heated surface units, cabinet storage space located above the surface units should be avoided. If cabinet storage is to be provided, the risk can be reduced by installing a range hood or microwave hood combination with minimum 400 CFM that projects horizontally a minimum of 5" (127 mm) beyond the bottom of the cabinets. • If a range hood is installed above the appliance, maintain a 30" minimum clearance between cooking surface and bottom of range hood. The range hood must be connected directly to flues or to the outside. • Avoid placing cabinetry directly above the appliance when possible. If cabinetry is used above the cooking surface, use cabinets no more than 13" deep. Make sure the wall coverings, countertop and cabinets around the appliance can withstand heat up to 200°F generated by the appliance. • Cabinet opening dimensions that are shown in Figure 3 must be used. Given dimensions are minimum clearances. Figure 3 • Working areas adjacent to the range should have 18" (457 mm) minimum clearance between countertop and cabinet bottom. 13.0" (589 mm) Max • All openings in the wall or floor where range is to be installed must be sealed. • Contact a qualified floor covering installer to check that the floor covering can withstand at least 200°F. 30.0" (762 mm) 18.0" (457 mm) • Use an insulated pad or ¼" (64 mm) plywood under range if installing range over carpeting. • The floor anti-tip bracket must be installed. To install the anti-tip bracket shipped with the range, refer to "Anti-Tip Bracket" section on page 12. • Grounded electrical supply is required. Refer to "Electrical Connection" section on page 13. 10
-
 1
1 -
2
-
3
-
4
-
 5
5 -
 6
6 -
 7
7 -
 8
8 -
 9
9 -
 10
10 -
 11
11 -
 12
12 -
 13
13 -
 14
14 -
 15
15 -
16
-
17
-
18
-
19
-
20
-
21
-
22
-
23
-
24
-
25
-
26
-
27
-
28
-
29
-
30
-
31
-
32
-
33
-
34
-
35
-
36
-
37
-
38
-
39
-
40
-
41
-
42
-
43
-
44
-
45
-
46
-
47
-
48
-
49
-
50
-
51
-
52
 |
 |