Magic Chef MCSRE24S User Manual - Page 19
Burner Locations, Description Of Warning Lights, Setting Range Controls
 |
View all Magic Chef MCSRE24S manuals
Add to My Manuals
Save this manual to your list of manuals |
Page 19 highlights
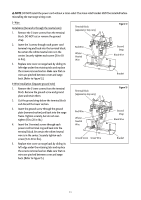
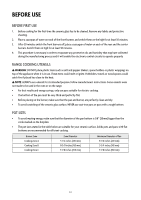
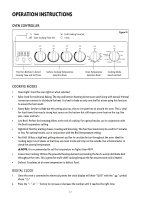
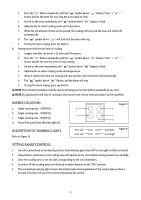
2. Press the " " button repeatedly until the " " symbol above " " flashes. Press " + " or " - " button and set the timer for how long the oven needs to cook. 3. Switch on the oven immediately, the " " symbol above " " begins to flash. 4. Adjust knobs to select cooking mode and temperature. 5. When the full amount of time set has passed, the cooking will stop and the oven will switch off automatically. 6. The " " symbol above " " will flash and the alarm will ring. 7. To stop the alarm ringing, press any button. B. Setting timer with the end time of cooking 1. Longest time that can be set is 23 hours and 59 minutes. 2. Press the " " button repeatedly until the " " symbol above " " flashes. Press " + " or " - " button and set the time for oven to stop cooking. 3. Switch on the oven immediately, the " " symbol above " " begins to flash. 4. Adjust knobs to select cooking mode and temperature. 5. When it reaches the time set, cooking will stop and the oven will switch off automatically. 6. The " " symbol above " " flashes, and the alarm will ring. 7. To stop the alarm ringing, press any button. NOTE: The set timer procedure could be seen by pressing any function button repeatedly at any time. NOTE: By adjusting the end time of cooking to the current time, the set timer procedure can be cancelled. BURNER LOCATIONS a. Single cooking zone - 2200W (1) b. Single cooking zone - 1200W (2) c. Single cooking zone - 1800W (1) d. Power & Residual Heat Warning Lights (4) DESCRIPTION OF WARNING LIGHTS Refer to Figure 16. b a Back Left Front Left Figure 15 b c d Back Right Figure 16 Front Right SETTING RANGE CONTROLS 1. Turn the control knob to the desired position. Heat intensity goes from LOW on the right to HIGH on the left. 2. Adjustment is continuous so the cooking zone will operate at any intermediate setting between low and high. 3. Once the cooking zone is hot, the LED corresponding to the zone illuminates. 4. To switch off the cooking zone turn the knob in either direction to the "OFF" position. 5. The residual heat warning light remains illuminated when the temperature of the ceramic glass surface is hot and will switch off once the surface temperature has cooled. 19
-
 1
1 -
2
-
3
-
4
-
5
-
6
-
7
-
8
-
9
-
10
-
11
-
12
-
13
-
 14
14 -
 15
15 -
 16
16 -
 17
17 -
 18
18 -
 19
19 -
 20
20 -
 21
21 -
 22
22 -
 23
23 -
 24
24 -
25
-
26
-
27
-
28
-
29
-
30
-
31
-
32
-
33
-
34
-
35
-
36
-
37
-
38
-
39
-
40
-
41
-
42
-
43
-
44
-
45
-
46
-
47
-
48
-
49
-
50
-
51
-
52
 |
 |