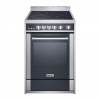
Magic Chef MCSRE24S User Manual - Page 15
Wire Installation Separate ground wire
 |
View all Magic Chef MCSRE24S manuals
Add to My Manuals
Save this manual to your list of manuals |
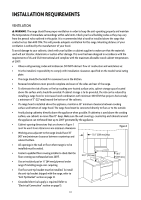
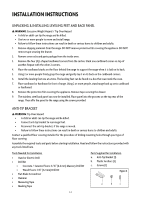
Page 15 highlights
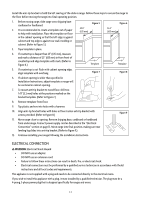
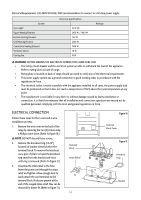
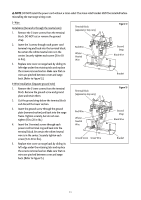
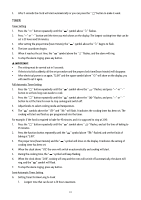
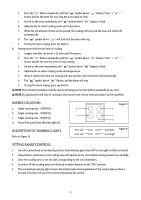
NOTE: Do not install the power cord without a strain relief. The strain relief bracket MUST be installed before reinstalling the rear range wiring cover. 3- Wire Installation (Ground is through the neutral wire) 1. Remove the 3 lower screws from the terminal block. Do not cut or remove the ground strap. 2. Insert the 3 screws through each power cord terminal ring and back into the terminal block. Be certain the white/neutral wire is in the center. Securely tighten each screw (35 to 50 in-lbs.). 3. Replace wire cover on range back by sliding its left edge under the retaining tabs and replace the screws removed earlier. Make sure that no wires are pinched between cover and range back. (Refer to Figure 12.) Terminal Block (appearance may vary) Red Wire White/ Neutral Wire Figure 12 Ground Strap Black Wire Bracket 4-Wire Installation (Separate ground wire) 1. Remove the 3 lower screws from the terminal block. Remove the ground screw and ground plate and retain them. 2. Cut the ground strap below the terminal block and discard the lower section. 3. Insert the ground screw through the ground plate (removed earlier) and back into the range frame. Tighten securely, but do not overtighten (15 to 20 in-lbs.) 4. Insert the 3 terminal screws through each power cord terminal ring and back into the terminal block. Be certain the white/neutral wire is in the center. Securely tighten each screw (35 to 50 in-lbs.). 5. Replace wire cover on range back by sliding its left edge under the retaining tabs and replace the screws removed earlier. Make sure that no wires are pinched between cover and range back. (Refer to Figure 13.) Terminal Block (appearance may vary) Red Wire White/ Neutral Wire Ground Screw Green Wire Figure 13 Ground Strap Black Wire Bracket 15
-
 1
1 -
2
-
3
-
4
-
5
-
6
-
7
-
8
-
9
-
 10
10 -
 11
11 -
 12
12 -
 13
13 -
 14
14 -
 15
15 -
 16
16 -
 17
17 -
 18
18 -
 19
19 -
 20
20 -
21
-
22
-
23
-
24
-
25
-
26
-
27
-
28
-
29
-
30
-
31
-
32
-
33
-
34
-
35
-
36
-
37
-
38
-
39
-
40
-
41
-
42
-
43
-
44
-
45
-
46
-
47
-
48
-
49
-
50
-
51
-
52
 |
 |
