Magnavox 50MV336X/F7 Owners Manual English - Page 23
Using Options menu
 |
View all Magnavox 50MV336X/F7 manuals
Add to My Manuals
Save this manual to your list of manuals |
Page 23 highlights
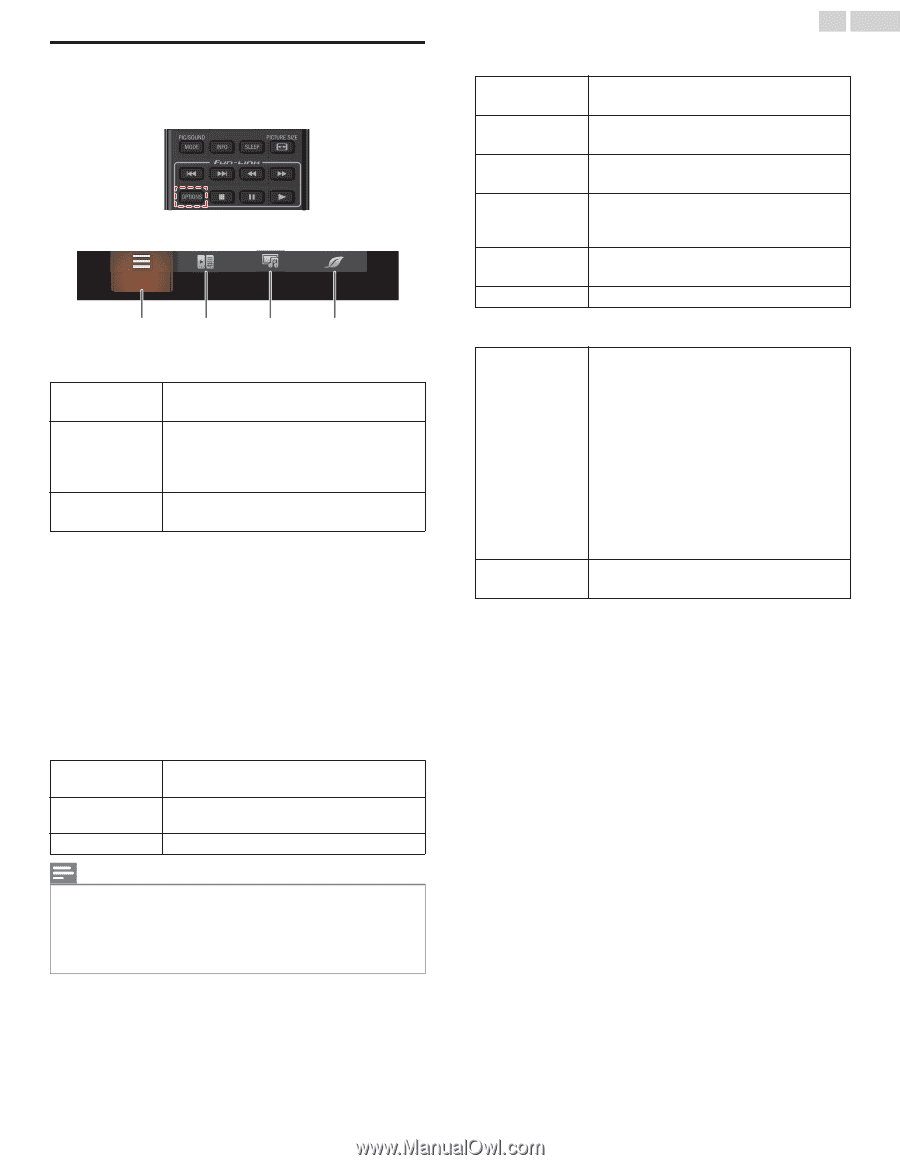
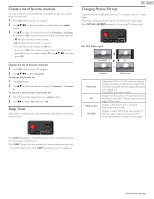
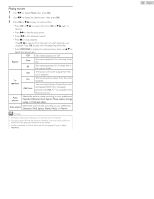
Using Options menu You can access to some TV settings directly by using OPTIONS. 1 Press OPTIONS to display options menu, then press OK. 2 Use H I J K to Select a desired setting, then press OK. Options a b c d a Options Following settings can be configured. Closed captions To choose the Closed captions display setting. Closed captions L p. 31 Digital audio language To Select the language according to your preference. (It differs depending on the program.) Digital audio language L p. 37 Mono/Stereo To Select an audio format. Mono/Stereo L p. 37 b Controls If you have our brand products such as Blu-ray disc player or DVD recorder that are compatible with HDMI-CEC functions, connect them to this unit via an HDMI cable so you can simply operate various items from this unit's Remote Control. Before you begin: select a device connected to an HDMI connection. L p. 20 You must set On in fun-Link control. L p. 34 Otherwise, LINK does not work even if you connected our brand devices to this unit. 1 Press OPTIONS to display options menu. 2 Use J K to Select Controls then press OK. 3 Use H I to Select the desired item, then press OK. Device-menu Controls the menu of your connected HDMICEC device. Device-contents Device-favorite Controls the top menu of your DVD or Blu-ray discs. Controls the pop-up menu of your Blu-ray discs. Note(s) ● Some of HDMI-CEC functions may not be available depending on your HDMI-CEC devices or discs. ● You must connect this unit to our brand HDMI-CEC devices and be sure its fun-Link (HDMI CEC) setting is also set to On. ● We do not guarantee 100% interoperability with other brands of HDMI link compliant devices. 23 .English c Picture and sound Following settings can be configured. Auto picture To set predefined picture mode. Picture L p. 28 Auto sound To set predefined sound mode. Sound L p. 30 Headphone volume To adjust headphone volume. Sound L p. 30 TV speakers To Select the audio output from the unit's speakers or not. Sound L p. 30 Picture format Setup To switch the TV aspect ratio. Changing Picture Format L p. 21 To display setup menu. d ECO settings Following settings can be configured. You can turn off the unit automatically when there is no operation for specified time. In spite of this setting, the unit goes into standby mode automatically if there is no signal input and no user operation for 15 minutes. Switch off timer Press H repeatedly to change the amount of time (increases the time by 30 minutes up to 240 minutes). Each press of I will decrease the time by 30 minutes. To cancel the timer, press I repeatedly until "0" is displayed. Light sensor To set light sensor On or off. Picture L p. 28 Continued on next page.
-
 1
1 -
2
-
3
-
4
-
5
-
6
-
7
-
8
-
9
-
10
-
11
-
12
-
13
-
14
-
15
-
16
-
17
-
 18
18 -
 19
19 -
 20
20 -
 21
21 -
 22
22 -
 23
23 -
 24
24 -
 25
25 -
 26
26 -
 27
27 -
 28
28 -
29
-
30
-
31
-
32
-
33
-
34
-
35
-
36
-
37
-
38
-
39
-
40
-
41
-
42
-
43
-
44
-
45
-
46
-
47
-
48
-
49
-
50
-
51
-
52
-
53
-
54
-
55
 |
 |