Marantz PMD340 User Guide - Page 8
Control I/o - cd player
 |
View all Marantz PMD340 manuals
Add to My Manuals
Save this manual to your list of manuals |
Page 8 highlights
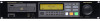
ENGLISH ENGLISH FRANCAIS FRANCAIS ESPANOL ESPANOL PORTUGUES PORTUGUES DEUTSCH DEUTSCH Name and Operation of Each Part . DIGITAL OUTPUT (SPDIF) (Optical digital output jack) (PMD331/PMD340 only) The digital signal from the compact disc that is being played is output through this jack. Connect a device with an optical digital input jack (such as recording equipment, an amp, or a D/A converter) to this jack through an optical cable. Notes: - Be careful not to bend the optical fiber cable. - Be sure to attach the connector caps when the OPTICAL connectors are not used. ⁄0 CONTROL I/O (Control I/O jack) (PMD331/PMD340 only) This is the remote control input/output connector. (See also page 18.) u TIME (Time display) Press this button to cycle the display D through the following displays: track remaining time → track elapsed time → disc remaining time → disc elapsed time → total disc playing time → back to "track remaining time", etc. i TEXT (CD text display) Press this button while a CD-TEXT disc is in the CD player to switch the character displayE from a time indicator display to a text display. Subsequent presses of this button will toggle through the available CD-TEXT displays. (See also page 16.) o 0 to 9 (Numeric buttons) These buttons are used to select tracks. When registering tracks for programmed playback, use these buttons to specify the tracks. ⁄1 POWER CONNECTOR Connect the power cord to this connector and connect the other end of the power cord to an AC outlet. !0 PRESET Press this button to put the player in Preset Setting mode. (See also page 17.) q POWER (Power button) Press this button once to turn the power on; press it again to turn the power off. !1 PROG (Program) Press this button to put the player in Program Registration mode. (See also page 11.) w DISC TRAY This is the disc tray on which the CD is placed. Press the button y to open and close the disc tray. e HEADPHONE (Headphone output jack) Plug headphones into this jack. The headphone volume level can be adjusted by using the headphone level r control. r LEVEL (Headphone volume level adjustment) This knob is used to adjust the headphone volume level. t LCD Display This displays the playing time, various playback modes, etc. y (Disc tray open/close) Press this button to open the disc tray w. Place a compact disc on the tray with the label facing up, and then press this button again to close the tray. ITALINO ITALINO NEDERLANDS NEDERLANDS SVENSKA SVENSKA DANSK DANSK 4
-
 1
1 -
2
-
 3
3 -
 4
4 -
 5
5 -
 6
6 -
 7
7 -
 8
8 -
 9
9 -
 10
10 -
 11
11 -
 12
12 -
 13
13 -
14
-
15
-
16
-
17
-
18
-
19
-
20
-
21
-
22
-
23
-
24
-
25
-
26
-
27
 |
 |
