Marantz VP-12S4 User Manual - Page 12
Remote Controller
 |
View all Marantz VP-12S4 manuals
Add to My Manuals
Save this manual to your list of manuals |
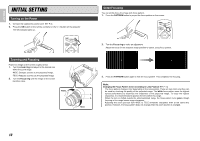
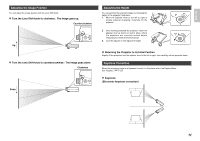
Page 12 highlights
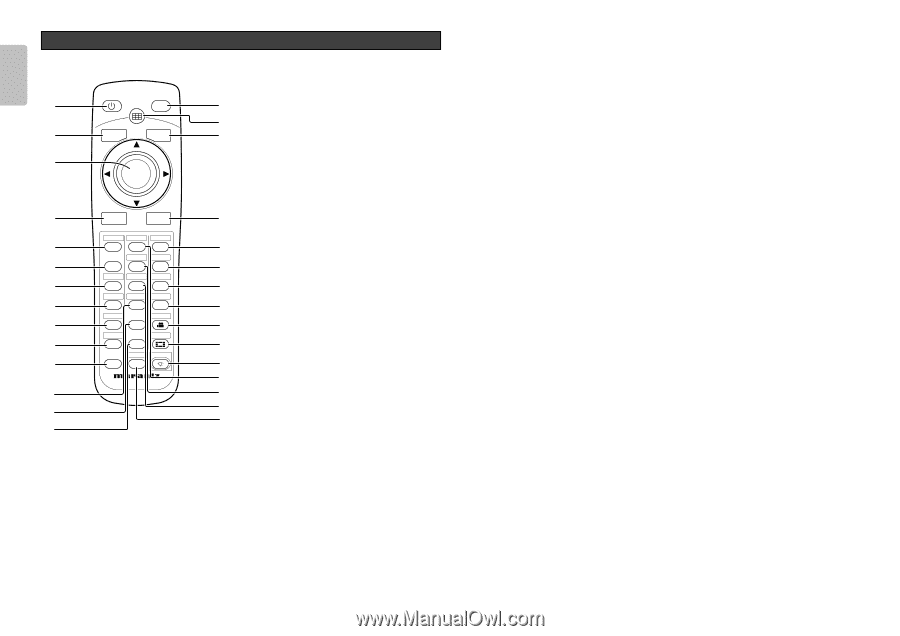
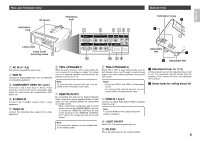
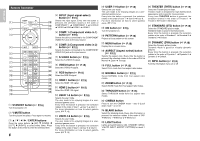
ENGLISH Remote Controller STANDBY ON a PATTERN I ¡5 ¡6 s V-MUTE MENU ¡7 d ENTER f INPUT ASPECT ¡8 g COMP. THEATER 1 THTR FULL F ¡9 h STANDARD NORMAL 2 STD N ™0 j S-VIDEO DYNAMIC ZOOM S DYN Z ™1 k VIDEO V USER THROUGH 1-3 T ™2 RGB CINEMA l RGB 4-6 ™3 HDMI BLANK ¡0 1 7-9 ™4 INFO. LIGHT ¡1 2 i ™5 ¡2 REMOTE CONTROLLER RC -12VPS4 ™6 ™7 ¡3 ™8 ™9 ¡4 a STANDBY button ( P.16) Turn the projector off. s V-MUTE button Turn the picture into black. Press again to resume. d 3 / 4 / 1 / 2 / ENTER buttons Press the cursor buttons (3 [UP], 4 [DOWN], 1 [LEFT], 2 [RIGHT]) to select menu items. Press the button at its center to enter the selected item. 6 f INPUT (Input signal select) button ( P.15) Selects the input signal. Every time the button is pressed, the selection rotates in the order of COMPONENT 1 ➔ COMPONENT 2 ➔ S-VIDEO ➔ VIDEO ➔ RGB ➔ HDMI 1 ➔ HDMI 2. g COMP. 1 (Component video in 1) button ( P.15) Selects the device connected to the COMPONENT VIDEO IN 1 jack as the input source. h COMP. 2 (Component video in 2) button ( P.15) Selects the device connected to the COMPONENT VIDEO IN 2 jack as the input source. j S-VIDEO button ( P.15) Select the S-VIDEO IN signal. k VIDEO button ( P.15) Select the VIDEO IN signal. l RGB button ( P.15) Select the RGB IN signal. ¡0 HDMI 1 button ( P.15) Select the HDMI 1 IN signal. ¡1 HDMI 2 button ( P.15) Select the HDMI 2 IN signal. ¡2 USER 1-3 button ( P.18) Selects the user mode. The user mode is for enjoying images at a userselected gamma curve. Every time the button is pressed, the selection rotates in the order of User 1 ➔ User 2 ➔ User 3. For more information on how to select gamma curve. ( P.19) ¡3 USER 4-6 button ( P.18) Selects the user mode. The user mode is for enjoying images at a userselected gamma curve. Every time the button is pressed, the selection rotates in the order of User 4 ➔ User 5 ➔ User 6. For more information on how to select gamma curve. ( P.19) ¡4 USER 7-9 button ( P.18) Selects the user mode. The user mode is for enjoying images at a userselected gamma curve. Every time the button is pressed, the selection rotates in the order of User 7 ➔ User 8 ➔ User 9. For more information on how to select gamma curve. ( P.19) ¡5 ON button ( P.15) Turn the projector on. ¡6 PATTERN button ( P.10) Projects a focus pattern on the screen. ¡7 MENU button ( P.18) Display the on-screen menu. ¡8 ASPECT (Aspect select) button ( P.15) Selects the aspect ratio. Every time the button is pressed, the selection rotates in the order of Full ➔ Normal ➔ Zoom ➔ Through. ¡9 FULL button ( P.15) Select FULL mode from four aspect ratio modes. ™0 NORMAL button ( P.15) Select NORMAL mode from four aspect ratio modes. ™1 ZOOM button ( P.15) Select ZOOM mode from four aspect ratio modes. ™2 THROUGH button ( P.15) Select THROUGH mode from four aspect ratio modes. ™3 CINEMA button Press to turn the CINEMA mode - auto 3-2 pull down mode - on or off. ™4 BLANK button Select the blanking mode. Every time the button is pressed, the selection rotates in the order of OFF ➔ Memory 1 ➔ Memory 2 ➔ Memory 3. ™5 LIGHT button Lights up backlit buttons (ON, STANDBY, MENU, V-MUTE, INPUT, ASPECT, PATTERN) for about 7 sec. ™6 THEATER (THTR) button ( P.18) Select the Theater picture mode. Theater mode is designed for high fidelity black appearance and is good for movie pictures. Every time THEATER button is pressed, the selection rotates in the order of Theater 1 ➔ Theater 2 ➔ Theater 3 ➔ Default. ™7 STANDARD (STD) button ( P.18) Select the STANDARD picture mode. Standard mode is good for normal pictures. Every time the button is pressed, the selection rotates in the order of Standard 1 ➔ Standard 2 ➔ Standard 3 ➔ Default. ™8 DYNAMIC (DYN) button ( P.18) Select the Dynamic picture mode. Dynamic mode is good for visually dynamic pictures. Every time the button is pressed, the selection rotates in the order of Dynamic 1 ➔ Dynamic 2 ➔ Dynamic 3 ➔ Default. ™9 INFO. button ( P.24) Turn the information menu on or off.
-
 1
1 -
2
-
3
-
4
-
5
-
6
-
 7
7 -
 8
8 -
 9
9 -
 10
10 -
 11
11 -
 12
12 -
 13
13 -
 14
14 -
 15
15 -
 16
16 -
 17
17 -
18
-
19
-
20
-
21
-
22
-
23
-
24
-
25
-
26
-
27
-
28
-
29
-
30
-
31
-
32
-
33
-
34
-
35
-
36
-
37
 |
 |