Marantz VP-12S4 User Manual - Page 18
Installation - mount
 |
View all Marantz VP-12S4 manuals
Add to My Manuals
Save this manual to your list of manuals |
Page 18 highlights
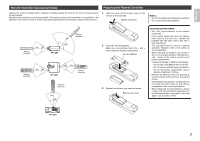
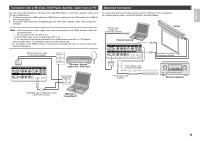
ENGLISH Screen size (vertical) Lens shift range Screen size (vertical) Lens shift range INSTALLATION Recommended Setting ❖ Installing on a tabletop Screen Screen upper end Range from light axis to upper end Light axis (center) Installing level Height from installing level to light axis Screen lower end Projection distance lens head ❖ Mounting on the ceiling Screen Screen upper end Range from light axis to upper end Light axis (center) Height from installing level to light axis Screen lower end Projection distance lens head CAUTION - For ceiling installation, consult with Marantz authorized dealer. - Do not look into the lens when the projector is turned on. It could damage your eyesight. 12
-
 1
1 -
2
-
3
-
4
-
5
-
6
-
7
-
8
-
9
-
10
-
11
-
12
-
 13
13 -
 14
14 -
 15
15 -
 16
16 -
 17
17 -
 18
18 -
 19
19 -
 20
20 -
 21
21 -
 22
22 -
 23
23 -
24
-
25
-
26
-
27
-
28
-
29
-
30
-
31
-
32
-
33
-
34
-
35
-
36
-
37
 |
 |

12
ENGLISH
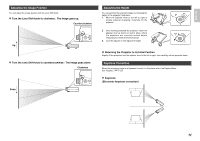
❖
Mounting on the ceiling
CAUTION
–
For ceiling installation, consult with Marantz authorized dealer.
–
Do not look into the lens when the projector is turned on.
It could damage your eyesight.
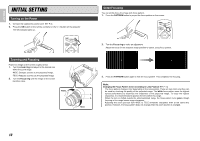
INSTALLATION
❖
Installing on a tabletop
Recommended Setting
Screen
Screen size (vertical)
Screen upper end
Range from light axis to upper end
Light axis (center)
Height from installing
level to light axis
Screen lower end
Projection distance
lens head
Lens shift range
Screen
Screen upper end
Range from light axis to upper
end
Light axis (center)
Height from installing level to light axis
Installing level
Screen size (vertical)
Screen lower end
Projection distance
lens head
Lens shift
range