Meade ETX125 Instruction Manual - Page 4
Quick-start Guide - observer telescope
 |
View all Meade ETX125 manuals
Add to My Manuals
Save this manual to your list of manuals |
Page 4 highlights
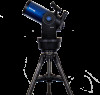
QUICK-START GUIDE This Quick Start Guide demonstrates how to install the batteries and eyepiece, and how to observe using the AutoStar Arrow keys. If you wish to try out AutoStar's "Go To" capabilities, check out the list of page references at the bottom of the following page 2 Ạ ạ Remove the ETX® telescope from its packaging and place it on a sturdy surface. Place the ETX on its side and remove the battery compartment cover (A) from the underside of the drive base. Insert eight (user-supplied) AA-size batteries into the battery compartment (B) oriented as shown in the battery compartment. Replace the cover and return the telescope to an upright position (if you wish to attach the telescope to the deluxe field tripod, see page 12). Ả ả ầ ...and the other end of the coiled cord into the coiled cord port at the bottom of AutoStar handbox (H), as shown above. Ẩ ẩ Tighten (to a "firm feel" only, do not overtighten) the vertical lock (I) and the horizontal lock (J). See page 7 and 8 for more infor- Ấ mation. Place the 26mm eyepiece (C) into the eyepiece holder on the telescope and tighten the attachment thumbscrew (D, not visible in photo) to a "firm feel" only. See page 7, for more information. Remove the dust cover (E) from the end of the telescope tube. Ầ ấ Make sure that the computer control panel power switch (F) is in the OFF position. Remove the AutoStar® handbox and the coiled cord from the packing materials. Plug one end of the cord into the HBX port (G). 4 ấ Flip the Power Switch (F) on the computer control panel to the ON position. A version screen briefly appears, followed by "Welcome to AutoStar." The screen displays "Press 0 to align or press Mode for Menu."
-
 1
1 -
 2
2 -
 3
3 -
 4
4 -
 5
5 -
 6
6 -
 7
7 -
 8
8 -
 9
9 -
 10
10 -
11
-
12
-
13
-
14
-
15
-
16
-
17
-
18
-
19
-
20
-
21
-
22
-
23
-
24
-
25
-
26
-
27
-
28
-
29
-
30
-
31
-
32
-
33
-
34
-
35
-
36
-
37
-
38
-
39
-
40
-
41
-
42
-
43
-
44
-
45
-
46
-
47
-
48
-
49
-
50
-
51
-
52
-
53
-
54
-
55
-
56
-
57
-
58
-
59
-
60
 |
 |
