Memorex 32023220 Manual - Page 8
English
 |
UPC - 034707032200
View all Memorex 32023220 manuals
Add to My Manuals
Save this manual to your list of manuals |
Page 8 highlights
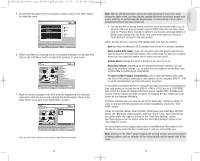
32023220_SG 050207.qxp:32023292_QIG_LO.qxp 8/3/07 11:48 AM Page 14 English To make a Data DVD, follow the same steps, but click on "Make Data DVD" instead. These buttons can also be found in the Favorites area. For the best compatibility with Data DVD's, do not use the multisession option. Due to specification limitations, the multiple sessions of Data DVD discs are not generally able to be read in Windows 98SE, Me or 2000 in most cases. Nero Express 7 Essentials starts automatically and the compilation window to Add your data opens. 2. In the window, click on the "Add" button to open the window for selecting files. 3. Select the desired files and click on the "Add" button to transfer them to the compilation. 4. Once you have finished adding files, click on the "Close" button to close the window and return to the Nero Express 7 Essentials screen. 5. All the files you have added appear in the compilation window. Click on the "Next" button to advance to the burning window. 6. Before burning the disc, make the final settings: Current Recorder: Select the Memorex DVD recorder from the list of connected recorders. Disc name: Give the disc a title if you like. Number of copies: Select the number of copies to be burned. Verify data on disc after burning: if this checkbox is selected, the program verifies that the burned data on the disc is identical to the original data once the disc is recorded. This guarantees that the burned data will function as desired, but this step adds time to the full recording process. Allow files to be added later (multisession disc): If this checkbox is selected, a multi-session disc is created, allowing you to add further sessions later. If the checkbox is not selected, the disc is finalized and no more burning is possible. Note: Clicking on the "More" button on the left side expands the burning window and offers additional setting options such as selection of the Write method, Writing speed and Simulation of the burning process. 7. Click on the "Burn" button to start burning the disc. The burning process starts and you will see information about the current status. 14 8. "Burn process completed successfully at...", Click on the "OK" button and then on the "Next" button to advance to the selection window. 9. Select the desired option, the "More" button or close Nero Express 7 Essentials by clicking on the button. b. Make an Audio CD An audio CD contains music files that can be played back in nearly any CD or DVD player. 1. Start Nero StartSmart Icon click on "Make Audio CD." ; select the "Audio" category and 2. In the window, click on the "Add" button to open the window for selecting files. 3. Select the desired files and click on the "Add" button to transfer them to the compilation. 4. Once you have finished adding files, click on the "Close" button to close the window and return to the Nero Express 7 Essentials screen. 5. All the files you have added appear in the compilation window. Click on the "Next" button to advance to the burning window. 6. Before burning the disc, make the final settings: Current Recorder: Select the Memorex DVD recorder from the list of connected recorders. Title (CD TEXT): If the recorder supports the writing of CD TEXT, you can enter the title of the CD here. The title may not be longer than 64 characters. Artist (CD TEXT): If the recorder supports the writing of CD TEXT, you can enter the artist's name for the CD here. The name may not be longer than 64 characters. Number of copies: Select the number of copies to be burned. Verify data on disc after burning: if this checkbox is selected, the program verifies that the burned data on the disc is identical to the original content once the disc is recorded. This guarantees that the burned content will function as desired, but this step adds time to the full recording process. Note: Clicking on the "More" button on the left side expands the burning window and offers additional setting options such as selection of the Write method, Writing speed and Simulation of the burning process. 7. Click on the "Burn" button to start burning the disc. 15
-
 1
1 -
2
-
 3
3 -
 4
4 -
 5
5 -
 6
6 -
 7
7 -
 8
8 -
 9
9 -
 10
10 -
 11
11 -
 12
12 -
 13
13 -
14
-
15
-
16
-
17
-
18
-
19
-
20
-
21
-
22
-
23
-
24
-
25
-
26
-
27
-
28
-
29
-
30
-
31
-
32
-
33
-
34
-
35
-
36
-
37
-
38
-
39
-
40
-
41
-
42
-
43
-
44
-
45
 |
 |
