Motorola DS6707-DP20411ZZR Reference Guide - Page 23
Connecting Power (if required), Configuring the Digital Imager Scanner, Desk Mount - user manual
 |
View all Motorola DS6707-DP20411ZZR manuals
Add to My Manuals
Save this manual to your list of manuals |
Page 23 highlights
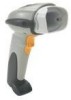
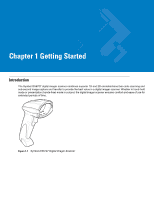
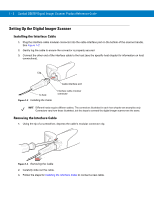
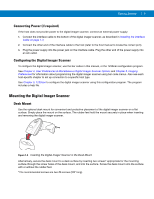
Getting Started 1 - 4 Connecting Power (if required) If the host does not provide power to the digital imager scanner, connect an external power supply: 1. Connect the interface cable to the bottom of the digital imager scanner, as described in Installing the Interface Cable on page 1-3. 2. Connect the other end of the interface cable to the host (refer to the host manual to locate the correct port). 3. Plug the power supply into the power jack on the interface cable. Plug the other end of the power supply into an AC outlet. Configuring the Digital Imager Scanner To configure the digital imager scanner, use the bar codes in this manual, or the 123Scan configuration program. See Chapter 4, User Preferences & Miscellaneous Digital Imager Scanner Options and Chapter 5, Imaging Preferences for information about programming the digital imager scanner using bar code menus. Also see each host-specific chapter to set up connection to a specific host type. See Chapter 9, 123Scan to configure the digital imager scanner using this configuration program. The program includes a help file. Mounting the Digital Imager Scanner Desk Mount Use the optional desk mount for convenient and protective placement of the digital imager scanner on a flat surface. Simply place the mount on the surface. The rubber feet hold the mount securely in place when inserting and removing the digital imager scanner. Figure 1-4 Inserting the Digital Imager Scanner in the Desk Mount Alternatively, secure the desk mount to a desk surface by inserting two screws* appropriate for the mounting surface through the screw holes of the desk mount, and into the surface. Screw the desk mount onto the surface with or without the rubber feet. *The recommended screws are two #6 screws (5/8" long).
-
 1
1 -
2
-
3
-
4
-
5
-
6
-
7
-
8
-
9
-
10
-
11
-
12
-
13
-
14
-
15
-
16
-
17
-
 18
18 -
 19
19 -
 20
20 -
 21
21 -
 22
22 -
 23
23 -
 24
24 -
 25
25 -
 26
26 -
 27
27 -
 28
28 -
29
-
30
-
31
-
32
-
33
-
34
-
35
-
36
-
37
-
38
-
39
-
40
-
41
-
42
-
43
-
44
-
45
-
46
-
47
-
48
-
49
-
50
-
51
-
52
-
53
-
54
-
55
-
56
-
57
-
58
-
59
-
60
-
61
-
62
-
63
-
64
-
65
-
66
-
67
-
68
-
69
-
70
-
71
-
72
-
73
-
74
-
75
-
76
-
77
-
78
-
79
-
80
-
81
-
82
-
83
-
84
-
85
-
86
-
87
-
88
-
89
-
90
-
91
-
92
-
93
-
94
-
95
-
96
-
97
-
98
-
99
-
100
-
101
-
102
-
103
-
104
-
105
-
106
-
107
-
108
-
109
-
110
-
111
-
112
-
113
-
114
-
115
-
116
-
117
-
118
-
119
-
120
-
121
-
122
-
123
-
124
-
125
-
126
-
127
-
128
-
129
-
130
-
131
-
132
-
133
-
134
-
135
-
136
-
137
-
138
-
139
-
140
-
141
-
142
-
143
-
144
-
145
-
146
-
147
-
148
-
149
-
150
-
151
-
152
-
153
-
154
-
155
-
156
-
157
-
158
-
159
-
160
-
161
-
162
-
163
-
164
-
165
-
166
-
167
-
168
-
169
-
170
-
171
-
172
-
173
-
174
-
175
-
176
-
177
-
178
-
179
-
180
-
181
-
182
-
183
-
184
-
185
-
186
-
187
-
188
-
189
-
190
-
191
-
192
-
193
-
194
-
195
-
196
-
197
-
198
-
199
-
200
-
201
-
202
-
203
-
204
-
205
-
206
-
207
-
208
-
209
-
210
-
211
-
212
-
213
-
214
-
215
-
216
-
217
-
218
-
219
-
220
-
221
-
222
-
223
-
224
-
225
-
226
-
227
-
228
-
229
-
230
-
231
-
232
-
233
-
234
-
235
-
236
-
237
-
238
-
239
-
240
-
241
-
242
-
243
-
244
-
245
-
246
-
247
-
248
-
249
-
250
-
251
-
252
-
253
-
254
-
255
-
256
-
257
-
258
-
259
-
260
-
261
-
262
-
263
-
264
-
265
-
266
-
267
-
268
-
269
-
270
-
271
-
272
-
273
-
274
-
275
-
276
-
277
-
278
-
279
-
280
-
281
-
282
-
283
-
284
-
285
-
286
-
287
-
288
-
289
-
290
-
291
-
292
-
293
-
294
-
295
-
296
-
297
-
298
-
299
-
300
-
301
-
302
-
303
-
304
-
305
-
306
-
307
-
308
-
309
-
310
-
311
-
312
-
313
-
314
-
315
-
316
-
317
-
318
-
319
-
320
-
321
-
322
-
323
-
324
-
325
-
326
-
327
-
328
-
329
-
330
-
331
-
332
-
333
-
334
-
335
-
336
-
337
-
338
-
339
-
340
-
341
-
342
-
343
-
344
-
345
-
346
-
347
-
348
-
349
-
350
-
351
-
352
-
353
-
354
-
355
-
356
-
357
-
358
-
359
-
360
-
361
-
362
-
363
-
364
-
365
-
366
-
367
-
368
-
369
-
370
-
371
-
372
-
373
-
374
-
375
-
376
-
377
-
378
-
379
-
380
-
381
-
382
-
383
-
384
-
385
-
386
-
387
-
388
-
389
-
390
-
391
-
392
-
393
-
394
-
395
-
396
-
397
-
398
-
399
-
400
-
401
-
402
 |
 |
