Motorola mbp36s User Guide - Page 10
Getting Started
 |
View all Motorola mbp36s manuals
Add to My Manuals
Save this manual to your list of manuals |
Page 10 highlights
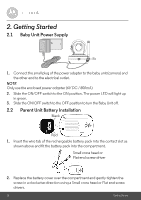
2. Getting Started 2.1 Baby Unit Power Supply 1. Connect the small plug of the power adapter to the baby unit (camera) and the other end to the electrical outlet. NOTE Only use the enclosed power adapter (6V DC / 800mA). 2. Slide the ON/OFF switch to the ON position. The power LED will light up in green. 3. Slide the ON/OFF switch to the OFF position to turn the Baby Unit off. 2.2 Parent Unit Battery Installation Black Red 1. Insert the wire tab of the rechargeable battery pack into the contact slot as shown above and fit the battery pack into the compartment. Small cross head or Flat end screw driver 2. Replace the battery cover over the compartment and gently tighten the screw in a clockwise direction using a Small cross head or Flat end screw drivers. 10 Getting Started
-
 1
1 -
2
-
3
-
4
-
 5
5 -
 6
6 -
 7
7 -
 8
8 -
 9
9 -
 10
10 -
 11
11 -
 12
12 -
 13
13 -
 14
14 -
 15
15 -
16
-
17
-
18
-
19
-
20
-
21
-
22
-
23
-
24
-
25
-
26
-
27
-
28
-
29
-
30
-
31
 |
 |
