NEC 42XP10 42PX10 50XP10 60XP10 user's manual - Page 20
English-17
 |
UPC - 805736019414
View all NEC 42XP10 manuals
Add to My Manuals
Save this manual to your list of manuals |
Page 20 highlights
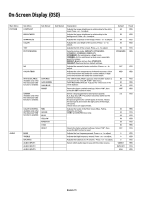
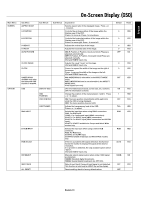
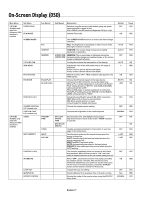
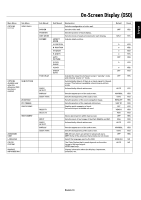
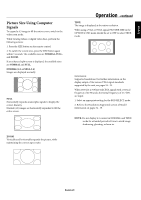
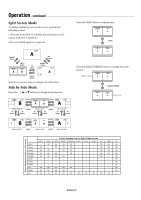
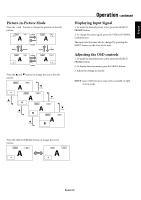
On-Screen Display (OSD) Main Menu Sub Menu OPTION2 Available only when the Advanced OSD function is enabled. POWER SAVE FILM MODE SCREEN SAVER COOLING FAN SIDE MASK PICTURE SIZE DVI MODE PROTOCOL SET CLOSED CAPTION U.S. models only CAPTION CONT U.S. models only OPTION3 Available only when the Advanced OSD function is enabled. TIMER INPUT DETECT CONTROL LOCK IR REMOTE LOOP OUT MONITOR ID RS232C CONTROL Sub Menu2 Sub Menu3 Explanation Sets how long the monitor waits before going into power save mode after a signal is lost. VGA, RGBHV, and DVI input and Separate HV Sync. only. Selects Film mode. Use SCREEN SAVER functions to reduce the risk of image retention. PLE PLE: The brightness is decreased in order of Lock mode. (the higher number is darker) ORBITER ORBITER: The screen image moves and is slightly squeezed or expanded. INVERSE WORKING TIME INVERSE: The screen image is displayed alternately /WAITING TIME between positive image and negative image, or the screen image is displayed full white. Cooling fan reduces the temperature of the display. Adjusts the color of the side mask when a 4:3 image is displayed. Press + button, the bar will become lighter. Press - button, the bar will become darker. When it is set to "OFF", TRUE of picture size appears only RGB signals. PLUG/PLAY BLACK LEVEL Choose the DVI mode based on the input device connected via DVI connector and set the black level. When a PC or similar equipment is connected, the PLUG/ PLAY setting should be "DVI-PC" and the BLACK LEVEL setting should be "LOW". When a DVD player or similar equipment is connected, PLUG/PLAY setting should be "DVI-HD" and the BLACK LEVEL setting should be "HIGH". Sets protocol setting for use with RS-232C connection. OFF: When NEC protocol is used (normal). ON: When special protocol is used. Consult dealer for details of protocol. Choose the closed caption setting. Chooses the brightness of the closed captions. PRESENT TIME TIMER INPUT VOLUME DAYLIGHT SAVING TIME DAY/HOUR/ MINUTE Sets the date, time, and daylight saving region. Day & time must be set in order for the "TIMER" function to operate. Creates a working schedule for the monitor to use. See page 24 for instructions. Sets the input mode and the sound volume when the power is turned on. LAST: Uses the input that was last selected when the power was turned off. MULTI to DVI: Fixed input mode. AUTO: Automatically searches for the input signal. PRIORITY: Sets which input has priority when using the AUTO setting. This function completely locks out access to all Control Key functions. When this item is set to "ON", the front panel is disabled as soon as the on-screen menu goes off. When "OFF", prevents the monitor from being controlled by wireless remote controller. The remote becomes ineffective disabled as soon as the on-screen menu goes off. To return to normal operation, press the "DISPLAY" button on the remote controller for 5 seconds. Change the loop out setting. Sets the Monitor ID to a number from 1-26 and or to ALL. Selects the mode of the monitor when using the RS-232C daisy chain. Default OFF ON AUTO AUTO1 OFF AUTO 3 ON DVI-PC LOW OFF OFF NORMAL OFF OFF LAST LAST OFF ON OFF ALL NORMAL Reset YES YES YES YES YES NO YES YES NO NO YES YES YES NO NO YES YES YES YES YES YES YES YES English-17
-
 1
1 -
2
-
3
-
4
-
5
-
6
-
7
-
8
-
9
-
10
-
11
-
12
-
13
-
14
-
 15
15 -
 16
16 -
 17
17 -
 18
18 -
 19
19 -
 20
20 -
 21
21 -
 22
22 -
 23
23 -
 24
24 -
 25
25 -
26
-
27
-
28
-
29
-
30
-
31
-
32
-
33
-
34
-
35
-
36
-
37
-
38
-
39
-
40
-
41
-
42
-
43
-
44
 |
 |