NEC EX231W MultiSync EX231W-BK : user manual - Page 8
Quick Start - panel
 |
View all NEC EX231W manuals
Add to My Manuals
Save this manual to your list of manuals |
Page 8 highlights
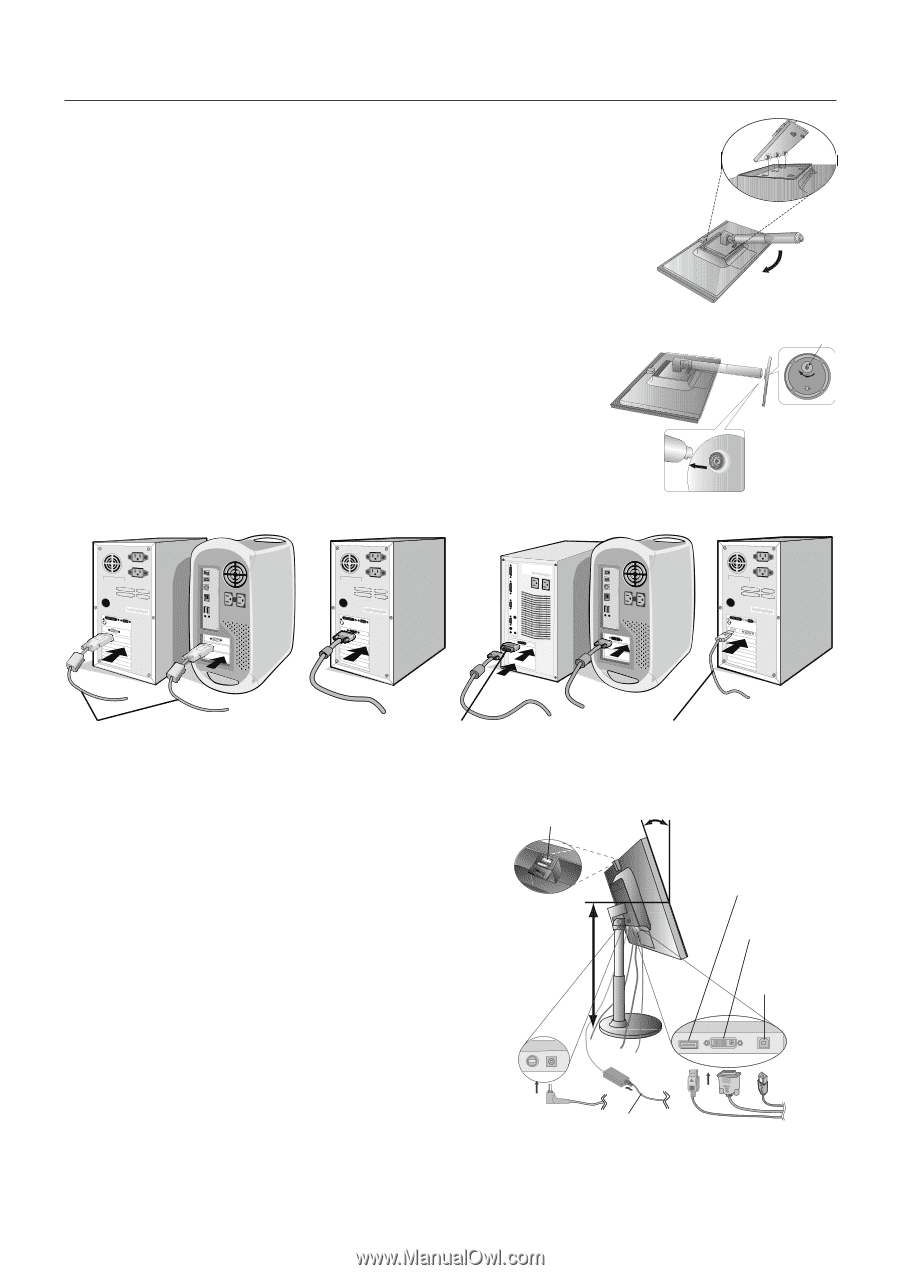
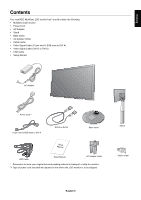
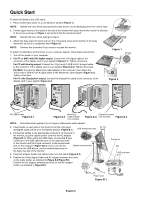
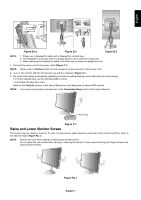
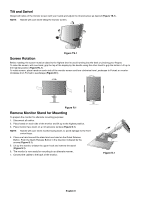
Quick Start To attach the Base to the LCD stand: 1. Place monitor face down on a non-abrasive surface (Figure 1). NOTE: Handle with care when placing monitor face down to avoid damaging the front control keys. 2. Put the upper hooks of the stand in the slot of the monitor then push stand into monitor in direction of the arrow as shown in Figure 1 and confirm that the stand is locked. NOTE: Handle with care when pulling the stand. 3. Attach the base stand to stand and turn the connecting screw at the bottom of the base stand fully so that it is completely fixed (Figure 2). NOTE: Reverse this procedure if you need to re-pack the monitor. To attach the MultiSync LCD monitor to your computer system, follow these instructions: 1. Turn off the power to your computer. 2. For PC or MAC with DVI digital output: Connect the DVI signal cable to the connector of the display card in your system (Figure A.1). Tighten all screws. For PC with Analog output: Connect the 15-pin mini D-SUB to DVI-A signal cable to the connector of the display card in your system (Figure A.2). Tighten all screws. For MAC: Connect the Macintosh cable adapter to the computer, then attach the 15-pin mini D-SUB to DVI-A signal cable to the Macintosh cable adapter (Figure A.3). Tighten all screws. For PC with DisplayPort output: Connect the DisplayPort cable to the connector of the display card in your system (Figure A.4). Figure 1 Figure 2 Screws DVI signal cable Figure A.1 Macintosh Figure A.2 Cable Adapter (not included) DisplayPort cable Figure A.3 (not included) Figure A.4 NOTE: Some Macintosh systems do not require a Macintosh cable adapter. 3. Place hands on each side of the monitor to tilt the LCD panel 30-degree angle and lift up to the highest position (Figure B.1). USB downstream port 4. Connect all cables to the appropriate connectors on the back of the monitor, plug the captive power cord into the AC adapter (Figure B.1). When using the USB cable, connect the B type connector to the USB upstream port on the right back side of the monitor and the A type connector to the downstream port on the computer (Figure B.1a). If you can use the Highest stand position cord from the USB device, use the downstream ports on the back-Top side of the monitor. 5. Place AC adapter holder and cable holder onto the stand (Figure B.2). 6. Position the Video Signal Cable and AC adapter between the holes on the cable holder, as indicated in Figure B.2/Figure B.3. Position the AC adapter between the holes on the AC adapter holder, as indicated in Figure B.2. 30˚ Tilt DisplayPort DVI USB upstream port Power Cord Figure B.1 English-6
-
 1
1 -
2
-
 3
3 -
 4
4 -
 5
5 -
 6
6 -
 7
7 -
 8
8 -
 9
9 -
 10
10 -
 11
11 -
 12
12 -
 13
13 -
14
-
15
-
16
-
17
-
18
-
19
-
20
-
21
 |
 |