NEC LT154 User Manual
NEC LT154 - MultiSync UXGA DLP Projector Manual
 |
UPC - 050927232534
View all NEC LT154 manuals
Add to My Manuals
Save this manual to your list of manuals |
NEC LT154 manual content summary:
- NEC LT154 | User Manual - Page 1
MultiSync LT156/LT155/LT154 LCD Projector User's Manual English E-1 MENU SELECT ENTER CANCEL SOURCE AUATDOJUST ONS/TAND BY PCACCCASRETSDASTPUOSWER - NEC LT154 | User Manual - Page 2
manual carefully before using your NEC MultiSync LT156/LT155/LT154 Projector and keep the manual handy for future reference. Your serial number is located under the name plate label on the bottom of your MultiSync LT156/LT155/LT154. Record it here: CAUTION To turn off main power REMOTE CONTROL MODEL: - NEC LT154 | User Manual - Page 3
lamp bulb may shatter, and pieces of glass may be scattered in the lamp case. Do not touch them as the pieces of glass may cause injury. If this happens, contact your NEC dealer for lamp replacement. • Allow a minimum of ONE minute to elapse after turning off the projector. Then disconnect the power - NEC LT154 | User Manual - Page 4
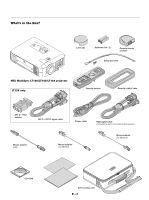
the Box E-6 Getting to Know Your MultiSync LT156/LT155/LT154 Projector E-7 Front / Side Features E-7 Attaching the lens cap E-7 Rear / Side Features E-8 Top Features E-9 Terminal Panel Features E-10 Remote Control Features E-11 Remote Control Battery Installation E-13 Operating Range E-13 - NEC LT154 | User Manual - Page 5
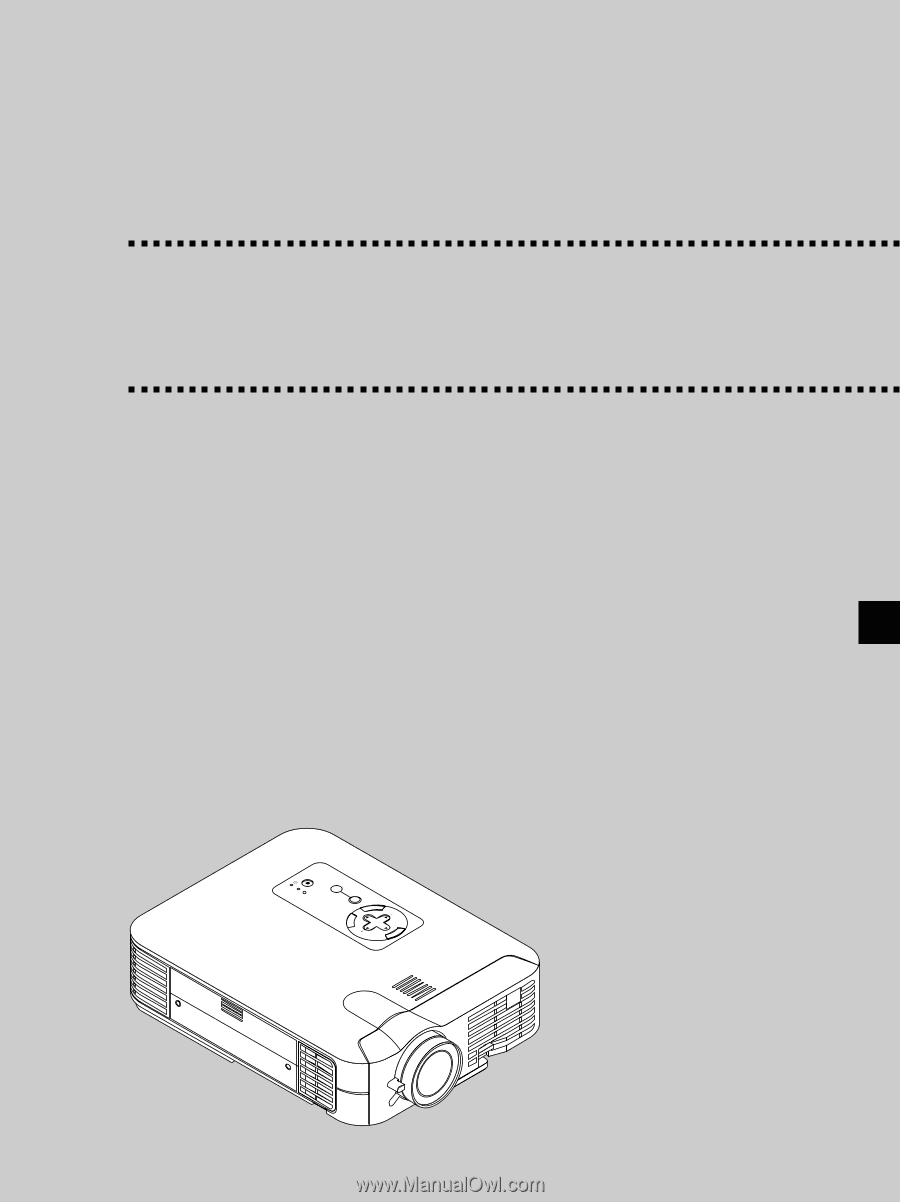
MultiSync LT156/LT155/LT154 Projector The MultiSync LT156/LT155/LT154 is one of the very best projectors available today. The MultiSync LT156/LT155/LT154 few minutes now to review the user's manual. This may save you time later on. At the beginning of each section of the manual you'll find an - NEC LT154 | User Manual - Page 6
if you ever need to ship your MultiSync LT156/LT155/LT154 Projector. SOURCE AUATDOJUST ON/STAND BY PCACCACSERTSDASTPUOSWER NEC MultiSync LT156/LT155/LT154 projector LT156 only CANCEL SELECT ENTER MENU Lens cap Batteries (AAן2) Remote mouse receiver String and rivet - PIC-MUTEFREEZE - NEC LT154 | User Manual - Page 7
SOURCE AUATDOJUST ON/STAND BY Getting to Know Your MultiSync LT156/LT155/LT154 Projector Front/Side Features Controls Built-In Monaural Speaker (0.5W) Lens Remote Sensor PCACCACSERTSDASTPUOSWER ENTER SELECT CANCEL MENU Air Filter Zoom lever Ventilation (inlet) One-touch Tilt Button - NEC LT154 | User Manual - Page 8
PCACCCASRETSDASTPUOSWER AUDIO Slot for Kensington Micro saver Security System Bottom Ventilation (inlet) Remote Sensor Ventilation (outlet) Rear Foot Rear Foot Rotate to fine-adjust horizontally position Lamp cover Lamp cover screw E - 8 Spacer (black rubber) To fine-adjust the height of the - NEC LT154 | User Manual - Page 9
When this is lit red (orange in Eco mode) continually, it's warning you that the projection lamp has exceeded 1000 hours (2000 hours in Eco mode) of service. After this light appears, it is advisable to replace the projection lamp as soon as possible. (See page E-48). In addition the message "The - NEC LT154 | User Manual - Page 10
control your projector via a serial cable. This enables you to use your PC and serial communication protocol to control the projector. The NEC optional serial the POWER indicator turns orange and the projector is in standby mode. 10 Built-in Security Slot ( ) This security slot supports the - NEC LT154 | User Manual - Page 11
battery power. To cancel this feature, press any one of the buttons other than the Mouse button. 1. Infrared Transmitter Direct the remote control toward the remote sensor on the projector on LT156). 9. RGB 2 Button Not available on LT155/LT154. For LT156: Press this button to select DVI analog - NEC LT154 | User Manual - Page 12
this button works as the mouse right button. When you are in the Projector mode, which is indicated by lighting the PJ button: Press this button list of slides included in a CompactFlash memory card. 28. Remote Jack Not available on this model. *NOTE: The default is the Computer mode, which allows - NEC LT154 | User Manual - Page 13
STAND BY PC CARD ACCESS STATUS POWER 7m 30˚ 30˚ Remote Sensor 2. Remove both old batteries and install new ones (AA). Ensure that you have the batteries' polarity (+/-) aligned correctly. Remote Control Precautions • Handle the remote control carefully. • If the remote control gets wet, wipe it - NEC LT154 | User Manual - Page 14
Projector mode, press the PJ button (lit red). Connecting the remote mouse receiver to your computer To use the remote mouse function, connect the remote mouse receiver to your computer with one of the remote use an IBM PC, the Remote mouse receiver does not support the other operating systems than - NEC LT154 | User Manual - Page 15
PJ button lights red to indicate that you are in the Projector mode, which allows the projector menu operation using the three buttons. • When the POINTER button out to indicate that you are in the Computer mode. To enable the projector menu operation again, press the PJ button to light red. To move - NEC LT154 | User Manual - Page 16
. Setting up Your Projector Your MultiSync LT156/LT155/LT154 Projector is simple to set up and use. But before you get started, you must first: 1. Determine the image size. 2. Set up a screen or select a non-glossy white wall onto which you can project your image. Ensure that the power cable and any - NEC LT154 | User Manual - Page 17
your NEC dealer for more information. * Do not attempt to install the projector yourself. • Only use your projector on a solid, level surface. If the projector falls to the ground, you can be injured and the projector severely damaged. • Do not use the projector where temperatures vary greatly - NEC LT154 | User Manual - Page 18
PC is turned on after connecting with the projector. NOTE: * If the screen goes blank while using your remote control, it may be the result of the computer's screen-saver or power management software. * If you accidentally hit the POWER button on the remote control, wait 60 seconds and then press - NEC LT154 | User Manual - Page 19
INPUT RGB AUDIO AUDIO Connecting your PC to your MultiSync LT155 (XGA)/ LT154 (XGA) projector will enable you to project your computer's screen connect to a PC, simply: 1. Turn off the power to your projector and computer. 2. Use the supplied DVI-D--DVI-D signal cable to connect a DVI connector of - NEC LT154 | User Manual - Page 20
Computer Macintosh (Notebook type) Audio cable (not supplied) LT155/LT154 AC IN RGB Signal cable (supplied) C CARD MENU video port. To connect to a Macintosh, simply: 1. Turn off the power to your projector and your Macintosh computer. 2. Use the supplied signal cable to connect your - NEC LT154 | User Manual - Page 21
Cr Cb Y White Red LT155 / LT154 LT155/LT154 Optional 15-pin-toRCAן3 projector to a DVD player with component outputs or Video output. To do so, simply: 1. Turn off the power to your projector projector. 3. Turn on the projector and DVD player. NOTE: Refer to your DVD player's owner's manual - NEC LT154 | User Manual - Page 22
disc player or document camera to your projector. To make these connections, simply: 1. Turn off the power to the projector and VCR, laser disc player or document Turn on the projector and the VCR or laser disc player. NOTE: Refer to your VCR or laser disc player owner's manual for more information - NEC LT154 | User Manual - Page 23
About Startup screen (Menu Language Select screen) When you first turn on the projector, you will get the Startup screen. This screen gives you the opportunity to select one of the seven menu languages: English, German, French, Itilan, Spanish, - NEC LT154 | User Manual - Page 24
3 to 5 minutes until the lamp lighting is stabilized. To turn off the projector: First press the "off" button on the remote control ("ON/STAND BY" button on the projector cabinet) for a minimum of two seconds. The power indicator will glow orange. After the projector turns off, the cooling fans - NEC LT154 | User Manual - Page 25
. RGB 1 RGB 2 PJ HELP POINTER PC CARD SELECT ENTER CANCEL SOURCE AUATDOJUST ONS/TAND BY Press the Source button on the remote control or the projector cabinet to select "Video" (VCR, document camera, or laser disc player), SVideo", "RGB" (computer or DVD with component output) [ "DVI digital - NEC LT154 | User Manual - Page 26
IN 3. Press and hold the Tilt button. 4. Lower the front of the projector to the desired height and release the button to lock the Adjustable tilt foot. gripping the tilt-foot or hanging on the wall can cause damage to the projector. To fine-adjust the height of the rear foot, remove the spacer ( - NEC LT154 | User Manual - Page 27
your computer for the first time. NOTE: The Auto Adjust function does not work for component signal. On LT156: Press the RGB 1 button on the remote control to select DVI digital signal and the RGB 2 button for DVI analog signal. Source display E - 27 - NEC LT154 | User Manual - Page 28
image and sound for a short period of time. Press again to restore the image and sound. PIC-MUTE Getting Help about how to operate the projector: You get the contents about Help. MENU LASER HELP Use the Select button to move the pointer. Enlarging and Moving a Picture You can enlarge the - NEC LT154 | User Manual - Page 29
to display the main menu. For other operations, do the same way as you use your PC mouse. 2. Press the LM buttons on the remote control or the projector cabinet to highlight the menu for the item you want to adjust or set. 3. Press the ᮣ button or the "Enter" button on the - NEC LT154 | User Manual - Page 30
remote control or the projector cabinet Reset" then press the "Enter" button. The default Basic/Custom Menu items are: Source Select (RGB [DVI (DIGITAL) / DVI (ANALOG) on LT156], Video, S-Video and PC Card Viewer), Picture, Volume, Image Options (Keystone, Color Temperature and Lamp Mode), Projector - NEC LT154 | User Manual - Page 31
remote control is also available. You can adjust the horizontal and the vertical position for DVI digital signal but cannot save those adjustments. * RGB Video S-Video PC Card Viewer Keystone Color Temperature Lamp ) (Auto Play/Manual Play) Interval (5- Lamp Remaining Time/Lamp Hour Meter/Projector - NEC LT154 | User Manual - Page 32
saving changes. (USB mouse only) Help button: Indicates that help about that feature is available (USB mouse only). Press the Help button on the remote control to display help. Toolbar: Contains several icons for specific tasks. It is also referred to as "launcher". Drag: Point the mouse here - NEC LT154 | User Manual - Page 33
to the next slide or folder. Play Plays back automatically or manually depending on the set- ting on PC Card Viewer Options of the menu. access to controls for your image. Use LM buttons on the projector cabinet or the remote control to highlight the menu for the item you want to adjust - NEC LT154 | User Manual - Page 34
will see. Color Temperature Aspect Ratio allows you hours by using the Eco mode. High-Bright Mode ....... This is the default setting. Eco Mode Select this mode to increase the lamp life. NOTE: If you have selected the Eco mode, the lamp lights in High-Bright mode for one minute after the projector - NEC LT154 | User Manual - Page 35
Auto Adjust feature. NOTE: While you are displaying an image with higher resolution than the projector's native resolution, even when you are in the Native mode, the image is displayed . This allows you to manually adjust the image horizontally and vertically, and adjust Clock and Phase. E - 35 - NEC LT154 | User Manual - Page 36
Lamp Hour Meter, Projector Usage, Language and Communication Speed. (To reset the lamp usage time, see "Clear Lamp Hour Meter" on page E-38.) All Data Reset instructions. The options are: English, German, French, Italian, Spanish, Swedish and Japanese. Projector button on the remote control. On You - NEC LT154 | User Manual - Page 37
Manual Play options determine the behavior of the Play/Stop [ / ] icon on the Viewer toolbar. NOTE: If you check "Auto Play" and select "PC Card Viewer" on the projector Gives compression a priority. [Page3] Signal Select RGB on LT155 and LT154/DVI (ANALOG) on LT156: Allows you to choose "RGB - NEC LT154 | User Manual - Page 38
OK". NOTE: The projector will turn off and go into standby mode after 1100 hours (up to 2200 hours in Eco mode) of service. If this happens, press the "Help" button on the remote control for ten seconds to reset the lamp clock back to zero. Do this only after replacing the lamp. [Page5] Auto Adjust - NEC LT154 | User Manual - Page 39
slot of the projector, the Capture feature is not available. The "Card Error" display means . NOTE: Be sure not to turn off the power or remove the CompactFlash card while capturing an image. JPEG or BMP file and press the Enter button on the remote or the cabinet, or "Execute" on the above, you - NEC LT154 | User Manual - Page 40
Press the Enter on the remote control or the cabinet. You the background from the NEC logo to another, you The NEC logo file UXGA signal is displayed. Information: Displays the status of the current signal, and the lamp and the projector usage hours Lamp Remaining Time (%) Lamp Hour Meter (H) Projector - NEC LT154 | User Manual - Page 41
this manual) to be displayed on the projector. Even if no computer is available, presentations can be conducted simply with the projector. pin and damage the card slot. Refer to the CompactFlash card's operating instructions for the proper direction of insertion. CompactFlash Card Type The PC Card - NEC LT154 | User Manual - Page 42
Viewer Utility 1.0 for creating viewer slides. To start the PC Card Viewer software: * Select [Start]-[Programs]-[NEC Projector Tools]-[PC Card Viewer Utility 1.0]. Refer to online help for instructions on using the PC Card Viewer software. * The auto CD play function operates if the "Auto insert - NEC LT154 | User Manual - Page 43
tool bar will appear when you press the MENU button on the remote control or the projector cabinet or clicking with the right button of a mouse. Prev Play this lets you play slides back. Play Plays back automatically or manually depending on the setting on PC Card Viewer Options of the menu. This - NEC LT154 | User Manual - Page 44
When the tool bar is not displayed: Press the FOLDER LIST button on the remote control to display folders from a CompactFlash card in the projector's PC Card slot. Multi cursor (blue marks) SLIDE Folder Folder Folder Folder Folder Current folder number 02 : 0001 / 0008 Current slide number - NEC LT154 | User Manual - Page 45
to press MENU or CANCEL button on the remote control or projector cabinet. NOTE: You can compress a captured the projector's display. Do not eject the CompactFlash card or turn off the projector's power • If the image can be stored in a format supported by the PC Card Viewer. With the PC Card Viewer - NEC LT154 | User Manual - Page 46
Uninstalling the PC Card Viewer Software Even if you do now know the PC Card Viewer software's file names or where they are stored, the PC Card Viewer software files can be easily removed from the system using the "Install/Uninstall Applications" control panel in Windows. (Normally there is no need - NEC LT154 | User Manual - Page 47
Terminology PC card This is the name of a card currently being standardized by the Japan Electronic Industry Association (JEIDA) and PCMCIA (Personal Computer Memory Card Interface Association) of the United States. ATA card A type of PC card. ATA was originally a type of interface between - NEC LT154 | User Manual - Page 48
Options] → [Setup]→[Page 4]→[Clear Lamp Hour Meter] to reset the lamp usage hours. NOTE: When the lamp exceeds 1100 hours (2200 hours : Eco mode) of service, the projector cannot turn on and the message is not displayed. If this happens, press the Help button on the remote control for a minimum of - NEC LT154 | User Manual - Page 49
of the MultiSync LT156/LT155/ LT154 Projector free from dust or dirt and should be cleaned after every 100 hours of operation (more often in dusty conditions). If the filter is dirty or clogged, your projector may overheat. CAUTION • Turn off the power and unplug the projector before replacing the - NEC LT154 | User Manual - Page 50
in Eco mode One minute after lamp is turned on in Eco mode Lamp has reached its end of life (1000 hours or over) Lamp life has reached its end of life (1100 hours or over) Lamp or filter cover error (2 locations) Temperature error Fan error Lamp error Power Indicator Status Indicator Note Steady - NEC LT154 | User Manual - Page 51
When using the PC Card Viewer function Condition No picture Status • Is "PC Card Viewer" selected from the Source menu? • Is the CompactFlash card seated in the PC CARD slot completely? • Are slide data stored in the CompactFlash card? • Have the contents of the CompactFlash card been destroyed? - NEC LT154 | User Manual - Page 52
the MultiSync LT156/LT155/LT154 Projector's performance. Model Number LT156/LT155/LT154 Optical LCD Panel Lens Lamp Image Size Projection Distance 0.9" p-Si TFT active-matrix, 1024ן768 dots With Micro Lens Array (LT155) Manual zoom, manual focus F2.0 - 2.3 f=36.5 - 42 mm 130W NSH lamp (110W - NEC LT154 | User Manual - Page 53
Cabinet Dimensions LT156/LT155/LT154 ON/ STAND BY PC CARD ACCESS STATUS POWER AUTO ADJUST SOURCE E 266 (10.47") NTER CANC EL SELECT MENU 17 (0.67") 40.3 (1.59") 31.2 (1.23") 40.35 (1.59") 207 (8.15") Lens center 63 (2.5") Lens center 5 (0.2") E - 53 Unit = mm (inch) - NEC LT154 | User Manual - Page 54
D-Sub Pin Assignments Mini D-Sub 15 Pin Connector 54321 10 9 8 7 6 15 14 13 12 11 Signal Level Video signal : 0.7Vp-p (Analog) Sync signal : TTL level Pin No. 1 2 3 4 5 6 7 8 9 10 11 12 13 14 15 RGB Signal (Analog) Red Green or Sync on Green Blue Ground Ground Red Ground Green Ground Blue Ground - NEC LT154 | User Manual - Page 55
. If this should happen, change the refresh rate or resolution on your PC. Refer to Display Properties help section of your PC for procedures. NOTE3: UXGA can be supported for separate sync signal only. NOTE4: DVI digital signal can - NEC LT154 | User Manual - Page 56
PC Control Codes LT155/LT154 Function POWER ON POWER OFF INPUT SELECT RGB INPUT SELECT VIDEO INPUT SELECT S-VIDEO INPUT SELECT PC CARD VIEWER PICTURE MUTE ON PICTURE ) To RxD of PC 87 5 4 2 6 3 1 To GND of PC To TxD of PC NOTE: Pins 2, 3, 5, 6 and 8 are used inside the projector. E - 56
-
 1
1 -
 2
2 -
 3
3 -
 4
4 -
 5
5 -
 6
6 -
 7
7 -
8
-
9
-
10
-
11
-
12
-
13
-
14
-
15
-
16
-
17
-
18
-
19
-
20
-
21
-
22
-
23
-
24
-
25
-
26
-
27
-
28
-
29
-
30
-
31
-
32
-
33
-
34
-
35
-
36
-
37
-
38
-
39
-
40
-
41
-
42
-
43
-
44
-
45
-
46
-
47
-
48
-
49
-
50
-
51
-
52
-
53
-
54
-
55
-
56
 |
 |
MultiSync LT156/LT155/LT154
LCD Projector
User’s Manual
English
M
E
N
U
E
N
T
E
R
C
A
N
C
E
L
SELECT
POWER
STATUS
ON
/
STAND BY
SOURCE
AUTO
ADJUST
PC
CARD
ACCESS