NEC PX-50XR6A 42XR5/50XR6/60XR5 UM - Page 8
Using the remote control, Cable Management
 |
View all NEC PX-50XR6A manuals
Add to My Manuals
Save this manual to your list of manuals |
Page 8 highlights
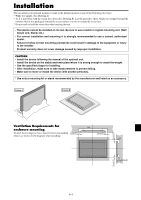
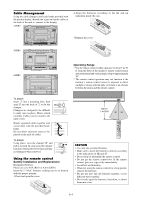
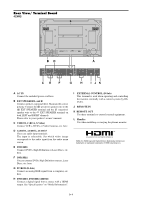
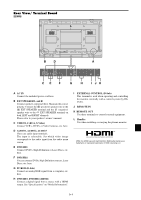
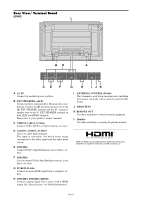
Cable Management 2.Align the batteries according to the and Using the cable clampers and beads bands provided with indication inside the case. the plasma display; Bundle the signal and audio cables at the back of the unit to connect to the display. 42XR5 Back of the unit mounting holes 3.Replace the cover. 50XR6 Back of the unit 60XR5 mounting holes Back of the unit mounting holes Operating Range * Use the remote control within a distance of about 7 m/ 23 ft. from the front of the monitor's remote control sensor and at horizontal and vertical angles of up to approximately 30°. * The remote control operation may not function if the monitor's remote control sensor is exposed to direct sunlight or strong artificial light, or if there is an obstacle between the sensor and the remote control. To attach Insert q into a mounting hole, then snap w into the back of q to fix the clamper. Clampers are designed to be difficult to undo once in place. Please attach carefully. Cables can be routed to the right or left. Bunch separated cables together and secure them with the provided beads bands. Do not allow excessive stress to be placed on the ends of cables. To detach Using pliers, twist the clamper 90° and pull it outward. In some cases the clamper may have deteriorated over time and may get damaged when removed. Using the remote control Battery Installation and Replacement Designated batteries: Please use size AAA (R03) or AAA (LR03). Insert the 2 "AAA" batteries, making sure to set them in with the proper polarity. 1.Press and open the cover. ON/STANDBY Approx. 7 m/ 23 ft CAUTION • Use only the specified batteries. • Make sure to insert the batteries correctly according to the indications of and . • Do not drop or mishandle the remote control. • Do not get the remote control wet. If the remote control gets wet, wipe it dry immediately. • Avoid heat and humidity. • When not using the remote control for a long period, remove the batteries. • Do not use new and old batteries together, or use different types together. • Do not take apart the batteries, heat them, or throw them into a fire. En-6
-
 1
1 -
2
-
 3
3 -
 4
4 -
 5
5 -
 6
6 -
 7
7 -
 8
8 -
 9
9 -
 10
10 -
 11
11 -
 12
12 -
 13
13 -
14
-
15
-
16
-
17
-
18
-
19
-
20
-
21
-
22
-
23
-
24
-
25
-
26
-
27
-
28
-
29
-
30
-
31
-
32
-
33
-
34
-
35
-
36
-
37
-
38
-
39
-
40
-
41
-
42
-
43
-
44
-
45
-
46
-
47
-
48
-
49
-
50
-
51
-
52
-
53
-
54
-
55
-
56
-
57
-
58
-
59
-
60
-
61
-
62
-
63
-
64
-
65
-
66
-
67
-
68
-
69
-
70
-
71
-
72
-
73
-
74
-
75
-
76
-
77
-
78
-
79
-
80
-
81
-
82
-
83
-
84
-
85
-
86
-
87
-
88
-
89
-
90
-
91
-
92
-
93
-
94
-
95
-
96
-
97
-
98
-
99
-
100
-
101
-
102
-
103
-
104
-
105
-
106
-
107
-
108
-
109
-
110
-
111
-
112
-
113
-
114
-
115
-
116
-
117
-
118
-
119
-
120
-
121
-
122
-
123
-
124
-
125
-
126
-
127
-
128
-
129
-
130
-
131
-
132
-
133
-
134
-
135
-
136
-
137
-
138
-
139
-
140
-
141
-
142
-
143
-
144
-
145
-
146
-
147
-
148
 |
 |
