Netgear AC1900-Nighthawk User Manual - Page 112
Use the Shared Printer, Manually Connect and Print
 |
View all Netgear AC1900-Nighthawk manuals
Add to My Manuals
Save this manual to your list of manuals |
Page 112 highlights
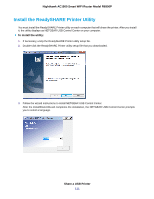
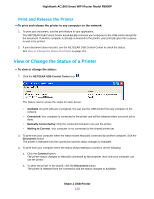
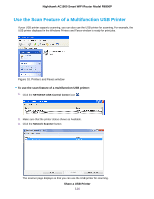
Nighthawk AC1900 Smart WiFi Router Model R6900P 4. Select a language from the menu and click the OK button. Some firewall software, such as Comodo, blocks NETGEAR USB Control Center from accessing the USB printer. If you do not see the USB printer displayed onscreen, you can disable the firewall temporarily to allow the utility to work. 5. Select the printer and click the Connect button. The printer status changes to Manually connected by Mycomputer. Now only the computer that you are using can use this printer. 6. Click the Disconnect button. The status changes to Available. Now all computers on the network can use the printer. 7. To exit the utility, select System > Exit. Use the Shared Printer For each computer, after you click the Connect and Disconnect buttons once, the utility automatically manages the printing queue. By default, the utility starts automatically whenever you log on to Windows and runs in the background. Manually Connect and Print For each computer, after you click the Connect and Disconnect buttons once, the utility automatically manages the printing queue. By default, the utility starts automatically whenever you log on to Windows and runs in the background. To manually connect and print: 1. Click the NETGEAR USB Control Center icon . The main page displays. 2. Click the Connect button. The printer status changes to Manually connected by Mycomputer. Now only the computer that you are using can use this printer. 3. Use the print feature in your application to print your document. 4. To release the printer so that all computers on the network can use it, click the Disconnect button. Share a USB Printer 112
-
 1
1 -
2
-
3
-
4
-
5
-
6
-
7
-
8
-
9
-
10
-
11
-
12
-
13
-
14
-
15
-
16
-
17
-
18
-
19
-
20
-
21
-
22
-
23
-
24
-
25
-
26
-
27
-
28
-
29
-
30
-
31
-
32
-
33
-
34
-
35
-
36
-
37
-
38
-
39
-
40
-
41
-
42
-
43
-
44
-
45
-
46
-
47
-
48
-
49
-
50
-
51
-
52
-
53
-
54
-
55
-
56
-
57
-
58
-
59
-
60
-
61
-
62
-
63
-
64
-
65
-
66
-
67
-
68
-
69
-
70
-
71
-
72
-
73
-
74
-
75
-
76
-
77
-
78
-
79
-
80
-
81
-
82
-
83
-
84
-
85
-
86
-
87
-
88
-
89
-
90
-
91
-
92
-
93
-
94
-
95
-
96
-
97
-
98
-
99
-
100
-
101
-
102
-
103
-
104
-
105
-
106
-
 107
107 -
 108
108 -
 109
109 -
 110
110 -
 111
111 -
 112
112 -
 113
113 -
 114
114 -
 115
115 -
 116
116 -
 117
117 -
118
-
119
-
120
-
121
-
122
-
123
-
124
-
125
-
126
-
127
-
128
-
129
-
130
-
131
-
132
-
133
-
134
-
135
-
136
-
137
-
138
-
139
-
140
-
141
-
142
-
143
-
144
-
145
-
146
-
147
-
148
-
149
-
150
-
151
-
152
-
153
-
154
-
155
-
156
-
157
-
158
-
159
-
160
-
161
-
162
-
163
-
164
-
165
-
166
-
167
-
168
-
169
-
170
-
171
-
172
-
173
-
174
-
175
-
176
-
177
-
178
-
179
-
180
-
181
-
182
-
183
-
184
-
185
-
186
-
187
-
188
-
189
-
190
-
191
-
192
-
193
-
194
-
195
-
196
-
197
-
198
-
199
-
200
-
201
-
202
-
203
-
204
-
205
-
206
-
207
-
208
-
209
-
210
-
211
-
212
-
213
-
214
-
215
 |
 |
