Netgear D7800 Installation Guide - Page 2
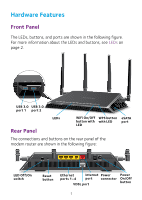
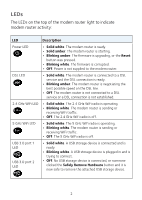
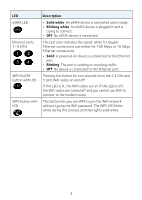
Check the DSL LED.
 |
View all Netgear D7800 manuals
Add to My Manuals
Save this manual to your list of manuals |
Page 2 highlights
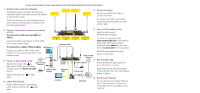
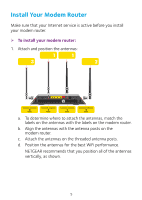
You can use this diagram to connect your modem router or follow the detailed instructions in this booklet. 1. Attach and position the antennas. To determine where to attach the antennas, match the labels on the antennas with the labels on the modem router. Attach the antennas on the threaded antenna posts. Position the antennas vertically for the best WiFi performance. 5. Connect a device. You can use an Ethernet cable or connect with WiFi. To connect with WiFi, use the WiFi network name and password on the product label. 2. Connect the modem router to an Internet service. To connect to a DSL service (ADSL or VDSL): Install a DSL filter and connect it to the VDSL port on the modem router. To connect to a cable or fiber modem: WiFi device Prepare your cable or fiber modem and connect it to the red Internet port on the modem router. Ethernet cable 3. Power on the modem router. Wait for the Power LED to Cable or fiber Internet light white. If the Power LED does not light, press the Power On/Off button. Cable or fiber modem Modem router Ethernet cable Wait for the WiFi LED white. to light 4. Check the DSL LED. If the modem router is connected to a DSL service, the DSL LED white. lights Computer 6. Log in to the modem router. Launch a web browser. NETGEAR genie displays. If you do not see genie, enter www.routerlogin.net in the address field of the web browser. When prompted, enter admin for the user name and password for the password. NETGEAR genie determines your ADSL or VDSL Internet Internet connection. 7. Get the genie app. Power adapter Download the free genie app from www.NETGEAR.com/genie. Phone cable Easily share media, files, and printers on the network from your smartphone, tablet, or laptop. DSL filter 8. Get the user manual. You can get the user manual online at http://downloadcenter.netgear.com or through a link in the product's user interface.
-
 1
1 -
 2
2 -
 3
3 -
 4
4 -
 5
5 -
 6
6 -
 7
7 -
 8
8 -
9
-
10
-
11
-
12
-
13
-
14
-
15
-
16
-
17
-
18
-
19
-
20
-
21
-
22
 |
 |
