Netgear DGN2200v3 DGN2200v3 User Manual - Page 19
NETGEAR Genie Setup, View or Change Settings, Settings Description - user manual
 |
View all Netgear DGN2200v3 manuals
Add to My Manuals
Save this manual to your list of manuals |
Page 19 highlights
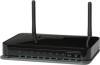
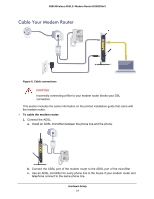
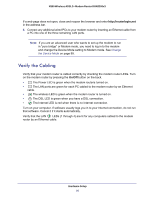
N300 Wireless ADSL2+ Modem Router DGN2200v3 NETGEAR Genie Setup NETGEAR Genie is the easiest way to set up the modem router because it automates many steps and verifies that those steps have been successfully completed. It takes about 15 minutes to complete. 1. Locate the DSL settings information (user name and password) provided by your ISP. Contact your ISP if you do not have it. 2. Connect a computer to the modem router with an Ethernet cable. 3. Launch an Internet browser. Your browser automatically displays the NETGEAR Genie screen. 4. Follow the instructions to complete the setup. NETGEAR Genie checks your hardware setup and guides you through connecting the modem router to the Internet and adding computers to your network. Your modem router connects to the Internet when any computer on your network launches a Web browser to access the Internet. The modem router's Internet LED blinks. View or Change Settings You can view and change the settings in the following ways: • Log in to your modem router. To do this you can click the shortcut that was placed on your desktop during the NETGEAR Genie setup, or use an Internet browser. See Log In to the Modem Router on page 20. • Open the Router_Setup.html file that was placed on your desktop during the NETGEAR Genie setup. This file has setup and system information, the NETGEAR Technical Support phone number, links to the NETGEAR website, and a modem router login link. Settings Description When the NETGEAR Genie is done, your modem router has the following settings. Some of these can be viewed in Router_Setup.html. • Language and country as described in Setup Wizard on page 22. • Internet connection settings as described in Manual Setup (Basic Settings) on page 23. • Network settings. The NETGEAR Genie steps you through connecting from your computer to the modem router. Modem Router Setup 19
-
 1
1 -
2
-
3
-
4
-
5
-
6
-
7
-
8
-
9
-
10
-
11
-
12
-
13
-
 14
14 -
 15
15 -
 16
16 -
 17
17 -
 18
18 -
 19
19 -
 20
20 -
 21
21 -
 22
22 -
 23
23 -
 24
24 -
25
-
26
-
27
-
28
-
29
-
30
-
31
-
32
-
33
-
34
-
35
-
36
-
37
-
38
-
39
-
40
-
41
-
42
-
43
-
44
-
45
-
46
-
47
-
48
-
49
-
50
-
51
-
52
-
53
-
54
-
55
-
56
-
57
-
58
-
59
-
60
-
61
-
62
-
63
-
64
-
65
-
66
-
67
-
68
-
69
-
70
-
71
-
72
-
73
-
74
-
75
-
76
-
77
-
78
-
79
-
80
-
81
-
82
-
83
-
84
-
85
-
86
-
87
-
88
-
89
-
90
-
91
-
92
-
93
-
94
-
95
-
96
-
97
-
98
-
99
-
100
-
101
-
102
-
103
-
104
-
105
-
106
-
107
-
108
-
109
-
110
-
111
-
112
-
113
-
114
-
115
-
116
-
117
-
118
-
119
-
120
 |
 |