Netgear FM114P FR114W Reference Manual - Page 89
Network Printing from the Macintosh, MacOS 8 or 9 Configuration
 |
UPC - 606449024029
View all Netgear FM114P manuals
Add to My Manuals
Save this manual to your list of manuals |
Page 89 highlights
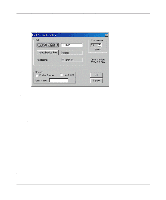
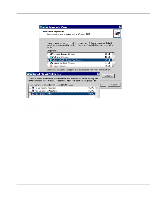
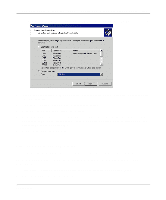
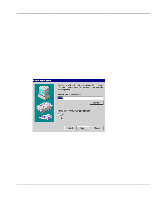
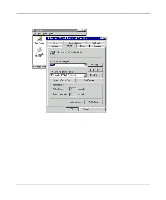
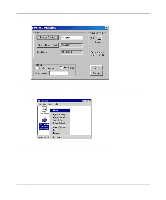
Reference Manual for the Model FR114P, FR114W and FM114P Cable/DSL ProSafe Firewall Network Printing from the Macintosh Macintosh computers can connect to a TCP/IP network printer using the Line Printer Remote (LPR) protocol. LPR printing can be set up on any Macintosh that has Desktop Printing installed or available. Desktop Printing is supported on MacOS versions beginning from 8.1. LaserWriter8 version 8.5.1 or higher is also required. MacOS 8 or 9 Configuration To configure the Macintosh to use the print server, follow these steps: 1. From the Apple Extras folder, under Apple LaserWriter Software, launch the Desktop Printing Utility. A new window titled New Desktop Printer will appear. 2. Select LaserWriter 8 in the 'With' drop-down menu. 3. Select Printer (LPR) and click OK. A new window titled Untitled 1 will open. 4. If the PostScript Printer Description does not match your printer, click Change... and select your actual printer. If your printer model does not appear, click the Generic button. 5. Click OK to return to the Untitled 1 window. 6. In the LPR Printer Selection box, click Change... 7. In the Printer Address field, type the name or IP address of the firewall. The IP address will usually be 192.168.0.1. You can leave the Queue Name blank. 8. Click Verify to make sure your computer can see the printer. You should see the IP address displayed above the button. If no IP address appears, check that you have correctly typed the queue name or IP Address. 9. Click OK to return to the Untitled 1 window. 10. At the bottom of the Untitled 1 dialog box, click 'Create...'. 11. When prompted, rename the printer with a descriptive name and click Save. A printer icon should now appear on your desktop. 12. Quit the Desktop Printer Utility. Print Server 7-9
-
 1
1 -
2
-
3
-
4
-
5
-
6
-
7
-
8
-
9
-
10
-
11
-
12
-
13
-
14
-
15
-
16
-
17
-
18
-
19
-
20
-
21
-
22
-
23
-
24
-
25
-
26
-
27
-
28
-
29
-
30
-
31
-
32
-
33
-
34
-
35
-
36
-
37
-
38
-
39
-
40
-
41
-
42
-
43
-
44
-
45
-
46
-
47
-
48
-
49
-
50
-
51
-
52
-
53
-
54
-
55
-
56
-
57
-
58
-
59
-
60
-
61
-
62
-
63
-
64
-
65
-
66
-
67
-
68
-
69
-
70
-
71
-
72
-
73
-
74
-
75
-
76
-
77
-
78
-
79
-
80
-
81
-
82
-
83
-
 84
84 -
 85
85 -
 86
86 -
 87
87 -
 88
88 -
 89
89 -
 90
90 -
 91
91 -
 92
92 -
 93
93 -
 94
94 -
95
-
96
-
97
-
98
-
99
-
100
-
101
-
102
-
103
-
104
-
105
-
106
-
107
-
108
-
109
-
110
-
111
-
112
-
113
-
114
-
115
-
116
-
117
-
118
-
119
-
120
-
121
-
122
-
123
-
124
-
125
-
126
-
127
-
128
-
129
-
130
-
131
-
132
-
133
-
134
-
135
-
136
-
137
-
138
-
139
-
140
-
141
-
142
-
143
-
144
-
145
-
146
-
147
-
148
-
149
-
150
 |
 |