3
Contents
Chapter 1
Introduction and Hardware Description
Overview. . . . . . . . . . . . . . . . . . . . . . . . . . . . . . . . . . . . . . . . . . . . . . . . . . . .5
Switch Features . . . . . . . . . . . . . . . . . . . . . . . . . . . . . . . . . . . . . . . . . . . . . .6
Package Contents . . . . . . . . . . . . . . . . . . . . . . . . . . . . . . . . . . . . . . . . . . . .8
Front Panel. . . . . . . . . . . . . . . . . . . . . . . . . . . . . . . . . . . . . . . . . . . . . . . . . .9
Back Panel . . . . . . . . . . . . . . . . . . . . . . . . . . . . . . . . . . . . . . . . . . . . . . . . . 10
LEDs. . . . . . . . . . . . . . . . . . . . . . . . . . . . . . . . . . . . . . . . . . . . . . . . . . . . . .10
Product Label . . . . . . . . . . . . . . . . . . . . . . . . . . . . . . . . . . . . . . . . . . . . . . . 11
RJ-45 Ports. . . . . . . . . . . . . . . . . . . . . . . . . . . . . . . . . . . . . . . . . . . . . . . . .12
SFP GBIC Modules . . . . . . . . . . . . . . . . . . . . . . . . . . . . . . . . . . . . . . . . . .12
Factory Defaults Button and Reset Button . . . . . . . . . . . . . . . . . . . . . . . . . 12
Chapter 2
Installation
Step 1: Prepare the Site . . . . . . . . . . . . . . . . . . . . . . . . . . . . . . . . . . . . . . . 14
Step 2: Install the Switch . . . . . . . . . . . . . . . . . . . . . . . . . . . . . . . . . . . . . .14
Install the Switch on a Flat Surface . . . . . . . . . . . . . . . . . . . . . . . . . . . .14
Install the Switch in a Rack. . . . . . . . . . . . . . . . . . . . . . . . . . . . . . . . . . .15
Step 3: Check the Installation. . . . . . . . . . . . . . . . . . . . . . . . . . . . . . . . . . .16
Step 4: Connect Devices to the Switch . . . . . . . . . . . . . . . . . . . . . . . . . . .16
Step 5: Install an SFP GBIC Module . . . . . . . . . . . . . . . . . . . . . . . . . . . . .17
Step 6: Apply AC Power. . . . . . . . . . . . . . . . . . . . . . . . . . . . . . . . . . . . . . .17
Step 7: Manage the Switch through a Web Browser or
through the Smart Control Center . . . . . . . . . . . . . . . . . . . . . . . . . . . . . . .18
Chapter 3
Troubleshooting
Troubleshooting Chart . . . . . . . . . . . . . . . . . . . . . . . . . . . . . . . . . . . . . . . .20
Troubleshooting Suggestions. . . . . . . . . . . . . . . . . . . . . . . . . . . . . . . . . . .20
Network Adapter Cards . . . . . . . . . . . . . . . . . . . . . . . . . . . . . . . . . . . . .20
Configuration . . . . . . . . . . . . . . . . . . . . . . . . . . . . . . . . . . . . . . . . . . . . .21
Switch Integrity . . . . . . . . . . . . . . . . . . . . . . . . . . . . . . . . . . . . . . . . . . . . 21
Autonegotiation. . . . . . . . . . . . . . . . . . . . . . . . . . . . . . . . . . . . . . . . . . . .21
Appendix A
Physical and Technical Specifications

 1
1 2
2 3
3 4
4 5
5 6
6 7
7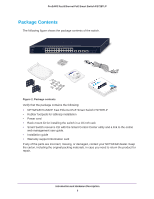 8
8 9
9

