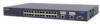
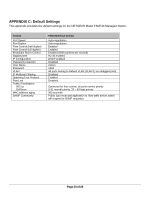
Netgear FSM726v2 FSM726v2 Installation Guide - Page 19
GearBox for Managed Switches CD-ROM.
 |
View all Netgear FSM726v2 manuals
Add to My Manuals
Save this manual to your list of manuals |
Page 19 highlights
2. Select 'C' for Set-up 3. Select 'B' for IP configuration 4. Enter in the IP address, Subnet mask, and Default Gateway 5. Hit 'Q' twice to exit to the main menu 6. Select 'D' for the Tools page 7. Select 'A' for Save Configurations to NVRAM, and confirm with a 'Y' 8. Select 'C' for Reset Switch, and confirm with a 'Y' To continue using the console interface to manage your switch, e.g. set GBIC ports, hit 'ESC' to go to the main menu. To set the GBIC ports, go to Set-up, then Port Configuration. Use your arrow keys to move the curser down to port 25 or 26, and hit the space bar to toggle between the RJ-45 port and the GBIC port. To learn more about the managed features on your switch, refer to the User Manual on the GearBox for Managed Switches CD-ROM. Page 18 of 18
-
 1
1 -
2
-
3
-
4
-
5
-
6
-
7
-
8
-
9
-
10
-
11
-
12
-
13
-
 14
14 -
 15
15 -
 16
16 -
 17
17 -
 18
18 -
 19
19 -
 20
20 -
 21
21 -
 22
22 -
 23
23 -
 24
24 -
25
 |
 |
