Netgear FVX538 FVX538 Reference Manual - Page 155
Apply, Administration, Remote Management, Allow Telnet Management, from the submenu.
 |
UPC - 606449037234
View all Netgear FVX538 manuals
Add to My Manuals
Save this manual to your list of manuals |
Page 155 highlights
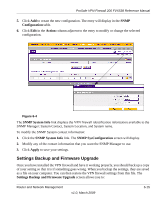
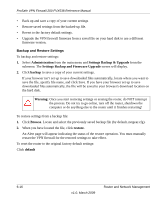
ProSafe VPN Firewall 200 FVX538 Reference Manual Web browser access normally uses the standard HTTP service port 80. For greater security, you can change the remote management Web interface to a custom port by entering that number in the box provided. Choose a number between 1024 and 65535, but do not use the number of any common service port. The default is 8080, which is a common alternate for HTTP. 5. Click Apply to have your changes take effect. When accessing your firewall from the Internet, the Secure Sockets Layer (SSL) will be enabled. You will enter https:// and type your firewall WAN IP address into your browser, followed by a colon (:) and the custom port number. For example, if your WAN IP address is 134.177.0.123 and you use port number 8080, type the following in your browser: https://134.177.0.123:8080 The router's remote login URL is https://IP_address:port_number or https://FullyQualifiedDomainName:port_number. If you do not use the SSL https://address, but rather use http://address, the FVX538 will automatically attempt to redirect to the https://address. Note: The first time you remotely connect the FVX538 with a browser via SSL, you may get a message regarding the SSL certificate. If you are using a Windows computer with Internet Explorer 5.5 or higher, simply click Yes to accept the certificate. Tip: If you are using a dynamic DNS service such as TZO, you can identify the IP address of your FVX538 by running tracert from the Windows Run menu option. For example, enter tracert your FVX538.mynetgear.net, and the IP address that your ISP assigned to the FVX538 will display. To configure your firewall for Telnet Management: 1. Select Administration from the main menu and Remote Management from the submenu. The Remote Management screen will display. 2. Check the Allow Telnet Management radio box. 3. Specify what external addresses will be allowed to access the firewall's remote management interface. Note: For enhanced security, restrict access to as few external IP addresses as practical. Router and Network Management v1.0, March 2009 6-13
-
 1
1 -
2
-
3
-
4
-
5
-
6
-
7
-
8
-
9
-
10
-
11
-
12
-
13
-
14
-
15
-
16
-
17
-
18
-
19
-
20
-
21
-
22
-
23
-
24
-
25
-
26
-
27
-
28
-
29
-
30
-
31
-
32
-
33
-
34
-
35
-
36
-
37
-
38
-
39
-
40
-
41
-
42
-
43
-
44
-
45
-
46
-
47
-
48
-
49
-
50
-
51
-
52
-
53
-
54
-
55
-
56
-
57
-
58
-
59
-
60
-
61
-
62
-
63
-
64
-
65
-
66
-
67
-
68
-
69
-
70
-
71
-
72
-
73
-
74
-
75
-
76
-
77
-
78
-
79
-
80
-
81
-
82
-
83
-
84
-
85
-
86
-
87
-
88
-
89
-
90
-
91
-
92
-
93
-
94
-
95
-
96
-
97
-
98
-
99
-
100
-
101
-
102
-
103
-
104
-
105
-
106
-
107
-
108
-
109
-
110
-
111
-
112
-
113
-
114
-
115
-
116
-
117
-
118
-
119
-
120
-
121
-
122
-
123
-
124
-
125
-
126
-
127
-
128
-
129
-
130
-
131
-
132
-
133
-
134
-
135
-
136
-
137
-
138
-
139
-
140
-
141
-
142
-
143
-
144
-
145
-
146
-
147
-
148
-
149
-
 150
150 -
 151
151 -
 152
152 -
 153
153 -
 154
154 -
 155
155 -
 156
156 -
 157
157 -
 158
158 -
 159
159 -
 160
160 -
161
-
162
-
163
-
164
-
165
-
166
-
167
-
168
-
169
-
170
-
171
-
172
-
173
-
174
-
175
-
176
-
177
-
178
-
179
-
180
-
181
-
182
-
183
-
184
-
185
-
186
-
187
-
188
-
189
-
190
-
191
-
192
-
193
-
194
-
195
-
196
-
197
-
198
-
199
-
200
-
201
-
202
-
203
-
204
-
205
-
206
-
207
-
208
-
209
-
210
-
211
-
212
-
213
-
214
-
215
-
216
-
217
-
218
-
219
-
220
-
221
-
222
-
223
-
224
-
225
-
226
-
227
-
228
-
229
-
230
-
231
-
232
-
233
-
234
-
235
-
236
-
237
-
238
-
239
-
240
 |
 |
