Netgear GS752TPSB GS7xxTS-TPS Software Admin Manual - Page 191
Policy Configuration, Destination Prefix/Length.
 |
View all Netgear GS752TPSB manuals
Add to My Manuals
Save this manual to your list of manuals |
Page 191 highlights
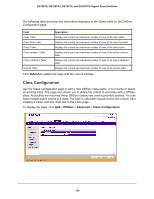
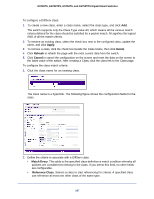
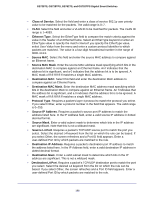
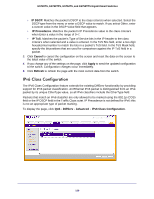
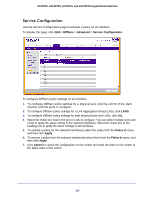
GS728TS, GS728TPS, GS752TS, and GS752TPS Gigabit Smart Switches • Source IP Address. Requires a packet's source port IP address to match the address listed here. In the IP Address field, enter a valid source IP address in dotted decimal format. • Source Prefix/Length. Enter a valid source IPv6 prefix to compare against an IPv6 packet. The prefix is always specified with the prefix length. The prefix can be in the range of ::0 to FFFF:FFFF:FFFF:FFFF:FFFF:FFFF:FFFF:FFFF. The prefix length range is 0-128. • Source L4 Port. Requires a packet's TCP/UDP source port to match the port you select. Select the desired L4 keyword from the list on which the rule can be based. If you select Other, the screen refreshes and a Port ID field appears. Enter a user-defined Port ID by which packets are matched to the rule. • Destination Prefix/Length. Requires a packet's destination IPv6 prefix and length matches the address listed here. The prefix can be in the range of ::0 to FFFF:FFFF:FFFF:FFFF:FFFF:FFFF:FFFF:FFFF. The prefix length range is 0-128. • Destination L4 Port. Requires a packet's TCP/UDP destination port to match the port you select. Select the desired L4 keyword from the list on which the rule can be based. If you select Other, the screen refreshes and a Port ID field appears. Enter a user-defined Port ID by which packets are matched to the rule. • Flow Label. This is a 20-bit number that is unique to an IPv6 packet. It is used by end stations to signify QoS handling in routers. The range is 0 to 1048575. • IP DSCP. Matches the packet's DSCP to the class criteria's when selected. Select the DSCP type from the menu or enter a DSCP value to match. If you select Other, enter a custom value in the DSCP Value field that appears. 3. Click Cancel to cancel the configuration on the screen and reset the data on the screen to the latest value of the switch. 4. If you change any of the settings on the page, click Apply to send the updated configuration to the switch. Configuration changes occur immediately. 5. Click Refresh to refresh the page with the most current data from the switch. Policy Configuration Use the Policy Configuration page to associate a collection of classes with one or more policy statements. After creating a Policy, click the policy link to the Policy page. To display the page, click QoS > DiffServ > Advanced > Policy Configuration. 191
-
 1
1 -
2
-
3
-
4
-
5
-
6
-
7
-
8
-
9
-
10
-
11
-
12
-
13
-
14
-
15
-
16
-
17
-
18
-
19
-
20
-
21
-
22
-
23
-
24
-
25
-
26
-
27
-
28
-
29
-
30
-
31
-
32
-
33
-
34
-
35
-
36
-
37
-
38
-
39
-
40
-
41
-
42
-
43
-
44
-
45
-
46
-
47
-
48
-
49
-
50
-
51
-
52
-
53
-
54
-
55
-
56
-
57
-
58
-
59
-
60
-
61
-
62
-
63
-
64
-
65
-
66
-
67
-
68
-
69
-
70
-
71
-
72
-
73
-
74
-
75
-
76
-
77
-
78
-
79
-
80
-
81
-
82
-
83
-
84
-
85
-
86
-
87
-
88
-
89
-
90
-
91
-
92
-
93
-
94
-
95
-
96
-
97
-
98
-
99
-
100
-
101
-
102
-
103
-
104
-
105
-
106
-
107
-
108
-
109
-
110
-
111
-
112
-
113
-
114
-
115
-
116
-
117
-
118
-
119
-
120
-
121
-
122
-
123
-
124
-
125
-
126
-
127
-
128
-
129
-
130
-
131
-
132
-
133
-
134
-
135
-
136
-
137
-
138
-
139
-
140
-
141
-
142
-
143
-
144
-
145
-
146
-
147
-
148
-
149
-
150
-
151
-
152
-
153
-
154
-
155
-
156
-
157
-
158
-
159
-
160
-
161
-
162
-
163
-
164
-
165
-
166
-
167
-
168
-
169
-
170
-
171
-
172
-
173
-
174
-
175
-
176
-
177
-
178
-
179
-
180
-
181
-
182
-
183
-
184
-
185
-
 186
186 -
 187
187 -
 188
188 -
 189
189 -
 190
190 -
 191
191 -
 192
192 -
 193
193 -
 194
194 -
 195
195 -
 196
196 -
197
-
198
-
199
-
200
-
201
-
202
-
203
-
204
-
205
-
206
-
207
-
208
-
209
-
210
-
211
-
212
-
213
-
214
-
215
-
216
-
217
-
218
-
219
-
220
-
221
-
222
-
223
-
224
-
225
-
226
-
227
-
228
-
229
-
230
-
231
-
232
-
233
-
234
-
235
-
236
-
237
-
238
-
239
-
240
-
241
-
242
-
243
-
244
-
245
-
246
-
247
-
248
-
249
-
250
-
251
-
252
-
253
-
254
-
255
-
256
-
257
-
258
-
259
-
260
-
261
-
262
-
263
-
264
-
265
-
266
-
267
-
268
-
269
-
270
-
271
-
272
-
273
-
274
-
275
-
276
-
277
-
278
-
279
-
280
-
281
-
282
-
283
-
284
-
285
-
286
-
287
-
288
-
289
-
290
-
291
-
292
-
293
-
294
-
295
-
296
-
297
-
298
-
299
-
300
-
301
-
302
-
303
-
304
-
305
-
306
-
307
-
308
-
309
-
310
-
311
-
312
-
313
-
314
-
315
-
316
-
317
-
318
-
319
-
320
-
321
-
322
-
323
-
324
-
325
-
326
-
327
-
328
-
329
 |
 |