Netgear GS752TPSB GS7xxTS-TPS Software Admin Manual - Page 65
Change to Switch ID, Apply, Delete, Refresh, Cancel
 |
View all Netgear GS752TPSB manuals
Add to My Manuals
Save this manual to your list of manuals |
Page 65 highlights
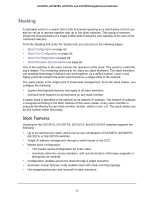
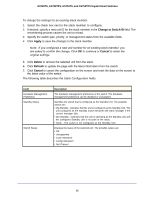
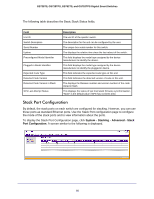
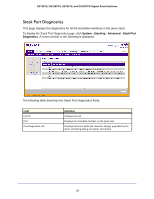
GS728TS, GS728TPS, GS752TS, and GS752TPS Gigabit Smart Switches To change the settings for an existing stack member: 1. Select the check box next to the stack member to configure. 2. If desired, specify a new unit ID for the stack member in the Change to Switch ID field. The renumbering process causes the unit to reload. 3. Specify the switch type, priority, or management status from the available fields. 4. Click Apply to save the changes to the stack member. Note: If you configured a new unit number for an existing stack member, you are asked to confirm the change. Click OK to continue or Cancel to retain the original settings. 5. Click Delete to remove the selected unit from the stack. 6. Click Refresh to update the page with the latest information from the switch. 7. Click Cancel to cancel the configuration on the screen and reset the data on the screen to the latest value of the switch. The following table describes the Stack Configuration fields. Field Hardware Management Preference Standby Status Switch Status Description The hardware management preference of the switch. The hardware management preference can be disabled or unassigned. Identifies the switch that is configured as the Standby Unit. The possible values are: • Cfg Standby - Indicates that the unit is configured as the Standby Unit. The unit configured as the Standby switch becomes the stack manager if the current manager fails. • Opr Standby - Indicates that this unit is operating as the Standby Unit and the configured Standby Unit is not part of the stack. • None - The switch is not configured as the Standby Unit. Displays the status of the selected unit. The possible values are: • OK • Unsupported • Code Mismatch • Config Mismatch • Not Present 65
-
 1
1 -
2
-
3
-
4
-
5
-
6
-
7
-
8
-
9
-
10
-
11
-
12
-
13
-
14
-
15
-
16
-
17
-
18
-
19
-
20
-
21
-
22
-
23
-
24
-
25
-
26
-
27
-
28
-
29
-
30
-
31
-
32
-
33
-
34
-
35
-
36
-
37
-
38
-
39
-
40
-
41
-
42
-
43
-
44
-
45
-
46
-
47
-
48
-
49
-
50
-
51
-
52
-
53
-
54
-
55
-
56
-
57
-
58
-
59
-
 60
60 -
 61
61 -
 62
62 -
 63
63 -
 64
64 -
 65
65 -
 66
66 -
 67
67 -
 68
68 -
 69
69 -
 70
70 -
71
-
72
-
73
-
74
-
75
-
76
-
77
-
78
-
79
-
80
-
81
-
82
-
83
-
84
-
85
-
86
-
87
-
88
-
89
-
90
-
91
-
92
-
93
-
94
-
95
-
96
-
97
-
98
-
99
-
100
-
101
-
102
-
103
-
104
-
105
-
106
-
107
-
108
-
109
-
110
-
111
-
112
-
113
-
114
-
115
-
116
-
117
-
118
-
119
-
120
-
121
-
122
-
123
-
124
-
125
-
126
-
127
-
128
-
129
-
130
-
131
-
132
-
133
-
134
-
135
-
136
-
137
-
138
-
139
-
140
-
141
-
142
-
143
-
144
-
145
-
146
-
147
-
148
-
149
-
150
-
151
-
152
-
153
-
154
-
155
-
156
-
157
-
158
-
159
-
160
-
161
-
162
-
163
-
164
-
165
-
166
-
167
-
168
-
169
-
170
-
171
-
172
-
173
-
174
-
175
-
176
-
177
-
178
-
179
-
180
-
181
-
182
-
183
-
184
-
185
-
186
-
187
-
188
-
189
-
190
-
191
-
192
-
193
-
194
-
195
-
196
-
197
-
198
-
199
-
200
-
201
-
202
-
203
-
204
-
205
-
206
-
207
-
208
-
209
-
210
-
211
-
212
-
213
-
214
-
215
-
216
-
217
-
218
-
219
-
220
-
221
-
222
-
223
-
224
-
225
-
226
-
227
-
228
-
229
-
230
-
231
-
232
-
233
-
234
-
235
-
236
-
237
-
238
-
239
-
240
-
241
-
242
-
243
-
244
-
245
-
246
-
247
-
248
-
249
-
250
-
251
-
252
-
253
-
254
-
255
-
256
-
257
-
258
-
259
-
260
-
261
-
262
-
263
-
264
-
265
-
266
-
267
-
268
-
269
-
270
-
271
-
272
-
273
-
274
-
275
-
276
-
277
-
278
-
279
-
280
-
281
-
282
-
283
-
284
-
285
-
286
-
287
-
288
-
289
-
290
-
291
-
292
-
293
-
294
-
295
-
296
-
297
-
298
-
299
-
300
-
301
-
302
-
303
-
304
-
305
-
306
-
307
-
308
-
309
-
310
-
311
-
312
-
313
-
314
-
315
-
316
-
317
-
318
-
319
-
320
-
321
-
322
-
323
-
324
-
325
-
326
-
327
-
328
-
329
 |
 |