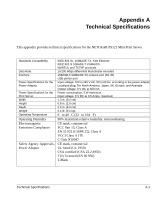
Netgear PS121v1 PS121v1 User Manual - Page 23
I am using a DHCP server, and the Mini Print Server gets an IP Address conflict - driver windows 7
 |
View all Netgear PS121v1 manuals
Add to My Manuals
Save this manual to your list of manuals |
Page 23 highlights
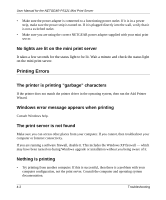
User Manual for the NETGEAR PS121 Mini Print Server • Turn off the print server, then turn it on. Test whether the print server works. • If the printer does not match the printer driver in the operating system, then run the Add Printer Wizard. See "Setting Up Each PC to Recognize the Print Server" on page 5-1 • Disable the printer's bidirectional feature, if it is turned on. I am using a DHCP server, and the Mini Print Server gets an IP Address conflict If the mini print server is left on when the DHCP server is turned off, the mini print server will retain its IP Address without informing the DHCP server. Reset the mini print server so it will obtain a new IP Address. This problem also arises if you assigned a static IP Address within the range used by the DHCP server. If so, use another address NOT within the range used by the DHCP server. Troubleshooting the TCP/IP Settings Using Ping The Windows ping utility sends an echo request packet to the designated device. The device then responds with an echo reply. You can ping the mini print server from your computer to verify that the LAN path to your mini print server is set up correctly. To ping the mini print server from a PC running Windows 95 or later: 1. From the Windows toolbar, click the Start button and select Run. 2. In the field provided, type Ping followed by the IP address of the mini print server, as in this example: ping 192.168.0.1 3. Click OK. You should see a message like this one: Pinging with 32 bytes of data If the path is working, you see this message: Reply from < IP address >: bytes=32 time=NN ms TTL=xxx If the path is not working, you see this message: Request timed out If the path is not functioning correctly, you could have one of the following problems: Troubleshooting 4-3
-
 1
1 -
2
-
3
-
4
-
5
-
6
-
7
-
8
-
9
-
10
-
11
-
12
-
13
-
14
-
15
-
16
-
17
-
 18
18 -
 19
19 -
 20
20 -
 21
21 -
 22
22 -
 23
23 -
 24
24 -
 25
25 -
 26
26 -
 27
27 -
 28
28 -
29
-
30
-
31
-
32
-
33
-
34
-
35
-
36
-
37
-
38
-
39
-
40
-
41
 |
 |
