Netgear R6100 User Manual - Page 64
Set Up Port Forwarding to Local Servers, Add a Custom Service
 |
View all Netgear R6100 manuals
Add to My Manuals
Save this manual to your list of manuals |
Page 64 highlights
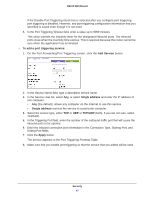
R6100 WiFi Router Set Up Port Forwarding to Local Servers The port forwarding feature lets you allow certain types of incoming traffic to reach servers on your local network. For example, you might want to make a local web server, FTP server, or game server visible and available to the Internet. Use the Port Forwarding/Port Triggering screen to configure the router to forward specific incoming protocols to computers on your local network. In addition to servers for specific applications, you can also specify a default DMZ server to which all other incoming protocols are forwarded. Before you start, determine which type of service, application, or game you want to provide, and the local IP address of the computer that will provide the service. The server computer has to always have the same IP address. To ensure that your server computer always has the same IP address, use the reserved IP address feature of your product. See Address Reservation on page 38. To forward specific incoming protocols: 1. Select ADVANCED > Advanced Setup > Port Forwarding/Port Triggering. 2. Leave the Port Forwarding radio button selected as the service type. 3. In the Service Name list, select the service name. If the service does not appear in the list, see Add a Custom Service on page 64. 4. Fill in the Server IP Address field. 5. Click the Add button. The service appears in the list on the Port Forwarding screen. Add a Custom Service To define a service, game, or application that does not appear in the Service Name list, first determine which port number or range of numbers the application uses. You can usually determine this information by contacting the publisher of the application or user groups or news groups. When you have the port number information, follow these steps. To add a custom service: 1. Select ADVANCED > Advanced Setup > Port Forwarding/Port Triggering. Security 64
-
 1
1 -
2
-
3
-
4
-
5
-
6
-
7
-
8
-
9
-
10
-
11
-
12
-
13
-
14
-
15
-
16
-
17
-
18
-
19
-
20
-
21
-
22
-
23
-
24
-
25
-
26
-
27
-
28
-
29
-
30
-
31
-
32
-
33
-
34
-
35
-
36
-
37
-
38
-
39
-
40
-
41
-
42
-
43
-
44
-
45
-
46
-
47
-
48
-
49
-
50
-
51
-
52
-
53
-
54
-
55
-
56
-
57
-
58
-
 59
59 -
 60
60 -
 61
61 -
 62
62 -
 63
63 -
 64
64 -
 65
65 -
 66
66 -
 67
67 -
 68
68 -
 69
69 -
70
-
71
-
72
-
73
-
74
-
75
-
76
-
77
-
78
-
79
-
80
-
81
-
82
-
83
-
84
-
85
-
86
-
87
-
88
-
89
-
90
-
91
-
92
-
93
-
94
-
95
-
96
-
97
-
98
-
99
-
100
-
101
-
102
-
103
-
104
-
105
-
106
-
107
-
108
-
109
-
110
-
111
-
112
-
113
-
114
-
115
-
116
-
117
-
118
-
119
-
120
-
121
-
122
 |
 |
