Netgear RN316 Hardware Manual - Page 175
Replace a Disk, Replace a 3.5-Inch Disk
 |
View all Netgear RN316 manuals
Add to My Manuals
Save this manual to your list of manuals |
Page 175 highlights
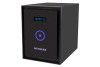
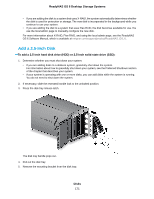
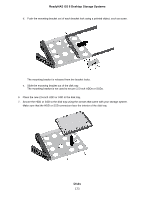
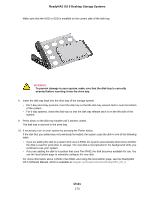
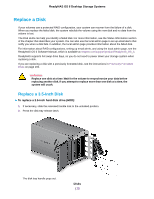
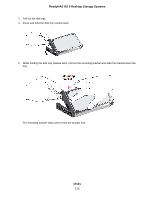
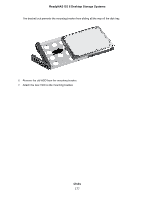
ReadyNAS OS 6 Desktop Storage Systems Replace a Disk If your volumes use a protected RAID configuration, your system can recover from the failure of a disk. When you replace the failed disk, the system rebuilds the volume using the new disk and no data from the volume is lost. The Disk LEDs can help you identify a failed disk. For more information, see the Status Information section of the chapter that describes your system. You can also use the local admin page to set up email alerts that notify you when a disk fails. In addition, the local admin page provides information about the failed disk. For information about RAID configurations, setting up email alerts, and using the local admin page, see the ReadyNAS OS 6 Software Manual, which is available at netgear.com/support/product/ReadyNAS_OS_6. ReadyNAS supports hot-swap drive bays, so you do not need to power down your storage system when replacing a disk. If you are replacing a disk with a previously formatted disk, see the instructions in Previously Formatted Disks on page 165. WARNING: Replace one disk at a time. Wait for the volume to resynchronize your data before replacing another disk. If you attempt to replace more than one disk at a time, the system will crash. Replace a 3.5-Inch Disk To replace a 3.5-inch hard disk drive (HDD): 1. If necessary, slide the recessed handle lock to the unlocked position. 2. Press the disk tray release latch. The disk tray handle pops out. Disks 175
-
 1
1 -
2
-
3
-
4
-
5
-
6
-
7
-
8
-
9
-
10
-
11
-
12
-
13
-
14
-
15
-
16
-
17
-
18
-
19
-
20
-
21
-
22
-
23
-
24
-
25
-
26
-
27
-
28
-
29
-
30
-
31
-
32
-
33
-
34
-
35
-
36
-
37
-
38
-
39
-
40
-
41
-
42
-
43
-
44
-
45
-
46
-
47
-
48
-
49
-
50
-
51
-
52
-
53
-
54
-
55
-
56
-
57
-
58
-
59
-
60
-
61
-
62
-
63
-
64
-
65
-
66
-
67
-
68
-
69
-
70
-
71
-
72
-
73
-
74
-
75
-
76
-
77
-
78
-
79
-
80
-
81
-
82
-
83
-
84
-
85
-
86
-
87
-
88
-
89
-
90
-
91
-
92
-
93
-
94
-
95
-
96
-
97
-
98
-
99
-
100
-
101
-
102
-
103
-
104
-
105
-
106
-
107
-
108
-
109
-
110
-
111
-
112
-
113
-
114
-
115
-
116
-
117
-
118
-
119
-
120
-
121
-
122
-
123
-
124
-
125
-
126
-
127
-
128
-
129
-
130
-
131
-
132
-
133
-
134
-
135
-
136
-
137
-
138
-
139
-
140
-
141
-
142
-
143
-
144
-
145
-
146
-
147
-
148
-
149
-
150
-
151
-
152
-
153
-
154
-
155
-
156
-
157
-
158
-
159
-
160
-
161
-
162
-
163
-
164
-
165
-
166
-
167
-
168
-
169
-
 170
170 -
 171
171 -
 172
172 -
 173
173 -
 174
174 -
 175
175 -
 176
176 -
 177
177 -
 178
178 -
 179
179 -
 180
180 -
181
-
182
-
183
-
184
-
185
-
186
-
187
-
188
-
189
-
190
-
191
-
192
-
193
-
194
-
195
-
196
-
197
-
198
-
199
-
200
-
201
-
202
-
203
-
204
-
205
-
206
-
207
-
208
-
209
-
210
-
211
-
212
-
213
 |
 |